
Bird baths are a practical and decorative addition to outdoor spaces. They provide a reliable water source for birds while enhancing the visual appeal of a garden, patio, balcony, or backyard. As more people explore Pinterest ideas focused on outdoor living, handmade garden features have become increasingly popular because they combine creativity, functionality, and affordability. A well-designed bird bath can attract local bird species, support backyard wildlife, and serve as an eye-catching focal point within a landscape. Many DIY bird bath projects can be completed using simple materials and basic tools, making them suitable for beginners and experienced crafters alike. Whether the goal is to create a minimalist style feature, a rustic garden accent, or an artistic decoration, there are numerous approaches that fit different preferences and budgets. This article explores ten detailed bird bath DIY ideas that are practical, beginner friendly, and visually appealing. Readers will learn how to prepare materials, plan their projects, follow step-by-step creation methods, and enhance the final appearance through thoughtful styling and organization. These creative ideas offer inspiration for transforming ordinary items into attractive and functional outdoor features.
Why This Idea Is Trending or Useful
Bird bath projects continue to gain popularity because they combine home decor, environmental awareness, and creative expression in one easy project. Pinterest inspiration frequently highlights outdoor spaces that feel welcoming, natural, and aesthetically balanced. A bird bath contributes to this atmosphere by attracting wildlife and creating movement within a garden setting. Unlike many outdoor decoration projects, bird baths serve both a decorative and practical purpose. They support birds by providing water for drinking and bathing, especially during warm weather. Their DIY appeal also makes them accessible to individuals who want to personalize their outdoor spaces without purchasing expensive garden features. Many designs can be created from recycled or repurposed materials, making them budget ideas that encourage sustainability. Beginners appreciate the simplicity of many bird bath tutorials because most projects require only basic planning and common tools. Modern design trends also favor customized handmade elements that reflect personal creativity rather than mass-produced products. From minimalist style installations to artistic mosaic creations, bird baths fit a wide range of aesthetic preferences. Their combination of functionality, affordability, and visual appeal explains why they remain among the most popular trending ideas for outdoor DIY enthusiasts.
Materials and Preparation
Successful bird bath projects begin with proper preparation and thoughtful planning. Before selecting a design, consider the available outdoor space, desired style, and expected maintenance requirements. Most bird bath DIY projects require a water-holding basin, a stable base, and weather-resistant materials. Common materials include concrete, terracotta pots, stones, recycled containers, ceramic dishes, glass bowls, and decorative pebbles. Basic tools may include gloves, measuring tape, adhesive, paintbrushes, waterproof sealant, and simple hand tools depending on the chosen design. Location planning is equally important because birds prefer quiet areas with nearby shelter such as shrubs or trees. The selected site should provide visibility while remaining safe from predators. Stability is another key factor. Every bird bath should have a secure base capable of supporting the water-filled basin without tipping. Cleaning considerations should also be addressed during planning. Smooth surfaces and accessible designs make regular maintenance easier. Preparing materials before construction reduces interruptions and improves efficiency during assembly. Careful preparation helps ensure that the finished bird bath remains functional, attractive, and durable throughout changing weather conditions. Proper planning creates a strong foundation for any creative project and increases the likelihood of successful results.
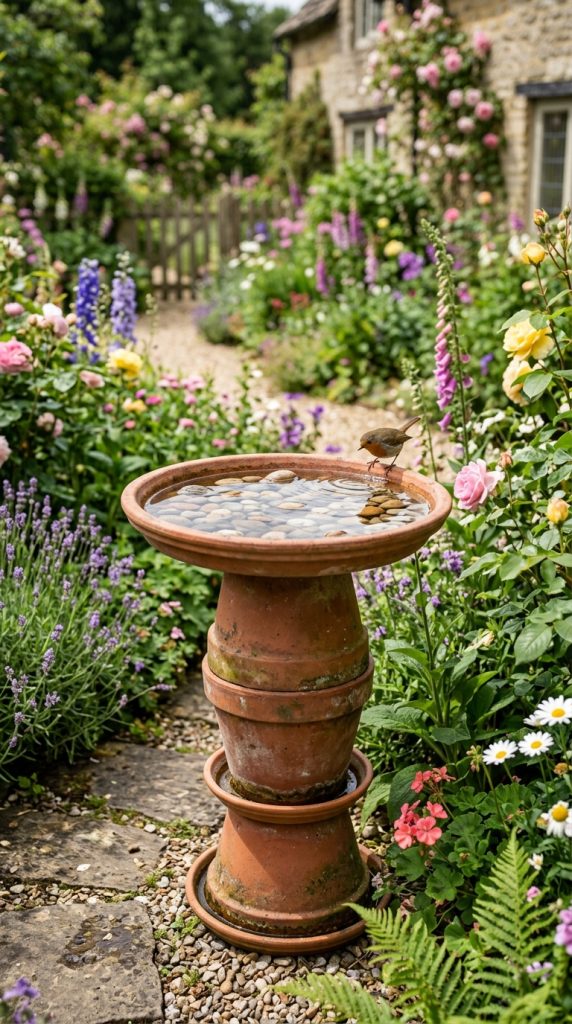
Idea 1: Stacked Terracotta Garden Bird Bath
How to Create
Stacked terracotta bird baths combine classic garden charm with simple construction techniques. This design uses multiple terracotta pots and saucers arranged vertically to create an elevated water feature that blends naturally into outdoor environments. The warm earthy tones of terracotta complement flowers, shrubs, and garden pathways while maintaining a timeless aesthetic. One advantage of this design is its adaptability. Different pot sizes can create various heights and visual proportions depending on available space. The structure also allows for decorative customization through paint, stencils, or textured finishes. As a handmade garden feature, it provides a balanced combination of functionality and decoration. The elevated basin helps birds feel secure while allowing easy observation from nearby seating areas. This style works particularly well in cottage gardens, rustic landscapes, and minimalist outdoor settings where natural materials are preferred. The layered appearance creates visual interest without overwhelming surrounding plants. Because terracotta is widely available and relatively easy to work with, this project remains one of the most beginner friendly bird bath ideas. With proper sealing and placement, the finished structure can withstand seasonal weather conditions while maintaining its aesthetic appeal for years.
To build this project, begin by selecting three terracotta pots of decreasing size along with a matching saucer that will serve as the basin. Place the largest pot upside down on a level surface to form the foundation. Position the medium pot upside down on top of the first pot and secure it if desired using weather-resistant adhesive. Continue with the smallest pot to create a stable tiered structure. Once the base is complete, attach the terracotta saucer to the top. Ensure that the saucer sits level so water remains evenly distributed. If decorative painting is planned, apply outdoor-safe paint and allow adequate drying time before assembly. A waterproof sealant can improve durability and reduce moisture absorption. Fill the saucer with a shallow layer of water suitable for birds. Add small stones within the basin to provide secure footing for smaller species. Position the completed bird bath near vegetation while maintaining open visibility. Regular cleaning and water replacement help maintain a healthy environment. This step-by-step approach creates an attractive garden feature that combines practicality with traditional outdoor design.
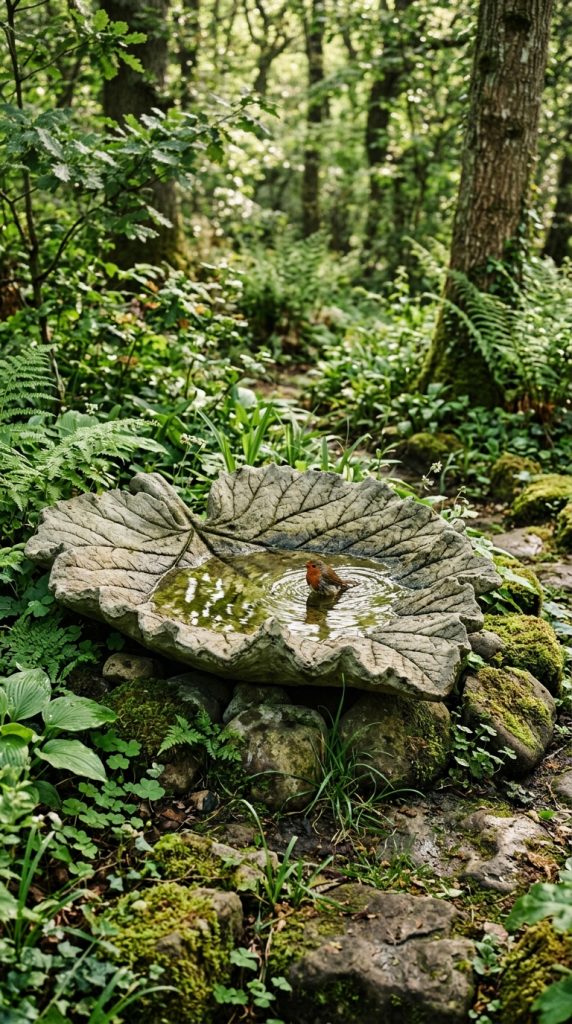
Idea 2: Concrete Leaf Impression Bird Bath
Step-by-Step Guide
A concrete leaf impression bird bath transforms natural textures into a striking outdoor feature. This project captures the intricate veins and shapes of large leaves within molded concrete, creating an organic appearance that blends seamlessly into garden environments. The resulting basin resembles a giant natural leaf resting among plants and flowers. This aesthetic appeals to gardeners who prefer earthy, nature-inspired decoration rather than highly manufactured designs. The detailed impressions add artistic value while preserving the practical purpose of the bird bath. Different leaf varieties produce unique patterns, allowing endless customization opportunities. Large leaves with pronounced textures create the most dramatic visual results. The finished basin often resembles a sculptural element while remaining fully functional. This design works especially well within woodland gardens, wildlife habitats, and natural landscaping projects. It also supports sustainable creative ideas because it utilizes readily available natural materials during the molding process. The textured surface provides additional grip for birds, improving usability. As a creative project, it introduces basic concrete crafting techniques while producing a durable outdoor feature capable of withstanding changing weather conditions and long-term outdoor exposure.
Begin by selecting a large leaf with strong vein patterns. Create a mound of damp sand on a flat work surface and place the leaf face down over the mound. Mix concrete according to manufacturer instructions and spread it evenly over the leaf to a thickness sufficient for structural strength. Shape the edges carefully to maintain a natural appearance. Allow the concrete to cure fully before removing the leaf material. Once cured, gently brush away any remaining leaf fragments to reveal the detailed texture. If desired, apply a weather-resistant sealant to increase durability. Create a supporting base using stones, bricks, or a concrete pedestal positioned on level ground. Place the completed leaf basin securely on top of the support structure. Add water and test stability before final placement. Decorative stones can be incorporated into the basin to provide resting spots for birds. Position the bird bath near plants where it complements surrounding greenery while remaining visible. Routine maintenance includes cleaning debris and refreshing water regularly. The result is a distinctive handmade bird bath that combines artistic craftsmanship with practical wildlife support.
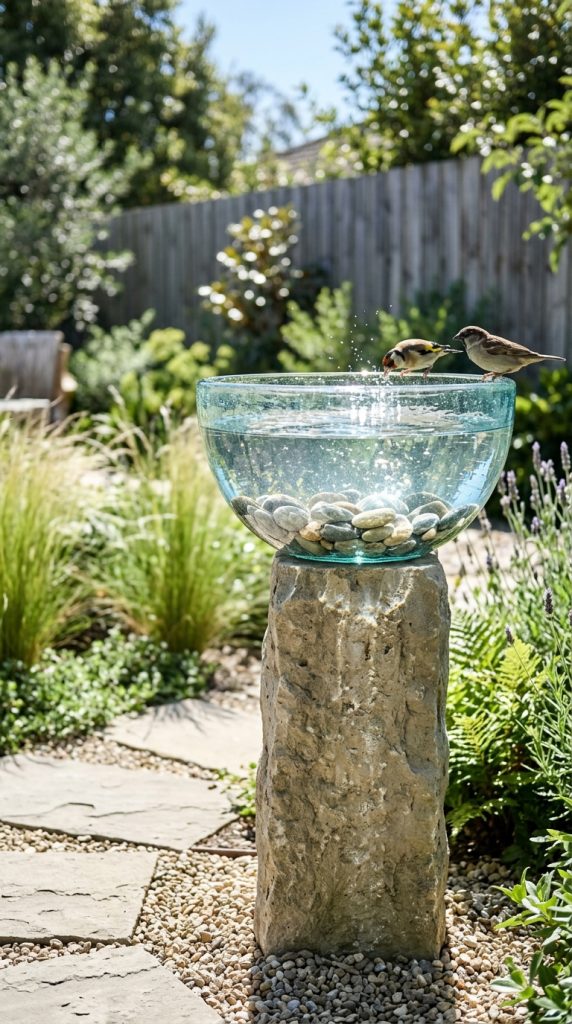
Idea 3: Recycled Glass Bowl Bird Bath
How to Make
A recycled glass bowl bird bath offers a sophisticated appearance while promoting sustainable DIY practices. This design repurposes decorative glass bowls, platters, or serving dishes into elegant outdoor water features. Transparent and colored glass creates attractive visual effects as sunlight reflects across the water surface. This style is especially suitable for contemporary gardens and modern design themes where clean lines and subtle elegance are preferred. Glass bird baths can also become focal points due to their reflective qualities and unique textures. Repurposing existing household items reduces waste while providing an opportunity to create customized garden decor. Different shapes, colors, and patterns allow extensive personalization without requiring advanced crafting skills. Because the basin remains highly visible, decorative pebbles and stones can further enhance its appearance. The project appeals to individuals seeking budget ideas that still achieve a refined aesthetic. Proper placement can transform a simple glass vessel into an eye-catching landscape element. When carefully assembled and securely supported, a recycled glass bird bath becomes both functional and decorative, attracting birds while adding artistic character to outdoor spaces.
Start by selecting a durable glass bowl or platter with sufficient depth to hold a shallow layer of water. Choose a sturdy base such as stacked stones, an inverted planter, or a concrete pedestal capable of supporting the basin safely. Clean all materials thoroughly before assembly. Position the base on a level surface and verify stability before attaching the glass component. Weather-resistant adhesive may be used if permanent installation is desired. Once secured, fill the bowl with water and add smooth stones to create varying depths. These stones provide safer footing for birds while improving visual interest. If the glass is transparent, decorative pebbles can be arranged beneath the water to enhance the overall appearance. Place the completed bird bath in an area that receives partial sunlight and offers nearby vegetation for shelter. Regularly inspect the structure to ensure stability and cleanliness. Water should be replaced frequently to maintain a healthy environment for visiting birds. This easy project demonstrates how recycled materials can be transformed into elegant outdoor decoration with minimal expense and effort.
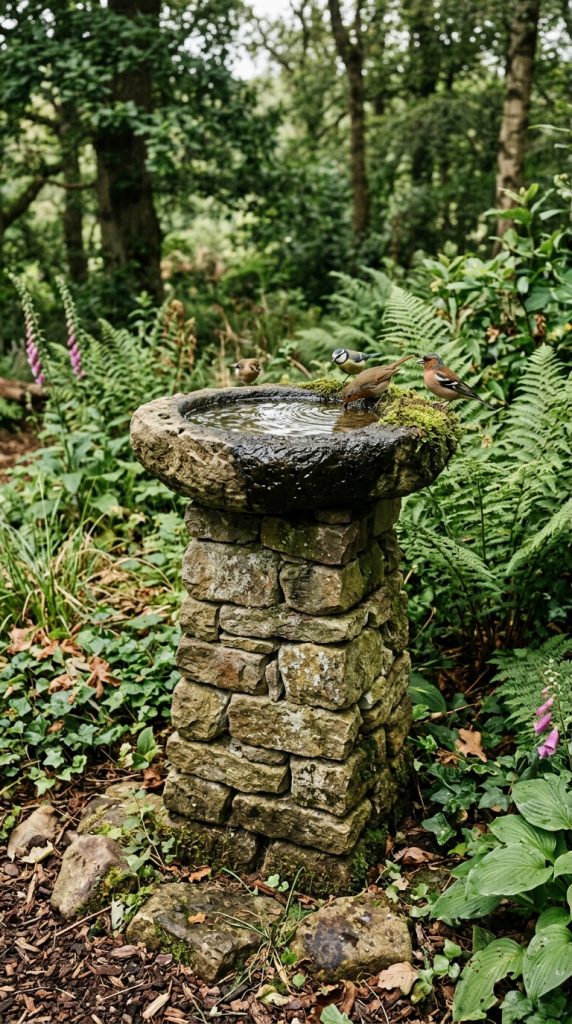
Idea 4: Stone Tower Bird Bath
Execution Process
The stone tower bird bath combines natural materials with durable construction, creating a feature that appears integrated into the landscape. Stacked stones provide a rustic aesthetic that works exceptionally well in natural gardens, woodland settings, and outdoor spaces emphasizing organic textures. Unlike highly decorative structures, this design relies on the inherent beauty of stone to create visual appeal. The varying shapes, colors, and textures of stones contribute to a unique appearance that cannot be precisely duplicated. This individuality makes every project distinctive. The substantial weight of the materials also creates excellent stability, reducing the risk of tipping. Stone bird baths require relatively little maintenance and blend harmoniously with surrounding vegetation. They support both wildlife attraction and landscape enhancement without appearing artificial. This approach appeals to homeowners seeking timeless outdoor features that complement existing garden elements. Because stones are often readily available, the project can also align with budget-conscious planning. The finished structure serves as both a functional water source and a decorative focal point, demonstrating how simple natural materials can create impressive results through thoughtful arrangement and design.
Begin by gathering stones of varying sizes, prioritizing flat pieces that stack securely. Establish a level foundation using larger stones placed directly on compacted ground. Gradually build upward by stacking increasingly smaller stones while checking stability throughout the process. Weather-resistant construction adhesive may be used between layers for additional security if desired. Once the tower reaches the preferred height, place a shallow stone bowl, ceramic dish, or concrete basin on top. Ensure the basin sits level and remains firmly supported by the underlying structure. Fill the basin with water and test the installation for stability before final use. Decorative gravel around the base can improve drainage and create a finished appearance. Position the bird bath near garden beds or natural planting areas where it appears integrated into the landscape. Regular cleaning and water replacement help maintain functionality. This step-by-step method results in a durable handmade feature that combines natural beauty, practical value, and long-term outdoor performance.
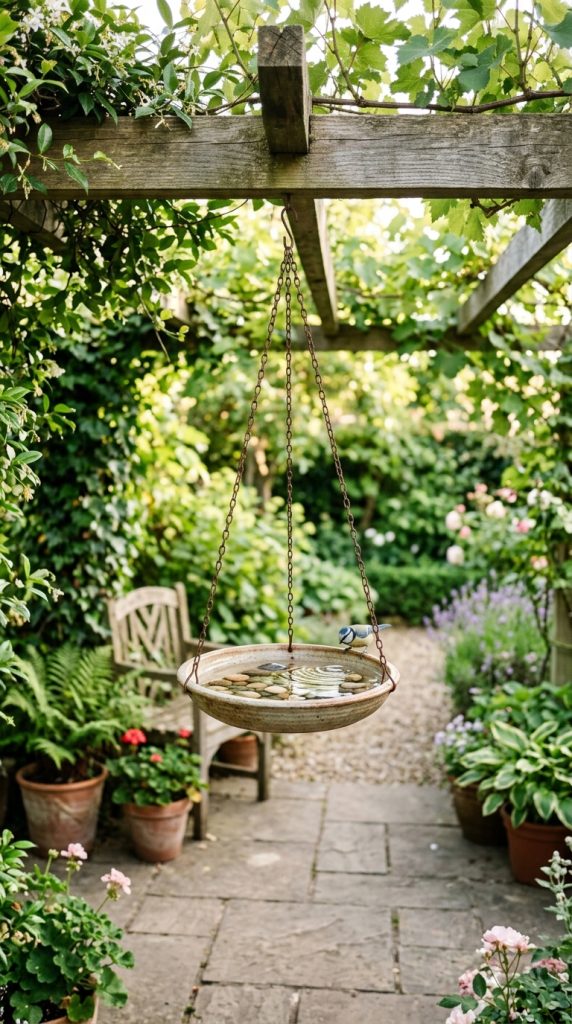
Idea 5: Hanging Bird Bath Design
Setup Method
A hanging bird bath introduces vertical interest into outdoor spaces while maximizing functionality in smaller gardens or balconies. Suspended designs provide birds with elevated access to water while reducing ground-level clutter. This makes them particularly useful in compact outdoor areas where space efficiency is important. Hanging bird baths often feature lightweight basins suspended from chains, ropes, or decorative supports. Their elevated position creates visual movement as the structure gently responds to wind conditions. This dynamic quality enhances overall garden aesthetics and contributes to a more engaging outdoor environment. The design also allows placement near trees, pergolas, or sturdy hooks, creating flexibility in installation. Many Pinterest ideas highlight hanging bird baths because they combine decorative appeal with accessibility for beginners. They can be customized using various materials, colors, and decorative accents to match different design preferences. Whether incorporated into a minimalist style garden or a vibrant outdoor retreat, hanging bird baths provide an attractive alternative to traditional pedestal designs while continuing to support local wildlife.
Select a shallow basin made from durable material and attach evenly spaced hanging points around its perimeter. Secure chains or strong outdoor rope to these attachment points, ensuring balanced weight distribution. Connect the suspension lines at a central ring positioned above the basin. Choose a sturdy support structure capable of bearing the combined weight of the basin and water. Before adding water, test the installation to confirm stability and balance. Once properly suspended, add a shallow layer of water along with small stones to provide secure footing. Decorative elements such as beads or painted accents may be incorporated into the suspension system if desired. Position the bird bath where birds have easy access to nearby shelter while maintaining visibility for observation. Periodically inspect all hanging components for wear and replace any damaged hardware promptly. Regular cleaning helps maintain water quality and prevents buildup. This simple tutorial creates a practical and visually appealing bird bath that makes efficient use of vertical space while enhancing outdoor decoration.
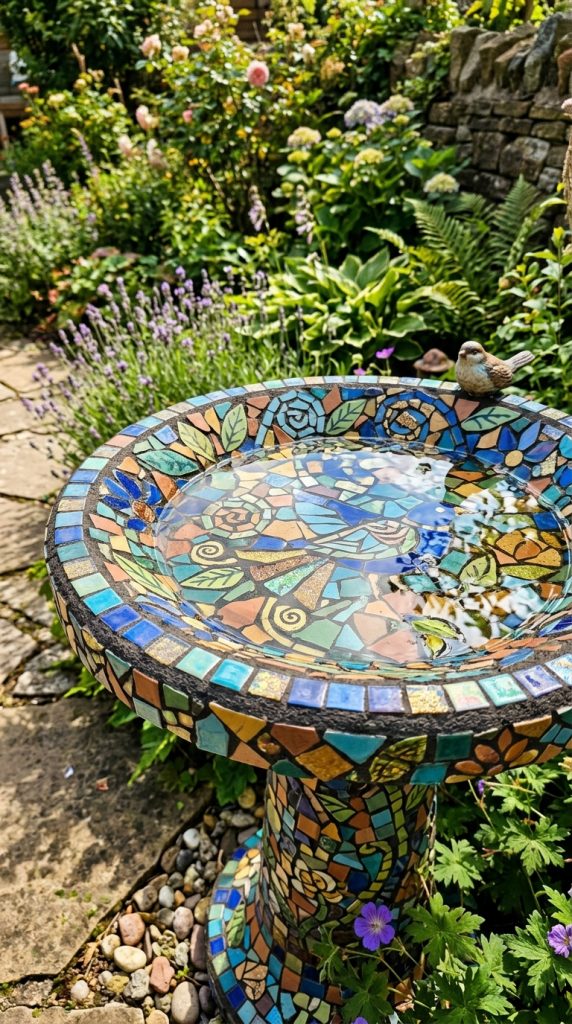
Idea 6: Mosaic Tile Bird Bath
How to Create
A mosaic tile bird bath transforms a functional garden feature into an artistic centerpiece through the use of colorful patterns and decorative surfaces. Mosaic techniques allow extensive customization, making this project ideal for individuals who enjoy creative expression and detailed craftsmanship. By arranging tiles, glass pieces, or ceramic fragments into geometric patterns, floral motifs, or abstract designs, the bird bath becomes a unique work of outdoor art. The decorative surface reflects light and introduces texture, color, and visual complexity to the garden environment. This approach aligns with many Pinterest inspiration trends that emphasize personalized handmade decoration. The project can complement both traditional and contemporary landscapes depending on the chosen color palette and design style. Mosaic bird baths often become focal points because of their vibrant appearance and intricate details. Beyond aesthetics, the tiled surface remains durable when properly sealed and maintained. The combination of artistic creativity and practical function makes this design appealing to homeowners seeking distinctive outdoor features that stand apart from conventional garden accessories.
Begin with a sturdy bird bath basin made from concrete, ceramic, or another suitable material. Clean the surface thoroughly and plan the mosaic pattern before attaching any decorative pieces. Arrange tiles, glass fragments, or ceramic shapes according to the selected design. Apply weather-resistant adhesive and place each piece carefully while maintaining consistent spacing. After the adhesive cures, fill the gaps with outdoor grout and remove excess material from the tile surfaces. Allow sufficient drying time before applying a waterproof sealant to protect the finished mosaic from weather exposure. Once fully cured, install the bird bath on a stable base positioned on level ground. Add water and inspect the surface for any sharp edges that might require smoothing. Regular cleaning preserves the brightness of the mosaic while maintaining a healthy environment for birds. This creative project combines artistic craftsmanship with practical outdoor functionality, resulting in a decorative feature that enhances both wildlife attraction and garden aesthetics.
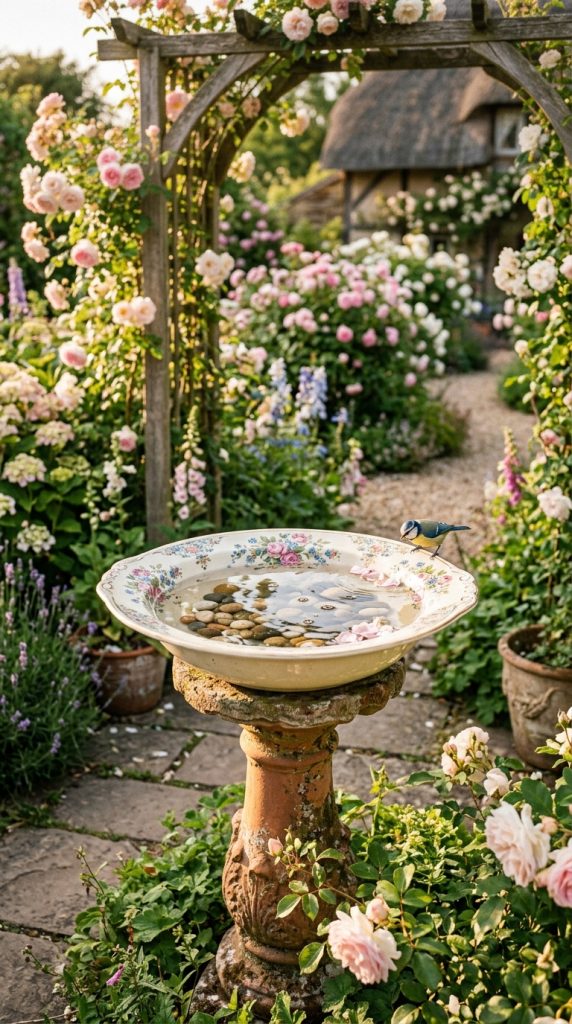
Idea 7: Vintage Dish Bird Bath
Step-by-Step Guide
A vintage dish bird bath repurposes decorative plates, bowls, and serving dishes into elegant outdoor features with nostalgic appeal. This design celebrates the beauty of older household items while providing a practical use for pieces that might otherwise remain unused. Decorative patterns, floral designs, and ornamental details contribute to a refined appearance that complements cottage gardens and romantic outdoor settings. The project appeals to those who appreciate antique-inspired decoration and sustainable DIY practices. Because vintage dishes vary widely in color and style, each completed bird bath possesses a distinctive personality. This individuality makes the project especially attractive for creative gardeners seeking personalized outdoor accents. The design requires relatively few materials and can often be completed using items already available at home. The resulting bird bath functions as both a decorative statement and a valuable resource for local birds. By combining repurposed materials with thoughtful presentation, this project demonstrates how everyday objects can be transformed into attractive garden features with enduring charm.
Select a decorative dish large enough to hold a shallow layer of water. Pair it with a sturdy base such as an inverted planter, column, or stack of stable materials. Clean all components thoroughly before assembly. Position the base on level ground and verify its stability. Attach the dish securely using weather-resistant adhesive if a permanent installation is preferred. Once assembled, allow adequate curing time before adding water. Decorative stones may be placed within the basin to provide secure perching areas and create visual interest. Position the bird bath in a quiet location with nearby vegetation and clear access for birds. Regularly inspect the structure for stability and replace water frequently to maintain cleanliness. During colder seasons, protective storage may help preserve delicate dish materials. This easy project transforms decorative tableware into a practical garden feature while preserving the character and beauty of vintage design elements.
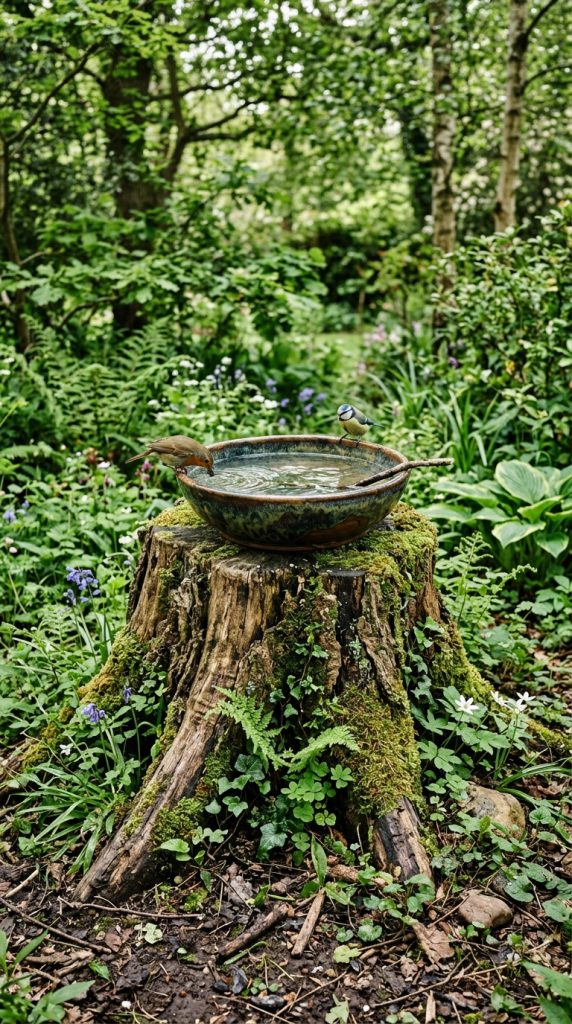
Idea 8: Tree Stump Bird Bath
How to Make
A tree stump bird bath utilizes natural landscape elements to create a rustic and environmentally integrated garden feature. This design works particularly well in outdoor spaces where existing tree stumps remain after tree removal. Rather than removing the stump entirely, it becomes the foundation for a functional wildlife feature. The natural texture and weathered appearance contribute to a rustic aesthetic that blends seamlessly with woodland gardens and nature-inspired landscapes. Tree stump bird baths support sustainability by repurposing existing materials instead of introducing entirely new construction components. The substantial base provides excellent stability and durability. This approach also maintains visual continuity within the landscape because the bird bath appears naturally connected to its surroundings. Many Pinterest ideas favor this style due to its simplicity, practicality, and organic beauty. The project can be enhanced with surrounding plants, decorative stones, or carved details depending on personal preferences. The result is a handmade feature that supports wildlife while preserving the character of the outdoor environment.
Begin by selecting a sturdy stump with a relatively level top surface. Clean away debris, loose bark, and deteriorated wood to create a stable foundation. Place a shallow basin on the stump, ensuring that it sits level and remains securely positioned. Depending on the design, the basin may be made from stone, ceramic, concrete, or another weather-resistant material. If desired, use outdoor adhesive to improve stability. Add decorative stones inside the basin to provide varying water depths and safe perching locations. Surround the base with mulch, gravel, or low-growing plants to create a finished appearance. Position additional landscaping elements nearby to encourage bird activity and enhance visual integration. Regular maintenance includes cleaning the basin and monitoring the condition of the stump over time. This beginner friendly project transforms an existing landscape feature into a practical and attractive bird bath that complements natural outdoor settings.
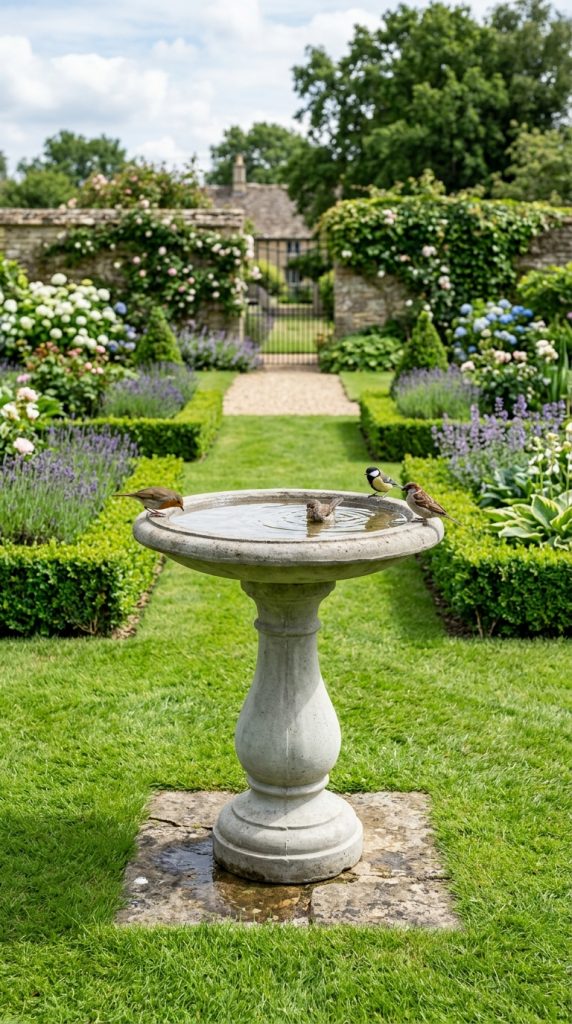
Idea 9: Concrete Pedestal Bird Bath
Execution Process
A concrete pedestal bird bath offers durability, simplicity, and classic garden appeal. This design has remained popular for decades because it provides a stable elevated basin while maintaining a clean and versatile appearance. Concrete construction allows extensive customization through shape, texture, and decorative finishing techniques. The substantial weight of the material enhances stability and makes the structure suitable for long-term outdoor use. Concrete bird baths can complement both traditional and modern design styles depending on their form and finish. Their neutral appearance also allows them to integrate easily into a variety of landscaping themes. Many DIY enthusiasts appreciate this project because it introduces basic concrete crafting skills while producing a highly functional result. The finished bird bath becomes a permanent landscape feature capable of attracting birds year after year. Its elevated design improves visibility and accessibility while helping the basin remain free from excessive debris. This combination of practicality and aesthetic flexibility explains why concrete pedestal bird baths remain among the most enduring garden decoration ideas.
Create a mold for both the pedestal and basin using suitable containers or forms. Mix concrete according to instructions and pour it into the prepared molds. Remove air pockets by gently tapping the molds during filling. Allow sufficient curing time before carefully removing the forms. Once cured, smooth rough edges and apply optional decorative finishes such as staining, texturing, or painting designed for outdoor use. Assemble the pedestal and basin securely, ensuring proper alignment and balance. Position the completed structure on level ground capable of supporting its weight. Fill the basin with water and add small stones if desired. Regular cleaning helps preserve appearance and functionality while preventing algae buildup. This step-by-step method creates a durable bird bath that combines professional-looking results with practical wildlife support. Proper curing and installation contribute significantly to long-term performance and structural integrity.
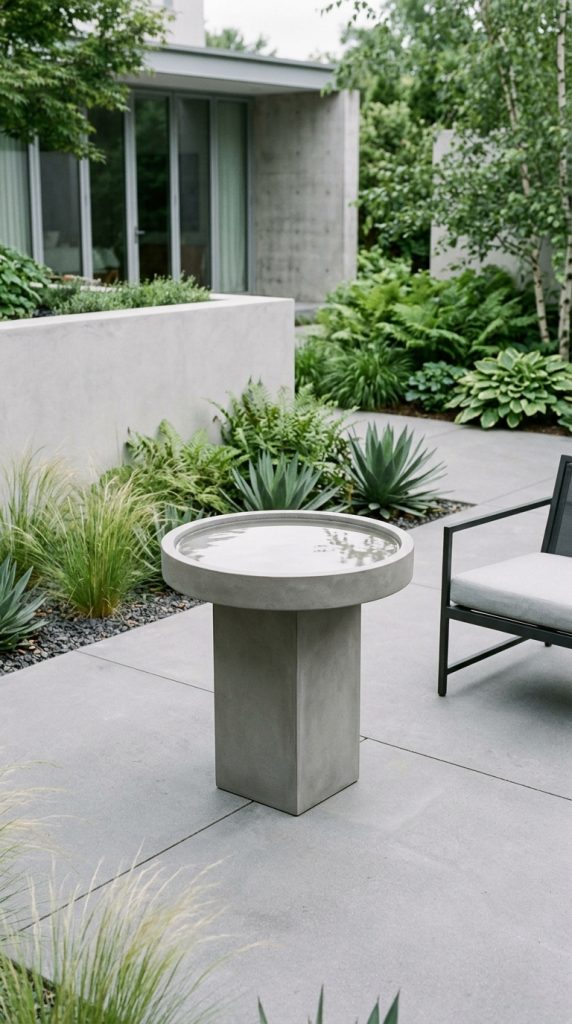
Idea 10: Minimalist Modern Bird Bath
How to Create
A minimalist modern bird bath emphasizes simplicity, clean lines, and restrained decoration. This style aligns with contemporary outdoor design trends that prioritize uncluttered forms and purposeful functionality. Rather than relying on elaborate ornamentation, minimalist bird baths achieve visual impact through proportion, balance, and material selection. Smooth surfaces, geometric shapes, and neutral colors contribute to a refined aesthetic suitable for modern gardens, patios, and architectural landscapes. The design complements spaces where simplicity and organization are central themes. Many Pinterest inspiration boards feature minimalist outdoor features because they create a sense of calm while maintaining strong visual appeal. This project demonstrates that effective design does not require complexity. A carefully selected basin and streamlined base can produce a sophisticated result with relatively little effort. The focus remains on clean presentation and practical usability. By reducing unnecessary decorative elements, the bird bath becomes a subtle yet elegant addition to the outdoor environment while continuing to serve as a valuable resource for local wildlife.
Choose a simple basin with smooth lines and pair it with a geometric support structure such as a concrete block, square pedestal, or cylindrical column. Select materials that complement existing outdoor architecture and maintain a cohesive color palette. Position the support on level ground and verify stability before placing the basin. If a permanent installation is desired, secure the components using outdoor adhesive. Fill the basin with a shallow layer of water and incorporate a few carefully selected stones for visual balance and bird safety. Avoid excessive decorative additions to preserve the minimalist style. Place the completed bird bath within an open area where its clean silhouette remains visible. Regular maintenance is essential because minimalist designs highlight cleanliness and organization. This easy project creates a modern outdoor feature that combines functional wildlife support with contemporary design principles and understated elegance.
Common Beginner Mistakes and How to Avoid Them
Many first-time bird bath builders encounter avoidable issues that affect functionality and appearance. One common mistake is selecting a basin that is too deep. Birds generally prefer shallow water, making gradual depths and secure footing important considerations. Another frequent problem involves unstable construction. Every bird bath should be positioned on level ground and tested thoroughly before use. Ignoring weather resistance can also shorten the lifespan of the project. Materials exposed to outdoor conditions should be sealed or selected for durability. Poor placement is another challenge. Bird baths positioned in highly exposed or heavily trafficked areas may receive fewer visitors. Locating the bath near vegetation while maintaining visibility often produces better results. Some beginners overlook maintenance requirements and allow water to become dirty or stagnant. Regular cleaning and water replacement are essential for bird health. Excessive decoration can also reduce practicality by creating difficult-to-clean surfaces. Balancing aesthetics with functionality leads to better outcomes. Careful planning, proper material selection, and consistent maintenance help prevent these common mistakes and contribute to successful long-term use.
Practical Tips for Better Results
Several practical techniques can improve the performance and appearance of a DIY bird bath. Maintaining shallow water levels encourages greater bird activity and improves safety. Adding smooth stones creates resting areas and accommodates birds of different sizes. Regular cleaning prevents algae accumulation and helps maintain a healthy environment. Placement plays a significant role in success. Bird baths positioned near shrubs, trees, or garden beds often attract more visitors because birds appreciate nearby shelter. However, visibility should remain sufficient to monitor activity and maintenance needs. Weather-resistant finishes can improve durability and reduce long-term wear. When selecting materials, prioritize stability and ease of cleaning. Consistent design choices also enhance visual appeal. Coordinating colors, textures, and surrounding landscaping elements creates a cohesive aesthetic. Seasonal inspections help identify potential issues before they become significant problems. Keeping spare materials available for minor repairs can simplify maintenance. These practical strategies help ensure that the bird bath remains attractive, functional, and welcoming throughout the year while supporting both wildlife and outdoor decoration goals.
Styling, Presentation, or Organization Ideas
Thoughtful presentation can significantly enhance the visual impact of a bird bath project. Surrounding the bird bath with complementary landscaping elements creates a more cohesive and inviting outdoor environment. Decorative gravel, natural stones, flowering plants, and low-growing greenery can help integrate the feature into the garden design. Consider establishing a dedicated wildlife corner where the bird bath serves as the central focal point. Layered planting arrangements add depth and visual interest while maintaining a natural appearance. For modern design settings, clean geometric layouts and restrained color palettes support a minimalist style. Rustic gardens may benefit from weathered materials, natural textures, and organic arrangements. Lighting can also contribute to presentation, especially when subtle landscape lighting highlights the bird bath during evening hours. Maintaining clear pathways around the feature improves accessibility and organization. Decorative elements should support rather than overwhelm the main design. Consistent styling choices create harmony throughout the outdoor space. Effective presentation transforms a simple DIY project into a visually integrated landscape feature that enhances both aesthetics and functionality.
Budget or Time Planning
Effective planning helps ensure that bird bath projects remain affordable and manageable. Begin by establishing a realistic budget based on available materials and desired design complexity. Repurposed household items often reduce costs significantly while still producing attractive results. Prioritizing essential materials before decorative additions helps maintain financial control. Time planning is equally important. Simple projects such as hanging bird baths or recycled bowl designs may be completed within a single day, while concrete or mosaic projects require additional curing and finishing time. Creating a materials checklist before starting helps prevent delays and unnecessary purchases. Breaking larger projects into smaller stages improves efficiency and reduces frustration. Scheduling assembly, drying, sealing, and installation phases separately can improve overall results. Weather conditions should also be considered when planning outdoor construction. Working methodically rather than rushing often leads to stronger and more durable outcomes. Careful budgeting and organization allow creators to complete projects efficiently while maintaining quality. Thoughtful planning ensures that creative ideas remain practical, enjoyable, and achievable regardless of experience level.
Creative Expansion and Advanced Inspiration
Once a basic bird bath has been completed successfully, there are numerous opportunities for creative expansion. Multiple bird baths can be incorporated throughout a landscape to create a connected wildlife-friendly environment. Combining bird baths with feeding stations, pollinator gardens, or decorative pathways can enhance the overall outdoor experience. Advanced projects may explore sculptural forms, custom concrete molds, or intricate mosaic artwork. Seasonal themes provide additional inspiration through changing decorative elements and surrounding plant selections. Water features such as gentle drippers can increase bird activity while introducing movement and sound. Larger creative projects may integrate bird baths into broader garden organization plans that include seating areas, focal points, and landscape structures. Experimenting with different materials and construction techniques helps expand DIY skills and encourages originality. Personalizing designs while maintaining functionality allows continued growth and exploration. These advanced ideas transform a simple bird bath project into part of a larger vision for a beautiful, wildlife-supporting outdoor space that reflects creativity, craftsmanship, and thoughtful design.