
Bird baths serve an important role in outdoor spaces by providing birds with a reliable source of water for drinking and bathing. At the same time, they add visual interest and character to gardens, patios, balconies, and backyard landscapes. Many homeowners and DIY enthusiasts are turning to upcycled bird bath projects because they combine creativity, sustainability, and practical outdoor decoration. Instead of purchasing new garden features, old household items can be transformed into attractive and functional bird baths using simple techniques and readily available materials. This approach reduces waste while creating unique focal points that reflect personal style and creativity.
This article explores ten bird bath DIY upcycle ideas that are suitable for beginners and experienced crafters alike. Readers will learn how to transform common items into beautiful garden features through step-by-step methods and practical preparation techniques. Each project focuses on affordability, accessibility, and creative reuse. Whether the goal is enhancing home decor, creating wildlife-friendly spaces, or completing an easy project over a weekend, these Pinterest ideas provide valuable inspiration. The designs range from minimalist style creations to decorative handmade projects, offering options for various outdoor aesthetics and garden sizes.
Why This Idea Is Trending or Useful
Upcycled bird bath projects continue gaining popularity because they combine several trends that resonate with modern DIY communities. Sustainability remains a significant focus in home improvement and garden decoration, encouraging people to reuse existing materials instead of purchasing new products. Pinterest users frequently search for creative ideas that transform overlooked household objects into useful outdoor features. Bird bath projects meet this demand by turning everyday items into attractive and practical garden elements.
Another reason these projects remain popular is their accessibility. Most designs require basic tools and common materials that many households already possess. Beginners can complete many projects without advanced woodworking, construction, or landscaping skills. The process encourages creativity while remaining manageable for first-time DIY enthusiasts. These projects also complement various home decor styles, including rustic, vintage, cottage-inspired, and modern design aesthetics. Because bird baths attract wildlife, they provide both decorative and environmental benefits. The combination of functionality, aesthetic appeal, budget ideas, and beginner friendly construction makes bird bath upcycling a source of ongoing inspiration. Their visual appeal also makes them highly shareable as trending ideas across Pinterest boards focused on gardening, organization, outdoor decoration, and creative projects.
Materials and Preparation
Proper planning helps ensure a successful bird bath upcycling project. Before beginning, gather all necessary materials and evaluate the condition of the items being reused. Common materials include old bowls, plates, plant stands, furniture pieces, glassware, metal containers, decorative stones, waterproof adhesive, outdoor paint, sealants, and sandpaper. Depending on the chosen project, additional materials may include concrete, gravel, wooden supports, or mosaic pieces for decoration.
Preparation begins with thoroughly cleaning all reusable items. Remove dirt, grease, rust, or old paint to create a stable foundation for construction. Inspect each item for cracks or structural weaknesses that could affect safety or durability. Planning is equally important. Consider the final location of the bird bath, ensuring birds can access it easily while remaining protected from potential predators. Stability should remain a top priority throughout the design process. The water basin should be shallow enough for safe bird use and easy maintenance. Measuring dimensions before assembly prevents imbalance and improves overall appearance. Thoughtful planning allows DIY enthusiasts to create attractive, long-lasting projects that fit seamlessly into existing garden layouts while supporting both functionality and aesthetic goals.
Idea 1: Vintage Teacup Garden Bird Bath
How to Create
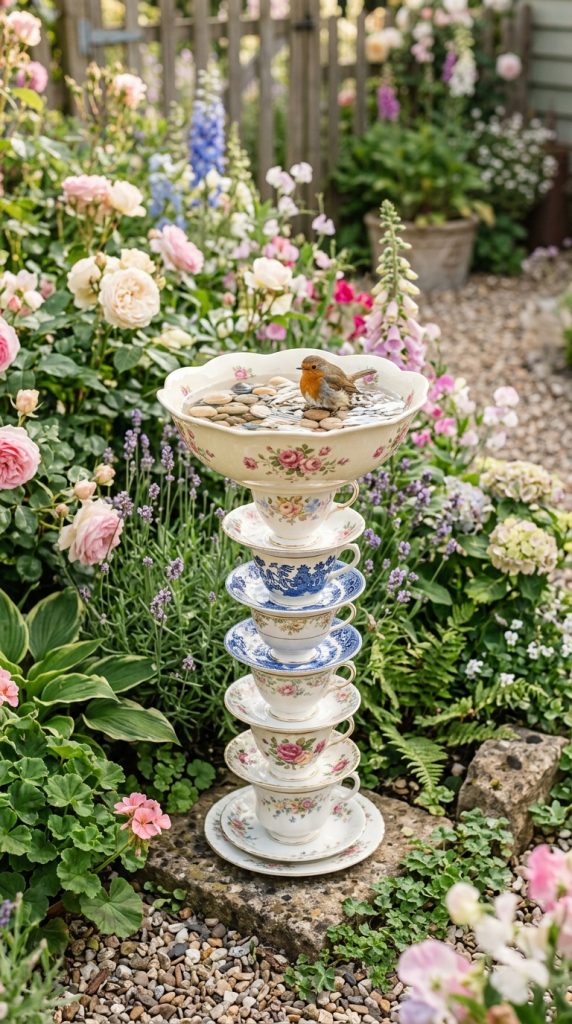
Vintage teacups and saucers can become charming bird baths that bring cottage-style character to outdoor spaces. This design works particularly well in flower gardens, herb gardens, or decorative patio corners where smaller birds frequently visit. The combination of delicate shapes and layered elements creates visual interest while maintaining functionality. Mismatched teacups, chipped china, and unused saucers often found in storage areas can gain a second life through this project. The finished bird bath offers a handmade aesthetic that aligns with popular Pinterest ideas emphasizing sustainability and creative reuse. Because the components are relatively lightweight, this project suits small outdoor areas where larger bird baths may feel overwhelming. The layered structure also creates an elegant focal point among flowers and greenery. Color coordination can further enhance the design, whether aiming for a vintage appearance, minimalist style, or colorful decorative theme. The project demonstrates how everyday household items can become attractive garden features without extensive renovation or expense. It is especially appealing to DIY enthusiasts interested in blending decorative charm with practical wildlife support.
Begin by selecting a large saucer for the water basin and several smaller teacups to act as support elements. Thoroughly clean each piece and allow them to dry completely. Use waterproof outdoor adhesive to stack the teacups securely beneath the saucer, creating a stable pedestal. Allow the adhesive to cure according to manufacturer instructions before moving the structure. Place decorative stones or pebbles inside the basin to provide secure footing for birds. If desired, apply weather-resistant sealant to increase durability. Position the finished bird bath on a level surface within the garden. Regularly refill with clean water and remove debris to maintain hygiene. This step by step process creates an elegant yet practical garden feature using materials that might otherwise remain unused. The project requires minimal tools and offers substantial creative flexibility, making it ideal for beginners seeking an easy project with strong visual appeal.
Idea 2: Repurposed Plant Stand Bird Bath
Step-by-Step Guide
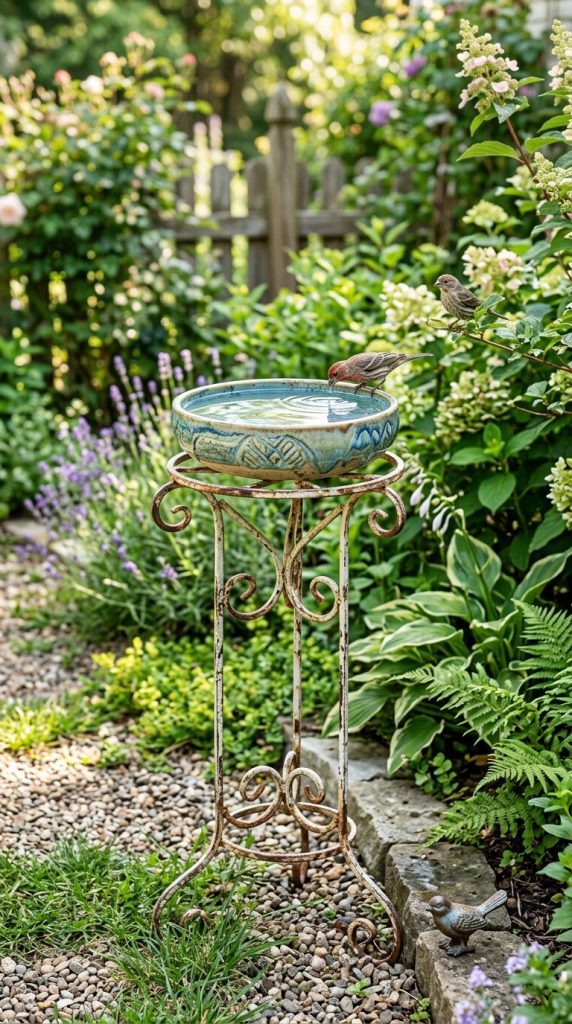
Old plant stands often possess the perfect structure for supporting a bird bath. Their height elevates the water source, making it more visible to birds while creating an attractive vertical feature in the garden. Metal, wooden, and wrought-iron plant stands can all serve as excellent foundations. This upcycling method combines organization and decoration by transforming unused furniture into a functional wildlife element. The elevated design improves visibility and helps integrate the bird bath into larger landscaping arrangements. Garden enthusiasts often appreciate this approach because it repurposes sturdy materials while reducing waste. The structure can complement various aesthetic styles, including rustic gardens, modern design spaces, and traditional landscapes. Depending on the stand’s original appearance, the finished project can be customized with paint, decorative stones, or weather-resistant finishes. The result is a balanced combination of functionality and visual interest that enhances outdoor environments while supporting local bird populations. This creative project is particularly effective for homeowners seeking practical garden upgrades without major investments.
To create the bird bath, begin by cleaning and inspecting the plant stand for stability. Sand rough surfaces and repair loose connections before assembly. Select a wide, shallow bowl that fits securely on top of the stand. Attach the basin using weather-resistant adhesive or mounting hardware suitable for outdoor conditions. Apply exterior paint or sealant if additional protection is required. Add decorative pebbles to the basin to improve bird safety and visual appeal. Place the completed structure on level ground and test its stability before filling with water. Position the bird bath near shrubs or natural cover while maintaining open sightlines for birds. Routine maintenance includes cleaning the basin and monitoring structural integrity. This setup method transforms a forgotten garden accessory into a useful feature that supports wildlife and enhances outdoor decoration through simple, beginner friendly construction techniques.
Idea 3: Glass Bowl and Vase Bird Bath
How to Make
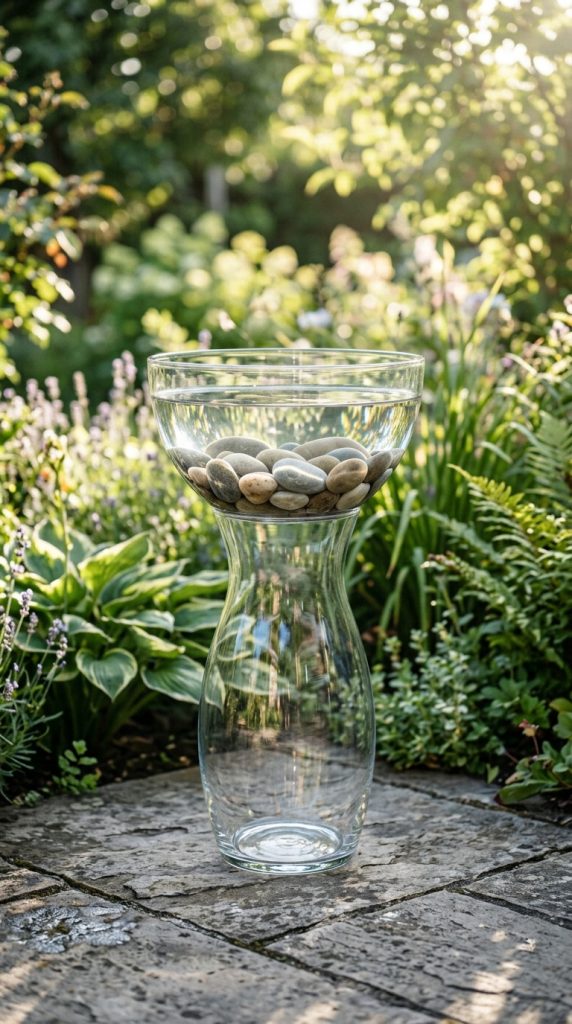
Glass bowls and decorative vases can create elegant bird baths that reflect sunlight and add sophistication to outdoor spaces. This project appeals to those seeking an aesthetic garden feature with a refined appearance. Clear, colored, or textured glass components can be combined to produce different visual effects. The transparency of the materials helps the bird bath blend naturally into garden environments while creating subtle decorative accents. Upcycling unused serving bowls, punch bowls, or large decorative vases provides an environmentally conscious alternative to purchasing new garden accessories. The design complements modern design themes as well as more traditional landscapes. Because glass surfaces can reflect surrounding plants and flowers, the finished piece often appears integrated into the natural setting. Many Pinterest inspiration boards highlight glass bird baths due to their ability to create visually striking focal points with minimal materials. The project demonstrates how elegant outdoor decoration can emerge from simple household items through thoughtful planning and assembly.
Select a sturdy vase capable of supporting the chosen bowl. Thoroughly clean both pieces and inspect them for cracks or damage. Apply a strong waterproof adhesive to secure the bowl onto the vase opening. Ensure the bowl remains centered during curing to prevent imbalance. Allow adequate drying time before moving the structure outdoors. Place decorative stones in the basin to improve footing and reduce slipping risks for birds. Position the bird bath on a stable surface where it will not be easily disturbed by wind or accidental contact. If desired, surround the base with plants or gravel for additional visual integration. Regular cleaning helps maintain clarity and prevents algae buildup. This easy project requires few materials while producing a sophisticated handmade feature that combines sustainability, functionality, and attractive garden decoration.
Idea 4: Upcycled Tire Bird Bath
Execution Process
Old tires offer surprising versatility for outdoor DIY projects, including bird bath construction. Their durable structure provides a stable foundation capable of supporting larger basins. This project appeals to individuals interested in bold garden features and sustainable reuse. Tires are frequently discarded despite retaining structural value, making them excellent candidates for creative upcycling. By transforming a tire into a decorative base, homeowners can reduce waste while creating a distinctive outdoor focal point. The circular form naturally complements garden layouts and can be adapted to various decorative styles. Paint, mosaic elements, and stone accents can dramatically alter the appearance, allowing the project to match existing landscaping themes. The sturdy construction also contributes to long-term durability, making it suitable for areas exposed to changing weather conditions. This bird bath design demonstrates how unconventional materials can become attractive and functional additions to outdoor spaces through thoughtful planning and creative execution.
Begin by thoroughly cleaning the tire and removing any debris or residue. Apply outdoor paint if a decorative finish is desired. Once dry, position the tire on level ground. Place a large shallow basin securely on top, ensuring it remains balanced and stable. Additional support can be created by filling part of the tire interior with gravel or concrete. Decorative stones around the base improve appearance and increase stability. Fill the basin with clean water and add several flat rocks for bird footing. Position the completed bird bath in a visible location where birds can easily access it. Regular maintenance includes water replacement and occasional repainting if weather exposure affects the finish. This setup method creates a durable and practical garden feature while demonstrating innovative reuse of materials commonly regarded as waste.

Idea 5: Hanging Basket Bird Bath
How to Create
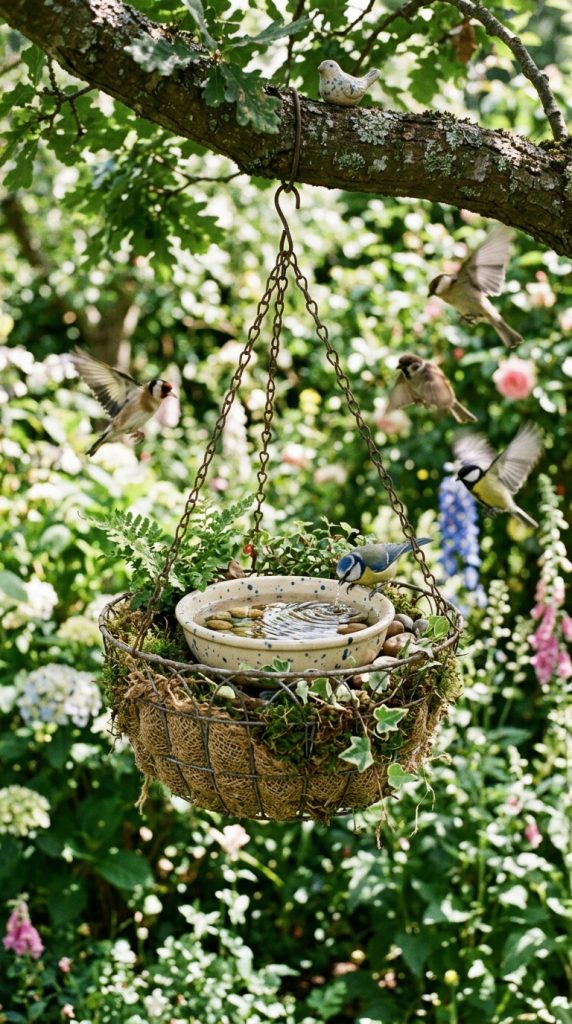
A hanging bird bath introduces vertical interest into gardens while maximizing limited outdoor space. Old hanging baskets can easily be transformed into suspended water features suitable for patios, balconies, and compact gardens. This design is especially useful where ground space is limited or where elevated placement offers additional protection from predators. The hanging format creates a unique visual element that differs from traditional pedestal bird baths. Decorative chains, natural rope, and attractive basket frames can enhance the overall aesthetic while maintaining functionality. Pinterest inspiration frequently showcases suspended garden features because they add depth and dimension to outdoor environments. The project also supports creative customization through paint, decorative liners, and ornamental accents. Because the structure remains lightweight, installation is generally straightforward. This beginner friendly project combines practicality, wildlife support, and artistic expression while encouraging reuse of existing garden accessories.
Remove any existing basket liners and clean the frame thoroughly. Attach a shallow waterproof bowl inside the basket using secure fastening methods. Verify that the bowl remains level when suspended. Strengthen chains or hanging hardware if necessary to ensure safe support. Place decorative stones in the basin to provide secure perches for birds. Hang the completed bird bath from a sturdy branch, pergola, or support structure capable of bearing the weight of water. Check alignment and balance before filling the basin. Maintain the bird bath by replacing water frequently and inspecting hanging components for wear. This simple step by step process transforms an unused basket into a practical and attractive garden feature that enhances outdoor decoration while supporting bird activity.
Idea 6: Mosaic Serving Tray Bird Bath
Setup Method
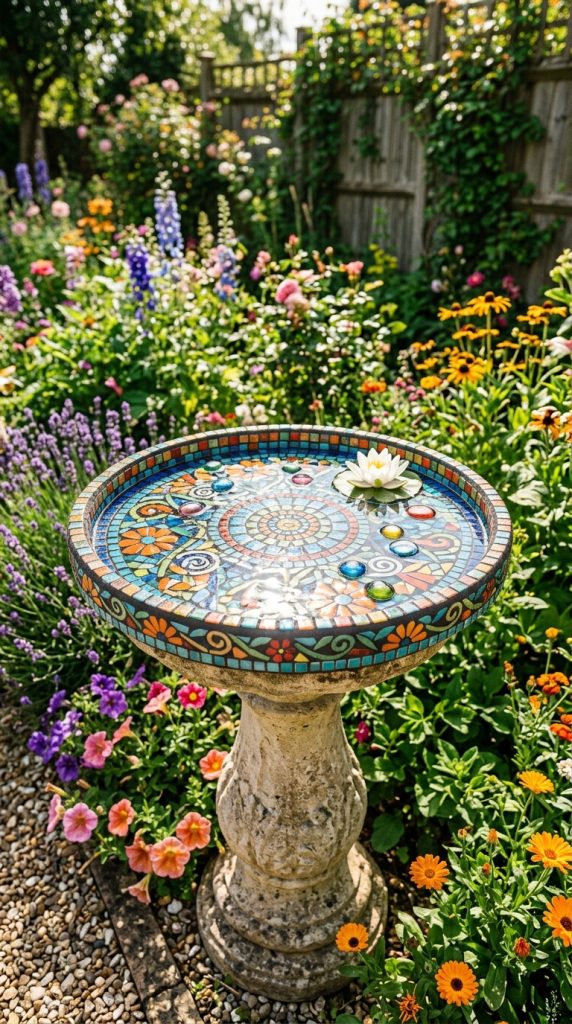
Unused serving trays provide excellent foundations for decorative mosaic bird baths. Their shallow design naturally accommodates water while offering ample surface area for creative embellishment. Mosaic decoration allows homeowners to transform ordinary trays into artistic garden accents featuring customized colors, patterns, and textures. This project combines functionality with artistic expression, making it particularly appealing for DIY enthusiasts interested in handmade decoration. Broken ceramic pieces, glass fragments, and decorative tiles can all contribute to unique designs. The resulting bird bath often becomes a focal point within the garden due to its visual complexity and personalized appearance. Mosaic projects remain popular among Pinterest users because they encourage creativity while utilizing reclaimed materials. The process also provides opportunities to coordinate colors with existing landscaping and home decor elements. Through thoughtful planning and careful arrangement, a simple serving tray can become a distinctive wildlife feature and decorative centerpiece.
Start by cleaning the serving tray and preparing the surface for decoration. Arrange mosaic materials into the desired pattern before attaching them with suitable adhesive. Allow sufficient drying time before applying grout between pieces. Once the grout cures, seal the surface with an outdoor-safe protective coating. Mount the tray onto a stable pedestal, stand, or base capable of supporting its weight. Test stability before adding water. Decorative stones placed within the basin improve safety for birds and complement the mosaic design. Locate the completed bird bath where sunlight highlights the decorative surface without causing excessive water evaporation. Routine cleaning preserves both appearance and functionality. This creative project transforms an ordinary household item into a visually engaging outdoor feature with lasting decorative value.
Idea 7: Old Chair Bird Bath Garden Feature
How to Make
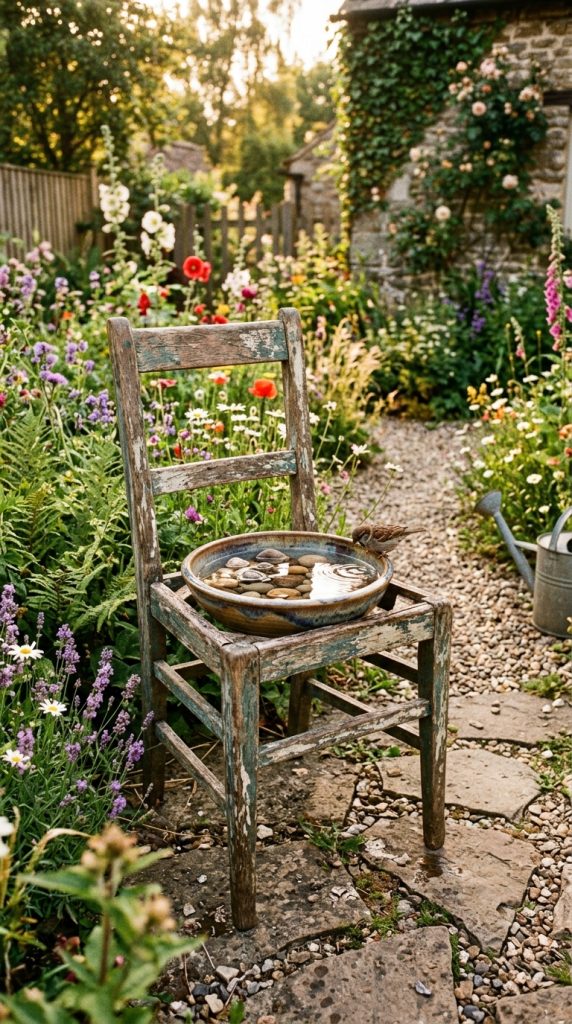
An old chair can become a striking bird bath centerpiece through imaginative upcycling. Wooden and metal chairs often possess structural qualities suitable for supporting water basins while adding architectural interest to outdoor spaces. The project combines furniture reuse with wildlife-friendly landscaping, resulting in a distinctive garden feature. Decorative painting, distressing techniques, or weathered finishes can further enhance the chair’s visual appeal. Pinterest ideas frequently feature repurposed furniture because such projects blend practicality with artistic transformation. The chair’s height naturally elevates the basin, improving visibility while creating a layered garden composition. This design works especially well in cottage gardens, rustic landscapes, and eclectic outdoor settings. By preserving and reusing old furniture, homeowners can create meaningful decorative elements that reflect creativity and environmental awareness. The finished bird bath often becomes both a conversation piece and a valuable water source for local birds.
Begin by inspecting the chair for structural stability. Tighten loose joints and repair damaged areas before proceeding. Remove the seat if necessary and install a platform capable of securely supporting a shallow basin. Paint or seal the chair using weather-resistant products appropriate for outdoor use. Once dry, attach the basin securely and verify balance. Decorative stones can be added to the water area to improve bird safety. Position the chair on level ground and test stability under full water weight. Regular maintenance includes monitoring connections and refreshing finishes when needed. This easy project demonstrates how furniture destined for disposal can become an attractive garden enhancement through straightforward modifications and thoughtful placement.
Idea 8: Concrete Mold Upcycle Bird Bath
Execution Process
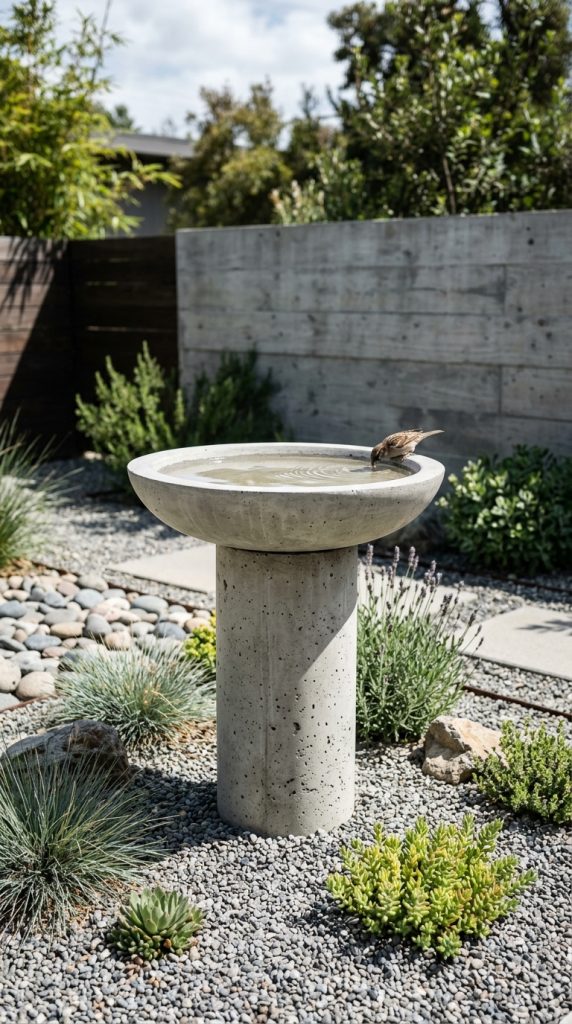
Repurposed household containers can serve as molds for creating custom concrete bird baths. This approach allows homeowners to produce durable, long-lasting garden features while reusing materials that might otherwise be discarded. Buckets, bowls, storage containers, and large trays can all function as molding forms. Concrete bird baths offer exceptional stability and durability, making them suitable for various climates and outdoor conditions. The design can remain simple and minimalist or incorporate decorative textures and embedded materials. Pinterest users often favor concrete projects because they provide professional-looking results at relatively low cost. The finished bird bath can complement modern design themes, rustic landscapes, and contemporary outdoor spaces. This creative project combines practical construction techniques with artistic flexibility, allowing builders to customize dimensions, textures, and overall appearance according to personal preferences.
Select suitable molds and prepare them with a release agent to facilitate removal. Mix concrete according to package instructions and pour it carefully into the chosen molds. Use smaller containers to create basin cavities where necessary. Allow adequate curing time before demolding. Smooth rough edges using sandpaper or masonry tools. If desired, apply decorative finishes, stains, or sealants designed for outdoor concrete surfaces. Assemble the basin and pedestal components securely, ensuring structural stability. Place the completed bird bath on a firm, level surface and test its balance before filling with water. Routine cleaning and occasional sealing help preserve appearance and longevity. This setup method produces a highly durable bird bath while demonstrating effective reuse of everyday materials.
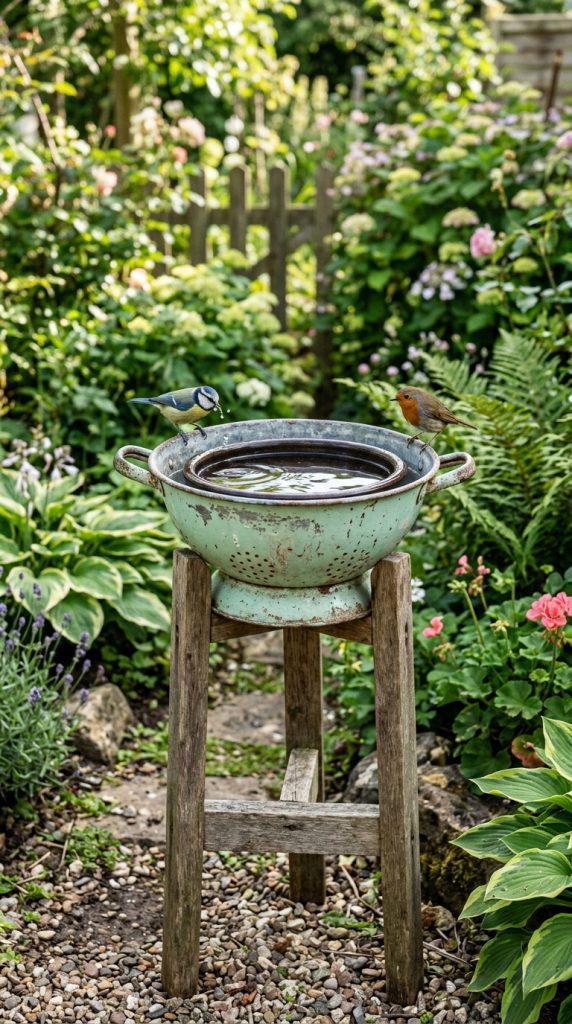
Idea 9: Kitchen Colander Bird Bath
Step-by-Step Guide
Old metal colanders possess unique characteristics that make them excellent candidates for bird bath projects. Their perforated design adds visual interest while creating opportunities for decorative customization. Colanders often feature attractive shapes and durable construction, making them suitable for long-term outdoor use. This project appeals to individuals interested in whimsical garden decoration and creative upcycling. Painted finishes, decorative chains, and complementary supports can significantly alter the final appearance. The distinctive design stands out among traditional bird baths, adding personality and charm to outdoor spaces. Pinterest inspiration often highlights kitchen-item transformations because they reveal unexpected possibilities for household objects. Through simple modifications, an unused colander can become a practical water feature that attracts birds while enhancing garden aesthetics. The project encourages experimentation and demonstrates how functional items can acquire entirely new purposes.
Clean the colander thoroughly and remove any rust or surface imperfections. Apply weather-resistant paint if desired and allow sufficient drying time. Mount the colander onto a stable pedestal, stand, or decorative support using secure hardware or waterproof adhesive. Because the perforations allow drainage, line the interior with a shallow waterproof insert capable of holding water. Add smooth stones to improve footing for birds. Position the bird bath in a location that balances visibility and accessibility. Inspect regularly for wear, especially around mounting points and painted surfaces. Frequent water replacement ensures a healthy environment for visiting birds. This beginner friendly tutorial transforms a common kitchen item into a creative and functional outdoor feature with minimal expense.
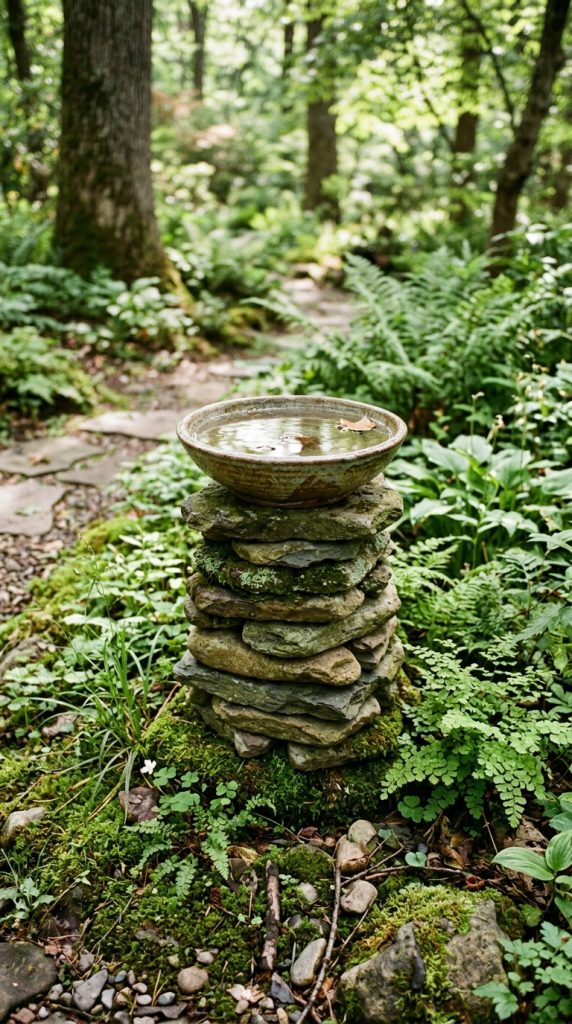
Idea 10: Stacked Stone and Bowl Bird Bath
How to Create
Stacked stone bird baths combine natural materials with upcycled components to create organic garden features. The design emphasizes balance, texture, and visual harmony while supporting wildlife activity. Stones collected from previous landscaping projects can often be reused, reducing material costs and environmental impact. The natural appearance integrates seamlessly into various garden styles, including woodland, cottage, and minimalist landscapes. Pinterest boards frequently feature stacked stone projects because they create timeless outdoor aesthetics with relatively simple construction methods. The combination of natural stone and a repurposed bowl offers both durability and visual appeal. This project encourages thoughtful arrangement and careful planning while remaining accessible to beginners. The finished bird bath often appears as though it naturally belongs within the surrounding landscape, enhancing both decoration and ecological value.
Select flat stones of varying sizes capable of forming a stable pedestal. Clean the stones thoroughly and experiment with arrangements before permanent assembly. Use outdoor construction adhesive between layers if additional stability is required. Once the pedestal reaches the desired height, place a shallow bowl securely on top. Decorative pebbles inside the basin improve safety for birds and complement the natural aesthetic. Position the structure on firm ground and test stability before adding water. Surrounding plants, gravel, or mulch can further integrate the bird bath into the landscape. Regular maintenance includes checking stone alignment and cleaning the basin. This handmade project demonstrates how natural and reclaimed materials can work together to create an attractive, durable, and wildlife-friendly garden feature.
Common Beginner Mistakes and How to Avoid Them
Many DIY bird bath projects encounter problems due to insufficient planning or overlooked details. One of the most common mistakes involves prioritizing appearance over stability. A visually attractive bird bath becomes ineffective if it tips easily or cannot safely support the weight of water. Always test balance before final placement. Another frequent issue is selecting basins that are too deep. Birds require shallow water with secure footing, making stones and pebbles important additions. Inadequate cleaning before assembly can also weaken adhesives and reduce durability. Materials should always be thoroughly prepared before construction begins.
Poor location selection creates additional challenges. Bird baths placed in exposed areas may discourage use, while locations too close to dense hiding spots can increase predator risks. Neglecting maintenance is another common problem. Dirty water can become unhealthy for birds and diminish the project’s appeal. Some beginners also overlook weather resistance, resulting in premature deterioration. Using outdoor-rated paints, sealants, and adhesives helps extend lifespan. Careful planning, proper preparation, and routine upkeep significantly improve results and ensure that bird bath projects remain attractive, functional, and safe over time.
Practical Tips for Better Results
Several practical techniques can improve both the appearance and functionality of upcycled bird baths. Selecting durable materials from the beginning helps reduce maintenance and increases longevity. Outdoor-rated adhesives, paints, and sealants provide valuable protection against moisture, sunlight, and temperature changes. Stability should remain a priority throughout every stage of construction. Testing structures under full water weight before final placement helps identify potential weaknesses.
Visual balance also contributes to successful outcomes. Coordinating colors, textures, and shapes with surrounding garden elements creates a more cohesive appearance. Adding natural stones to the basin improves bird safety while enhancing aesthetics. Regular cleaning prevents algae growth and maintains water quality. Positioning bird baths where they receive partial shade can reduce evaporation and improve comfort for visiting birds. Seasonal inspections help identify wear before significant damage occurs. Thoughtful planning and consistent maintenance allow DIY enthusiasts to maximize the value of their creative projects while supporting local wildlife. Small improvements often produce substantial benefits in durability, appearance, and usability.
Styling, Presentation, or Organization Ideas
Presentation plays an important role in the success of any bird bath DIY project. Integrating the finished piece into existing landscaping helps create a unified outdoor environment. Grouping bird baths with flowers, ornamental grasses, and low shrubs can enhance visual impact while providing birds with nearby shelter. Decorative gravel, mulch, and stepping stones help define the area and improve organization within the landscape.
Different styling approaches can produce distinct results. A minimalist style may emphasize clean lines, neutral colors, and simple forms. Rustic themes often incorporate weathered finishes, natural textures, and reclaimed materials. Cottage-inspired gardens may feature colorful flowers and decorative accents surrounding the bird bath. Consistency across nearby garden elements helps maintain visual harmony. Seasonal decorations can also refresh the appearance throughout the year without major modifications. Thoughtful arrangement ensures the bird bath remains a focal point while contributing positively to the overall landscape design. Effective styling enhances both decorative value and practical functionality.
Budget or Time Planning
Careful planning helps keep bird bath projects affordable and manageable. One advantage of upcycling is the ability to utilize existing materials, significantly reducing costs. Before purchasing anything, evaluate available household items that could serve as basins, pedestals, supports, or decorative elements. Creating a materials list prevents unnecessary spending and improves organization throughout the project.
Time management is equally important. Simple projects such as teacup bird baths or hanging basket designs can often be completed within a single afternoon. More complex projects involving concrete, mosaics, or structural modifications may require several days due to curing and drying periods. Scheduling work in stages helps maintain efficiency and reduces frustration. Grouping preparation tasks together can save time while improving workflow. Budget ideas become more effective when materials are sourced gradually or reused from previous projects. Realistic planning allows DIY enthusiasts to complete attractive garden features without exceeding financial or time limitations.
Creative Expansion and Advanced Inspiration
Once basic bird bath projects become familiar, numerous opportunities exist for creative expansion. Larger garden designs can incorporate multiple bird baths connected through coordinated themes, colors, or materials. Combining water features with pollinator-friendly plantings creates multifunctional wildlife habitats that support various species. Decorative lighting can enhance evening visibility and increase visual interest.
Advanced techniques may include mosaic artistry, sculptural pedestals, layered landscaping, or integrated seating areas surrounding bird bath installations. Seasonal adaptations provide additional inspiration by allowing decorative updates throughout the year. Garden enthusiasts may also experiment with mixed materials such as stone, metal, wood, and glass to create unique custom designs. Expanding projects gradually encourages skill development while maintaining manageable workloads. These creative ideas demonstrate how a simple bird bath can evolve into a central component of broader home decor and garden decoration plans. Continued experimentation supports personal creativity while contributing to attractive, wildlife-friendly outdoor spaces.