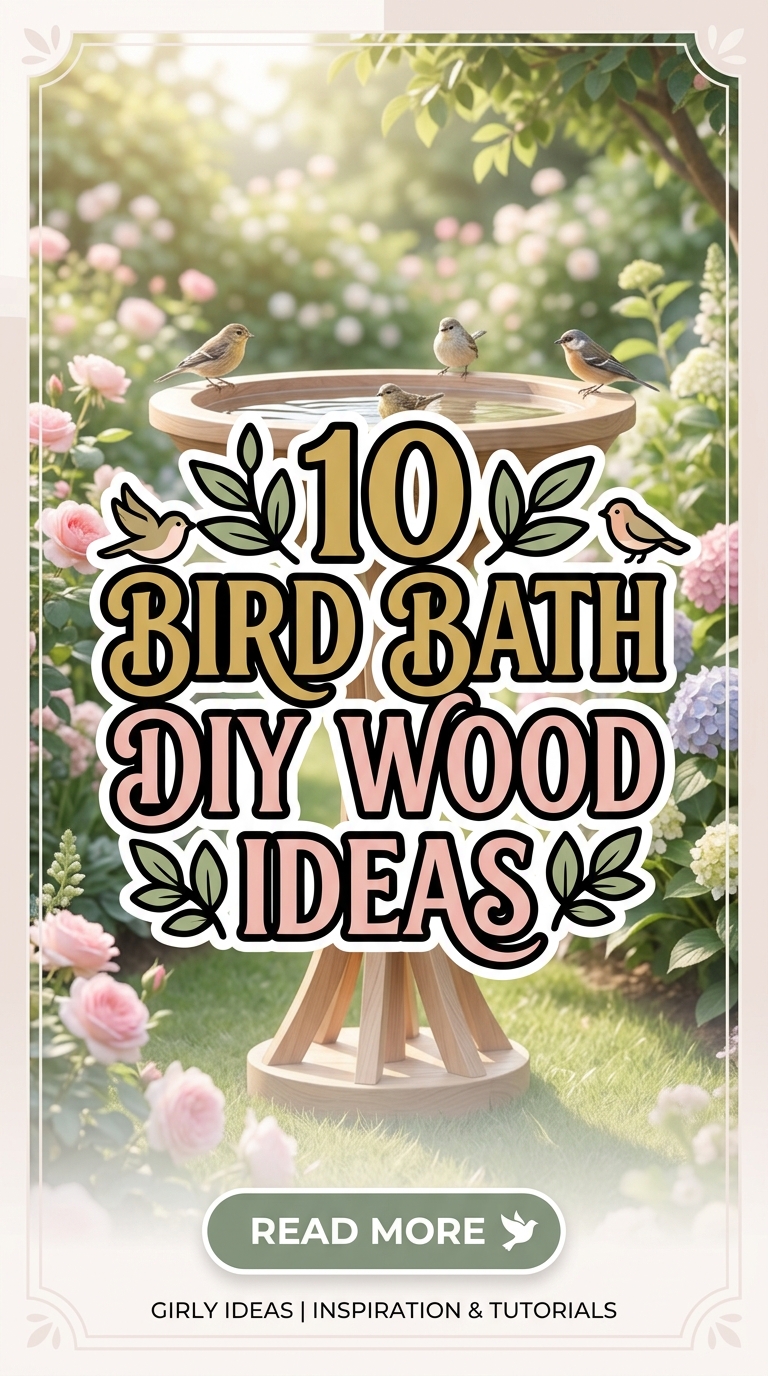

Wooden bird baths combine natural materials with functional outdoor design, making them one of the most popular Pinterest ideas for backyard decoration and wildlife-friendly landscaping. A DIY bird bath made from wood creates a warm and organic appearance that blends easily with gardens, patios, balconies, and outdoor seating areas. These creative ideas also support local birds by providing a safe space for drinking and bathing. Wooden bird bath projects are especially attractive because they are beginner friendly, customizable, and suitable for different outdoor aesthetics, including rustic, farmhouse, minimalist style, and modern design themes.
This article explains how to build ten different bird bath DIY wood ideas using practical methods and accessible materials. Readers will learn step by step techniques for planning, cutting, assembling, sealing, and styling wooden bird baths for long-term outdoor use. The guide also covers important preparation methods, common mistakes, organization strategies, budget ideas, and creative expansion concepts for advanced projects. Each project focuses on realistic construction methods that can be completed with basic DIY tools and simple woodworking techniques. These handmade bird bath designs also function as decorative garden features that improve outdoor organization and visual balance while creating a relaxing environment for birds and people alike.
Why This Idea Is Trending or Useful
Wooden bird bath projects continue gaining popularity because they combine outdoor decoration, sustainability, and easy DIY construction into one practical creative project. Pinterest inspiration increasingly focuses on natural materials, eco-friendly garden upgrades, and handmade outdoor accessories that improve both aesthetics and functionality. Wood provides a softer and more natural appearance compared to metal or plastic alternatives, making these projects suitable for modern design trends that emphasize earthy textures and minimalist outdoor styling.
Another reason these bird bath ideas remain trending is their accessibility for beginners. Most designs require only simple materials, standard hardware, and basic tools such as drills, screws, sandpaper, and wood sealants. This makes the projects approachable for people with limited woodworking experience. The flexibility of wood also allows easy customization through staining, painting, carving, or decorative shaping. DIY bird baths can be adapted for small balconies, large gardens, farmhouse landscapes, or compact urban patios without requiring expensive supplies.
These projects also support practical outdoor planning. Bird baths encourage wildlife activity while serving as decorative focal points within landscaping arrangements. Many Pinterest users seek budget ideas that improve outdoor spaces without requiring major renovations. Wooden bird baths provide a low-cost solution that combines home decor, organization, and natural inspiration into one easy project suitable for year-round outdoor decoration.
Materials and Preparation
Careful preparation improves the durability, safety, and appearance of any wooden bird bath DIY tutorial. Before beginning construction, it is important to choose weather-resistant wood such as cedar, redwood, cypress, or pressure-treated lumber approved for outdoor use. These materials tolerate moisture more effectively and reduce the likelihood of cracking or warping. Basic materials often include wooden boards, waterproof wood glue, galvanized screws, outdoor sealant, shallow bowls or trays, wood stain, and sanding supplies. Some projects may also require concrete bases, hanging chains, decorative stones, or support posts depending on the design style.
Preparation starts with measuring the available outdoor space and deciding whether the bird bath will stand independently, attach to a fence, hang from a tree, or sit on a pedestal. Planning dimensions carefully helps maintain proper balance and stability. Most bird baths function best with shallow water depths that remain safe for birds while preventing overflow issues. Sanding all wooden surfaces before assembly helps eliminate rough edges and improves the finish quality after sealing.
Proper sealing is essential for outdoor longevity. Waterproof sealants designed for exterior wood help protect against rain, sunlight, and moisture damage. Organizing tools before starting also improves efficiency during the step by step building process. Keeping materials sorted by size and function reduces mistakes and supports smoother project execution for beginner friendly woodworking results.
Idea 1: Rustic Barrel Style Wooden Bird Bath
How to Create
A rustic barrel style wooden bird bath creates a farmhouse-inspired outdoor centerpiece using reclaimed wood planks or curved barrel sections. This design works especially well in cottage gardens, natural landscaping layouts, and backyard decoration themes focused on earthy textures. The structure typically includes a thick circular wooden base with vertical wood slats arranged around the support column. A shallow wooden basin or inserted waterproof tray forms the upper bathing area. The aged appearance of reclaimed wood enhances the aesthetic value while helping the bird bath blend naturally into outdoor surroundings.
This type of DIY project emphasizes texture and natural character rather than perfectly smooth construction. Weathered wood patterns, visible grain lines, and uneven finishes contribute to the rustic atmosphere that remains highly popular among Pinterest inspiration trends. The design can also include decorative rope, engraved details, or dark stain finishes for additional visual depth. Because the structure appears substantial and grounded, it functions effectively as both a bird bath and a garden focal point. Rustic wooden bird baths also complement stone pathways, raised flower beds, and vintage outdoor furniture arrangements while supporting wildlife activity in a practical and visually balanced way.
To build this bird bath, begin by cutting thick wooden boards into equal vertical slats for the support section. Arrange the slats into a circular formation around a reinforced center post and secure them using galvanized screws and waterproof adhesive. The upper basin can be created from a shallow wooden tray lined with waterproof epoxy or fitted with a removable metal or ceramic insert for easier cleaning. Sand all surfaces carefully to prevent splinters and improve sealant adhesion.
Apply an exterior wood stain followed by multiple coats of waterproof sealant to protect the wood from moisture damage. Place the structure on a stable surface such as compact gravel, concrete pavers, or a patio corner to reduce movement. Decorative stones can be added inside the basin to create shallow standing areas for smaller birds. Maintenance involves regular cleaning and resealing during seasonal weather changes. This beginner friendly project uses accessible materials and supports practical outdoor planning while creating a timeless handmade garden decoration suitable for rustic and modern outdoor layouts alike.

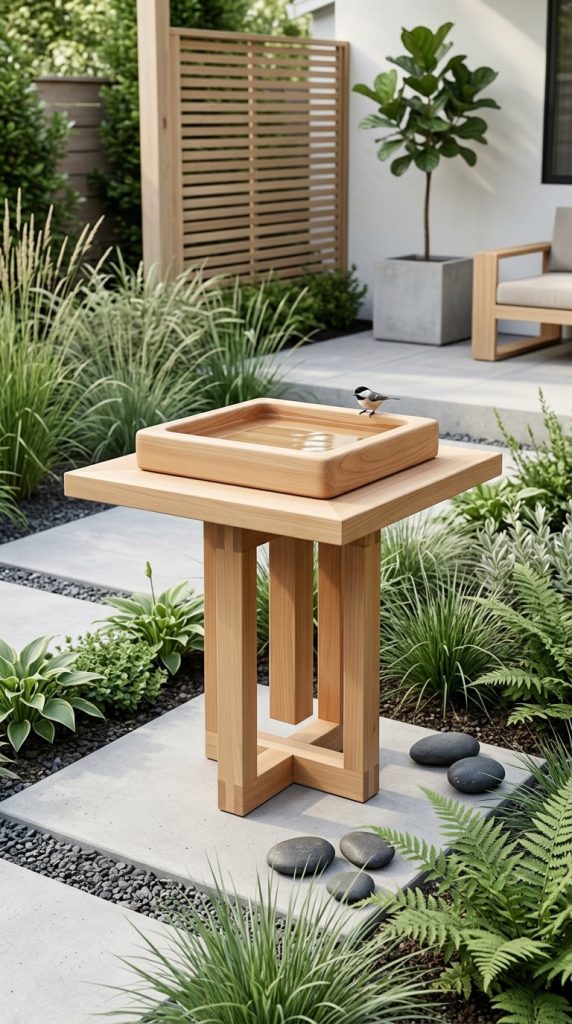
Idea 2: Minimalist Square Platform Bird Bath
Step-by-Step Guide
A minimalist square platform bird bath focuses on clean geometry, simple lines, and uncluttered modern design principles. This Pinterest-style idea works particularly well for contemporary patios, urban gardens, and outdoor spaces organized around neutral colors and balanced landscaping. The structure usually consists of a square wooden pedestal supporting a flat shallow basin with symmetrical proportions. The simplicity of the design allows the natural texture of the wood to become the primary decorative feature while maintaining a sleek and organized appearance.
This aesthetic appeals to homeowners seeking functional outdoor decor without excessive ornamentation. Smooth edges, evenly spaced boards, and subtle stain finishes help maintain the minimalist style. Lighter wood tones create an airy and modern atmosphere, while darker stains provide dramatic contrast against greenery and stone landscaping. The design also supports practical organization because the structure occupies limited visual space while still functioning as an attractive centerpiece. This easy project aligns with trending ideas focused on calm outdoor environments and simplified home decor arrangements inspired by Scandinavian and modern landscaping concepts.
Construction begins by assembling a square base using four thick support boards connected to a reinforced center column. Attach a shallow square tray at the top using waterproof screws and strong exterior adhesive. The basin should remain relatively shallow to allow safe access for birds while preventing excessive water accumulation. Sand all corners thoroughly to maintain smooth minimalist lines and eliminate rough edges.
Seal the completed structure with weather-resistant exterior coating to improve durability against rain and sunlight exposure. Position the bird bath in an open area with partial shade to maintain cooler water temperatures during warmer seasons. Decorative gravel or simple pavers beneath the structure can improve stability while reinforcing the clean geometric presentation. This DIY tutorial remains highly beginner friendly because it uses straightforward measurements, limited materials, and simple assembly methods. The finished result provides a modern aesthetic that integrates naturally into organized outdoor layouts while supporting wildlife activity through practical and accessible design.
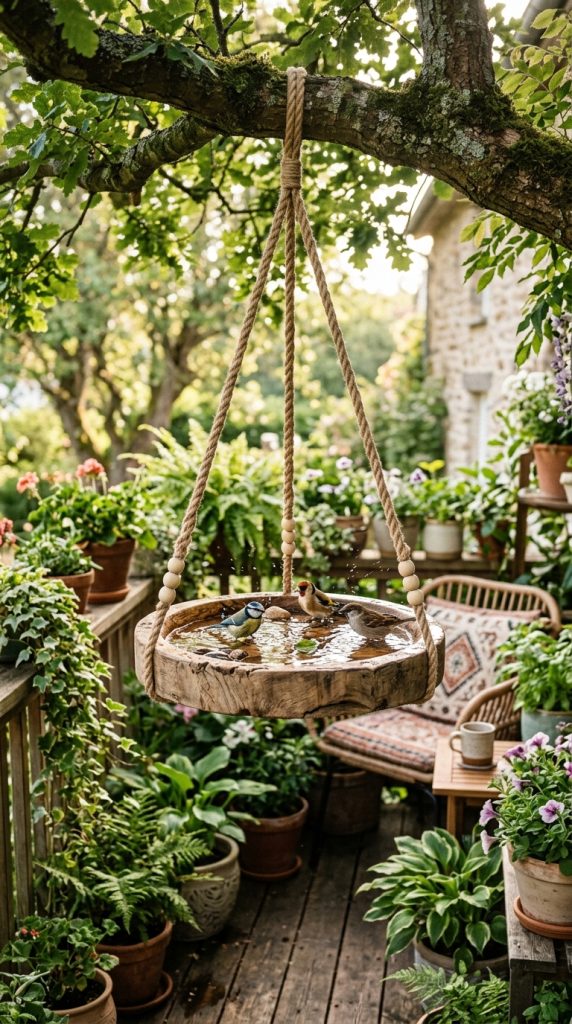
Idea 3: Hanging Wooden Bird Bath Tray
How to Make
A hanging wooden bird bath tray offers a lightweight and space-saving solution for balconies, patios, porches, and smaller gardens. This design suspends a shallow wooden basin using chains or thick rope attached to overhead branches, pergolas, or ceiling hooks. Hanging bird baths are especially useful for compact outdoor spaces where traditional pedestal structures may not fit comfortably. The floating appearance also creates visual movement that complements natural landscaping and softens outdoor organization layouts.
The design focuses on simplicity and accessibility while still maintaining decorative value. Circular or hexagonal tray shapes work especially well because they distribute weight evenly during suspension. Decorative rope knots, stained wood finishes, or carved edge details can enhance the handmade aesthetic without making the project overly complex. Because the bird bath hangs above ground level, it can also help reduce access from certain animals while providing birds with a safer bathing environment. Pinterest inspiration often highlights hanging bird baths within bohemian, cottagecore, and minimalist outdoor themes because the suspended structure creates a calm and relaxed atmosphere.
Begin construction by cutting a thick wooden board into the desired tray shape and sanding all edges until smooth. Drill evenly spaced holes near the outer perimeter for attaching rope or chain supports. A shallow waterproof insert can be added inside the tray to improve water retention and simplify cleaning. Use galvanized eye hooks and durable outdoor rope to create balanced suspension points connected to a central hanging ring.
Apply multiple layers of waterproof sealant to protect the wood from moisture exposure and seasonal weather changes. Install the hanging bird bath in a stable location with sufficient overhead support and partial shade coverage. The tray should remain level after hanging to prevent water imbalance or spilling. Decorative pebbles placed inside the basin can help birds maintain secure footing while bathing. This easy project requires minimal materials and works well for beginners seeking creative ideas that combine handmade decoration with practical outdoor functionality in small or organized spaces.
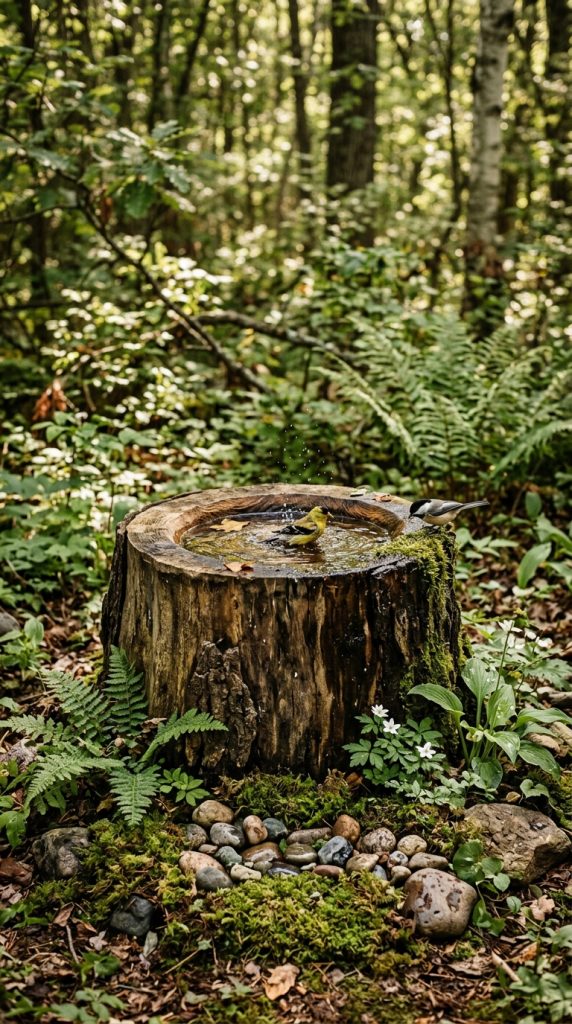
Idea 4: Tree Stump Wooden Bird Bath
Execution Process
A tree stump wooden bird bath transforms natural landscaping materials into a functional and aesthetic outdoor decoration. This project uses a cut tree stump as the base support for a shallow wooden basin or carved upper section. The design blends naturally into woodland gardens, rustic patios, and organic landscaping themes while emphasizing sustainability and resourceful DIY construction. The textured appearance of bark, natural wood grain, and irregular shapes creates strong visual character that complements earthy outdoor aesthetics.
This project remains popular among Pinterest ideas because it combines natural scenery with simple woodworking methods. The structure feels integrated into the environment rather than artificially placed within it. Tree stump bird baths also provide excellent stability due to their heavy base construction. The natural appearance works effectively alongside wildflowers, stone pathways, native plants, and cottage garden layouts. Because every stump contains unique grain patterns and dimensions, each finished project becomes visually distinct while maintaining a consistent handmade style suitable for modern rustic decoration trends.
To create this project, begin by selecting a sturdy and dry tree stump with a flat upper surface. Sand the top lightly to improve stability and remove loose bark sections if necessary. Attach a shallow wooden tray or carve a basin directly into the top surface using woodworking tools. The basin should remain shallow enough for safe bird access while allowing easy cleaning and maintenance.
Seal all exposed wood using exterior-grade waterproof coating to reduce moisture damage and insect deterioration. Place the completed bird bath on level ground surrounded by gravel or mulch for improved drainage and visual integration with landscaping. Decorative moss, stones, or small plants can be arranged around the base to enhance the natural aesthetic. This beginner friendly DIY tutorial supports sustainable planning by repurposing existing materials while creating a durable and highly decorative outdoor feature suitable for year-round garden organization and wildlife support.
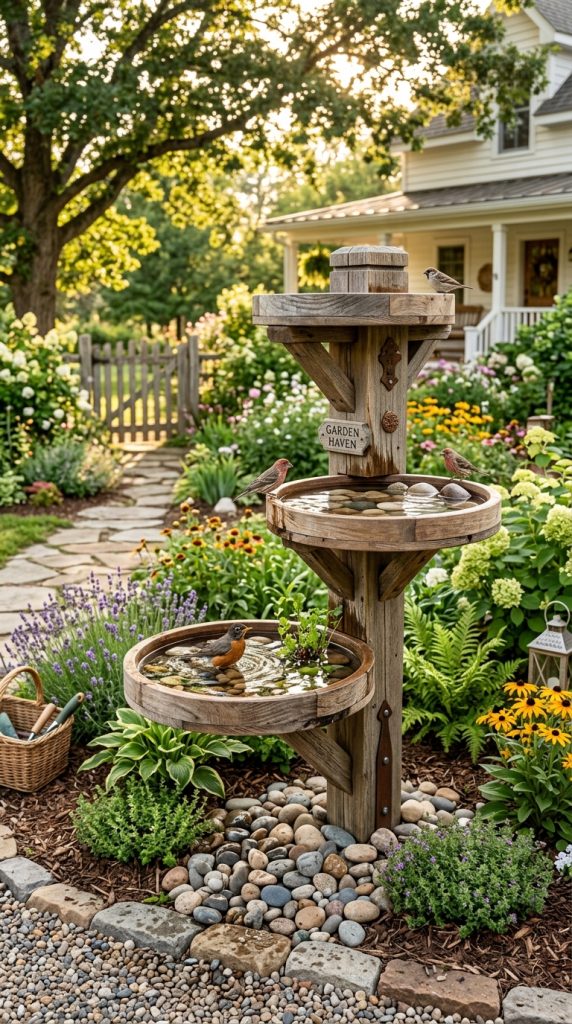
Idea 5: Tiered Wooden Bird Bath Station
Setup Method
A tiered wooden bird bath station creates a multi-level outdoor feature that combines decoration, organization, and increased functionality for bird activity. This design includes two or three stacked platforms positioned at varying heights, each serving a different purpose such as bathing, drinking, or feeding. The layered arrangement adds vertical visual interest while maximizing space efficiency within garden layouts. Tiered structures are especially effective in larger backyards where a single bird bath may appear visually small or isolated.
The design aligns closely with trending Pinterest inspiration focused on structured outdoor organization and balanced landscaping. Multiple levels create depth and movement while allowing decorative customization through staining, painted accents, or contrasting wood textures. The structure also accommodates different bird species by providing several landing areas and water depths. Because the arrangement occupies vertical rather than horizontal space, it remains practical for gardens requiring organized placement of decorative elements. This creative project combines functionality and visual complexity while still remaining achievable for beginner friendly woodworking enthusiasts.
Construction begins with a strong central support post anchored securely into a wide wooden or concrete base. Attach progressively smaller wooden trays at staggered heights using reinforced brackets and waterproof screws. Each basin should maintain shallow depth and proper drainage to prevent standing water issues. Sand all surfaces thoroughly and round sharp corners to improve safety for birds and users alike.
Apply weather-resistant wood sealant across every exposed surface and allow sufficient drying time before outdoor installation. Position the bird bath station in an area visible from windows or seating spaces while maintaining nearby plant coverage for bird security. Decorative stones and small branches can be added around the base to integrate the structure into surrounding landscaping. This DIY tutorial supports practical planning by combining several outdoor functions into one organized and visually appealing handmade decoration suitable for modern garden aesthetics.
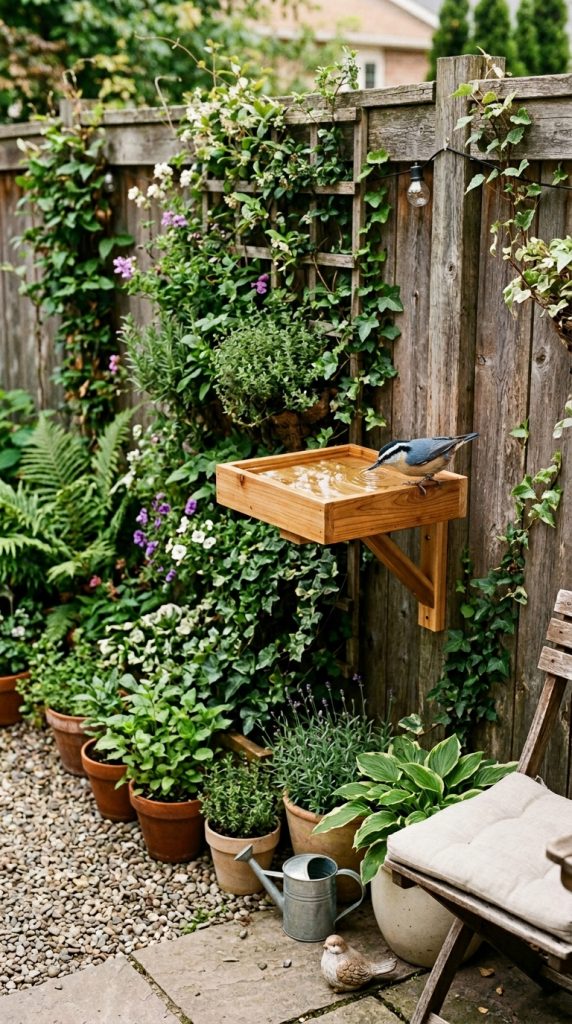
Idea 6: Wooden Fence-Mounted Bird Bath
How to Create
A fence-mounted wooden bird bath provides a compact and highly functional solution for patios, side yards, and small outdoor spaces with limited ground area. Instead of using a freestanding pedestal, this design attaches directly to an existing wooden fence or vertical garden structure. The elevated installation creates a cleaner appearance while helping maintain organized outdoor layouts. Fence-mounted bird baths are especially useful in urban environments where efficient use of vertical space remains important for practical landscaping and decoration planning.
The design usually consists of a sturdy support bracket holding a shallow wooden tray with reinforced edges. Because the structure becomes part of the fence itself, it integrates naturally into outdoor architecture while maintaining visual simplicity. Pinterest-style outdoor inspiration frequently features wall-mounted and fence-mounted projects because they reduce clutter while adding decorative functionality. This style also works effectively within minimalist and modern design themes where horizontal space must remain visually open and balanced.
Begin construction by cutting a thick wooden support bracket capable of holding the combined weight of the tray and water basin. Secure the bracket to a fence post using galvanized screws designed for exterior use. Attach a shallow wooden platform or tray on top of the support bracket, ensuring the structure remains level and stable after installation. Waterproof liners or removable inserts simplify long-term cleaning and maintenance.
Sand all surfaces carefully and apply an outdoor sealant to protect against weather exposure. Position the bird bath at a moderate height that allows birds to access it comfortably while remaining visible from nearby seating areas or windows. Decorative climbing plants or hanging flower baskets can surround the structure without obstructing bird movement. This beginner friendly easy project requires relatively few materials while creating an organized and aesthetic outdoor feature that supports wildlife activity in compact spaces.
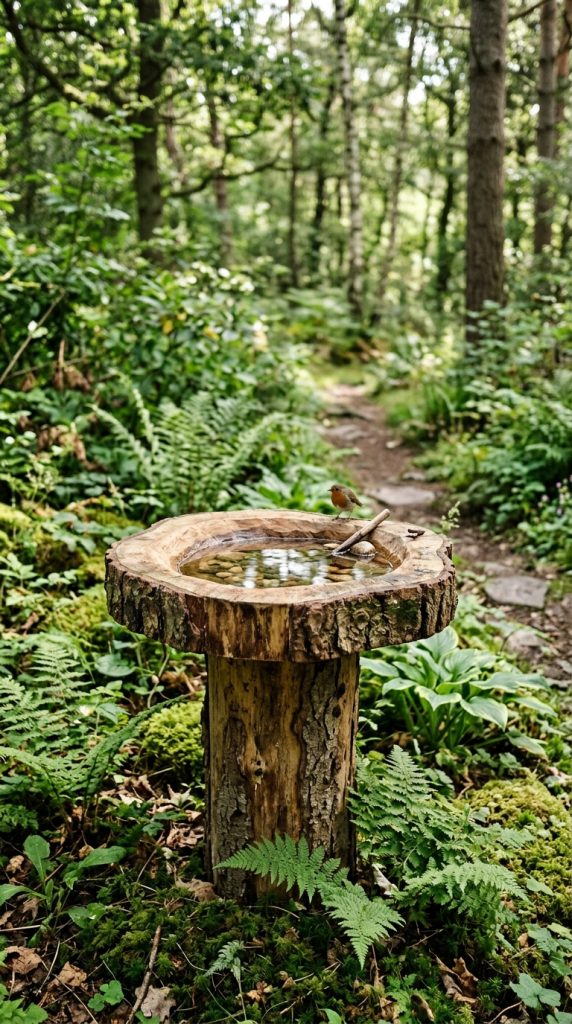
Idea 7: Log Slice Natural Bird Bath
Step-by-Step Guide
A log slice natural bird bath uses thick cross-sections of tree trunks to create a raw and organic outdoor decoration with strong woodland character. Unlike heavily shaped woodworking projects, this design emphasizes the natural appearance of wood grain, bark texture, and irregular edges. The bird bath may consist of a carved basin directly within the log slice or a shallow tray mounted on top of stacked wooden rounds. This approach creates a highly aesthetic and nature-inspired focal point suitable for rustic gardens and outdoor relaxation areas.
The popularity of natural wood projects continues growing because many Pinterest users seek sustainable and environmentally integrated decoration ideas. Log slice bird baths support this trend by minimizing excessive processing while highlighting natural materials. The design works particularly well alongside wildflower gardens, stone pathways, and forest-style landscaping arrangements. Because each log section contains unique textures and patterns, the finished structure develops individual visual identity while maintaining strong connection to outdoor surroundings.
To build the bird bath, begin by selecting a thick and stable log slice with minimal cracking. Sand the upper surface lightly while preserving the natural bark texture around the outer edges. Use carving tools or a router to create a shallow basin in the center area. Alternatively, mount a waterproof bowl onto the top surface for easier construction and maintenance. Secure the structure onto a wider wooden or stone base if additional stability becomes necessary.
Apply exterior wood sealant carefully while avoiding excessive glossy finishes that reduce the natural appearance. Install the completed bird bath in a partially shaded location to reduce rapid water evaporation during warm weather. Surrounding the structure with moss, river stones, or low-growing plants enhances the woodland aesthetic. This DIY tutorial remains highly beginner friendly because it relies more on natural shaping than advanced woodworking techniques while producing visually striking outdoor decoration results.
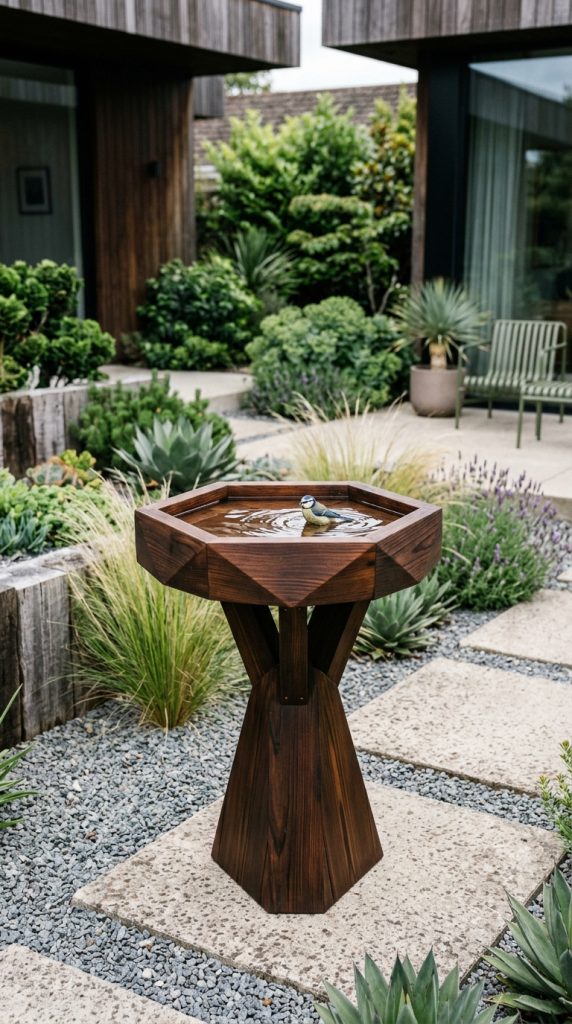
Idea 8: Geometric Modern Wooden Bird Bath
How to Make
A geometric modern wooden bird bath combines sharp angles, symmetrical lines, and architectural styling to create a contemporary outdoor centerpiece. This design often incorporates hexagonal, triangular, or polygonal shapes rather than traditional circular basins. Clean geometry and balanced proportions help the structure complement modern landscaping arrangements focused on organization and minimalist style. The visual emphasis remains on structure and form rather than decorative embellishments, making the project suitable for contemporary patios and structured garden environments.
Modern geometric bird baths align strongly with trending ideas seen across Pinterest home decor inspiration boards. These projects appeal to homeowners seeking sleek outdoor accessories that blend artistic design with practical functionality. Contrasting wood stains, layered platforms, and angular supports create visual depth while maintaining a clean and uncluttered appearance. Because geometric designs appear intentional and organized, they integrate effectively into contemporary outdoor layouts featuring stone surfaces, neutral color palettes, and structured planting arrangements.
Construction begins by carefully measuring and cutting angled wooden panels according to the desired geometric pattern. Assemble the basin using waterproof adhesive and galvanized screws while reinforcing joints for outdoor durability. A polygonal support column or crossed-leg base provides structural stability and enhances the architectural appearance. Sand all edges evenly to maintain smooth transitions between angled surfaces and improve overall finish quality.
Apply weather-resistant sealant followed by optional stain finishes that highlight the geometric contours of the structure. Install the bird bath in an open area where sunlight and landscaping create strong visual contrast against the angular design. Decorative gravel or concrete pavers beneath the structure can reinforce the modern aesthetic while improving drainage and stability. This creative project requires careful planning and measurement but remains achievable for beginners willing to follow precise step by step construction methods.
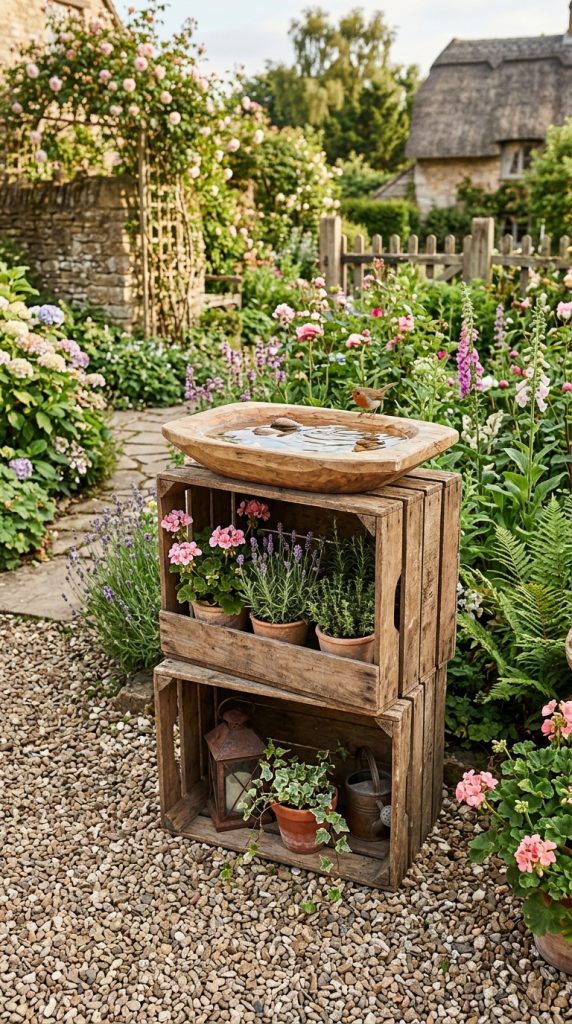
Idea 9: Farmhouse Crate Style Bird Bath
Execution Process
A farmhouse crate style bird bath uses stacked wooden crates or slatted box structures to create a decorative outdoor feature with practical storage-inspired aesthetics. This design combines rustic charm with structured organization, making it especially popular within farmhouse and cottage-style Pinterest inspiration trends. The lower section often includes stacked crates or open shelving while the upper portion supports a shallow bird bath basin. The layered structure creates additional opportunities for decorative styling using plants, lanterns, or seasonal outdoor accessories.
The appeal of this design comes from its balance between functionality and visual warmth. Wooden crate textures create a handcrafted atmosphere that complements garden pathways, porch seating areas, and flower arrangements. Open slats improve airflow and reduce the visual heaviness of the structure, helping it blend naturally into outdoor spaces. The design also remains highly adaptable because the crate arrangement can vary according to available space and preferred styling themes. This easy project works well for both large backyards and compact patio corners.
To create the bird bath, begin by assembling or repurposing sturdy wooden crates with reinforced corners. Stack the crates vertically and secure them together using long exterior screws and waterproof adhesive. Attach a thick wooden platform or tray at the top to support the bathing basin. Removable waterproof inserts simplify maintenance and prevent standing water from damaging the wood structure over time.
Sand all wooden surfaces thoroughly before applying stain or protective sealant. Position the completed bird bath on a stable surface such as concrete pavers or compact gravel to improve balance and drainage. Decorative potted plants or garden accents placed within the crate openings can enhance the farmhouse aesthetic without interfering with bird activity. This beginner friendly DIY tutorial combines organization, decoration, and wildlife support into one practical handmade outdoor project suitable for trending rustic home decor themes.
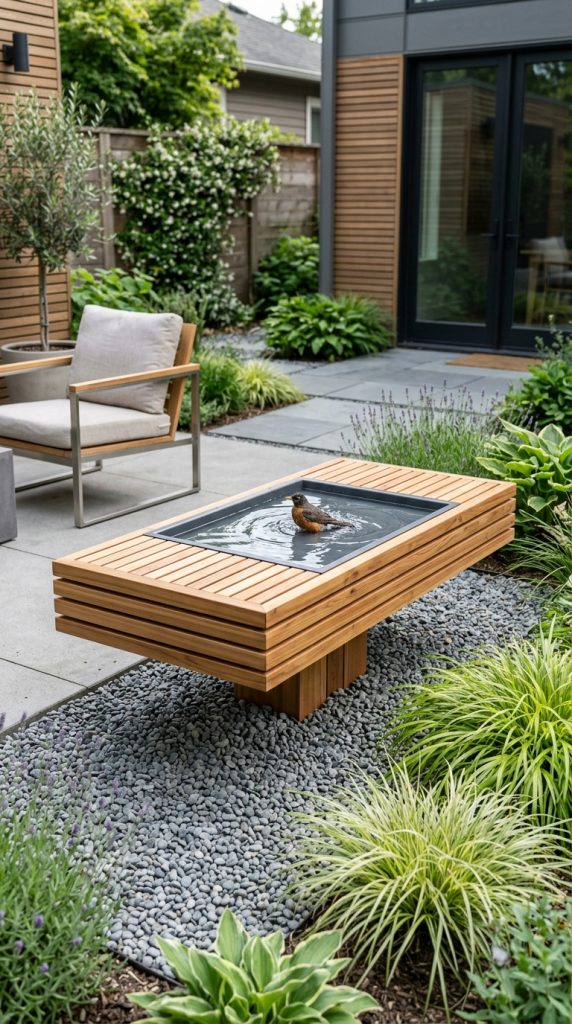
Idea 10: Floating Deck Style Wooden Bird Bath
How to Create
A floating deck style wooden bird bath creates the appearance of a suspended platform using concealed supports and clean horizontal lines. This design draws inspiration from modern deck architecture and minimalist landscaping trends that emphasize open visual space and balanced proportions. The structure usually consists of a flat wooden platform elevated slightly above a hidden support base, creating the illusion that the bird bath floats above the ground. This contemporary aesthetic works especially well in organized gardens with modern stone pathways, neutral outdoor furniture, and structured planting layouts.
Pinterest users frequently save floating deck projects because they appear sophisticated while still remaining achievable through straightforward DIY methods. The low-profile structure also integrates smoothly into minimalist outdoor organization concepts where excessive ornamentation is avoided. Wider horizontal surfaces allow birds to land comfortably while creating elegant visual symmetry across the surrounding landscape. Natural wood finishes soften the modern geometry and help maintain connection with outdoor materials and greenery.
To build this project, construct a concealed support frame slightly smaller than the upper platform dimensions. Attach a broad shallow wooden tray on top of the hidden base using waterproof screws and reinforced corner brackets. The upper platform should extend beyond the support frame evenly on all sides to strengthen the floating visual effect. A waterproof insert or sealed basin area improves water retention and simplifies maintenance procedures.
Sand every surface thoroughly and apply multiple layers of weather-resistant sealant to improve outdoor durability. Install the bird bath on level ground surrounded by gravel, pavers, or minimalist landscaping features to emphasize the clean architectural presentation. Small decorative stones inside the basin help birds maintain secure footing while enhancing the overall aesthetic. This creative project combines modern design, practical functionality, and handmade outdoor decoration into a visually striking yet beginner friendly woodworking tutorial.
Common Beginner Mistakes and How to Avoid Them
One of the most common mistakes in wooden bird bath DIY projects involves choosing untreated or unsuitable wood that deteriorates quickly when exposed to moisture. Soft indoor lumber often warps, cracks, or rots after repeated outdoor exposure. Using weather-resistant wood and applying proper waterproof sealant significantly improves long-term durability. Another frequent issue involves creating basins that are too deep. Birds require shallow water areas for safe bathing, so overly deep bowls reduce usability and increase cleaning difficulties.
Poor structural balance also creates problems, especially for pedestal or hanging bird bath designs. Weak bases, uneven supports, or improper screw placement can cause instability and tipping. Careful measurement and reinforcement during assembly help prevent these issues. Many beginners also skip sanding steps, leaving rough surfaces that reduce finish quality and create safety concerns for birds.
Improper placement remains another avoidable mistake. Bird baths positioned in direct sunlight may overheat quickly and experience rapid water evaporation. Placing the structure near moderate plant coverage creates a safer and cooler environment for wildlife. Neglecting regular cleaning also leads to algae buildup and unsanitary water conditions. Establishing a simple maintenance schedule supports healthier bird activity while preserving the appearance of the handmade outdoor decoration over time.
Practical Tips for Better Results
Careful planning and material organization improve the quality and efficiency of any bird bath DIY tutorial. Measuring all components before cutting reduces waste and prevents uneven assembly problems. Using pre-sanded lumber or sanding thoroughly before construction creates smoother finishes and improves sealant adhesion. Exterior-grade screws and waterproof adhesives also increase structural durability during changing weather conditions.
Applying multiple thin coats of sealant rather than one heavy layer provides stronger moisture protection while maintaining a cleaner finish appearance. Allowing sufficient drying time between coats improves long-term performance and reduces peeling or cracking. Installing removable basin inserts simplifies cleaning and prevents standing water from directly damaging wooden surfaces over time.
Placement strategy also affects functionality and visual presentation. Positioning bird baths near shrubs or trees gives birds nearby shelter while maintaining open flight access. Avoid placing structures too close to dense hiding areas that may conceal predators. Decorative stones inside the basin create secure footing for smaller birds and improve the overall aesthetic. Matching wood stain colors with nearby fences, furniture, or decking also helps integrate the bird bath naturally into the surrounding outdoor organization and home decor arrangement.
Styling, Presentation, or Organization Ideas
Wooden bird baths can become major decorative focal points when styled thoughtfully within outdoor spaces. Coordinating surrounding landscaping elements helps create visual consistency and stronger aesthetic impact. Gravel borders, stone pathways, flower beds, and potted plants all help frame the bird bath while reinforcing organized garden layouts. Rustic projects often pair effectively with weathered lanterns, reclaimed wood accents, and natural planting schemes, while minimalist bird baths benefit from clean lines, neutral surfaces, and structured greenery.
Layering decorative elements around the base also improves visual depth. Small river stones, moss arrangements, or low-maintenance plants soften the transition between the bird bath and surrounding ground surfaces. Multi-height arrangements work particularly well for larger yards because they create movement and balance throughout the landscape. Fence-mounted and hanging designs can be integrated with climbing plants or decorative trellises without obstructing bird access.
Seasonal styling also helps maintain year-round visual interest. Autumn arrangements may include pumpkins or dried grasses, while spring decoration can emphasize fresh flowers and lighter natural textures. Coordinating bird bath finishes with outdoor furniture or patio accents strengthens the overall design theme. Thoughtful presentation transforms simple handmade projects into highly aesthetic outdoor features that support both wildlife activity and organized garden decoration.
Budget or Time Planning
Most wooden bird bath DIY projects remain affordable because they require relatively limited materials and accessible tools. Budget planning begins with selecting an appropriate project size and determining whether reclaimed wood or leftover lumber can be reused. Simple hanging trays and fence-mounted designs usually require the least material investment, while tiered or geometric structures may involve additional hardware and support components. Creating a detailed material list before shopping helps reduce unnecessary purchases and improves project organization.
Time management also improves project success, especially for beginners learning basic woodworking techniques. Separating the process into stages such as cutting, sanding, assembly, sealing, and installation makes the work more manageable and prevents rushed mistakes. Many projects can be completed over a weekend when materials are prepared in advance. Allowing adequate drying time for stains and sealants remains essential for long-term durability and finish quality.
Borrowing tools, repurposing existing wood, and simplifying decorative details can significantly reduce overall expenses without affecting functionality. Batch cutting similar components also improves efficiency for larger projects. Planning installation locations before construction prevents measurement problems and unnecessary adjustments later. Organized preparation supports smoother workflow while helping DIY enthusiasts complete attractive handmade outdoor decoration projects within practical time and budget limitations.
Creative Expansion and Advanced Inspiration
Once basic wooden bird bath projects become familiar, many DIY enthusiasts expand their designs into more advanced creative ideas with additional decorative and functional features. Integrated planter sections, solar-powered lighting, and multi-purpose feeding stations all provide opportunities for customization and enhanced outdoor organization. Tiered platforms can be expanded into complete bird sanctuary arrangements that combine feeding, bathing, and nesting areas within one coordinated structure.
Advanced woodworking techniques also allow for more decorative detailing. Carved edges, layered geometric panels, engraved patterns, and mixed-material combinations create distinctive visual character while strengthening the handmade aesthetic. Combining wood with stone, copper, or concrete elements introduces additional texture and contrast that supports modern design trends. Floating platforms and modular bird bath systems can also be adapted for larger landscape planning projects.
Creative seasonal updates provide another expansion opportunity. Interchangeable decorative accents allow bird baths to match changing outdoor themes throughout the year. Painted finishes, custom stain colors, and coordinated garden accessories can transform simple DIY structures into highly personalized outdoor focal points. Experimenting with shape variations, layered levels, and integrated landscaping features encourages long-term creativity while helping homeowners continuously improve the functionality and aesthetic value of their outdoor spaces through practical and inspiring woodworking projects.