Ceramics and pottery are among the oldest and most expressive art forms in human history. From simple clay vessels used for storage to intricate decorative pieces, pottery allows artists to combine creativity with functionality. Today, ceramics is not only a traditional craft but also a modern artistic outlet that encourages experimentation, mindfulness, and personal expression. Whether you are a beginner exploring clay for the first time or someone looking to expand your creative skills, pottery offers endless possibilities.
Working with clay is a hands-on experience that connects you with natural materials. It teaches patience, precision, and imagination. Before starting any project, it is important to understand the basic preparation, materials, and tools involved. Common materials include earthenware, stoneware, and porcelain clay. Essential tools may include a pottery wheel, carving tools, sponges, rolling pins, and a kiln for firing. Proper wedging of clay removes air bubbles and ensures consistency, while glazing adds color and durability after firing.
In this blog post, you will discover ten creative ceramics ideas, each explained in detail with preparation steps, materials required, and useful tips. These ideas are designed to inspire creativity while also helping you build technical skills in pottery.
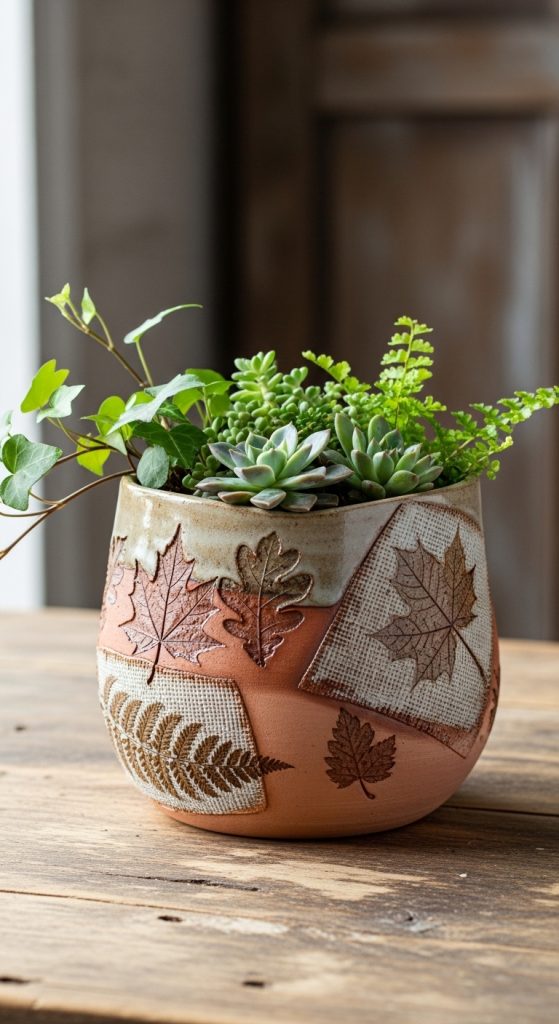
1. Hand-Built Textured Planters
Creating textured planters is a perfect starting point for beginners. This project involves shaping clay by hand without a pottery wheel, making it accessible and enjoyable. Begin by preparing stoneware or earthenware clay and wedging it thoroughly to remove air pockets. Roll out the clay into an even slab using a rolling pin, ensuring a consistent thickness of around half an inch.
To create texture, you can press natural materials such as leaves, fabric, or carved stamps onto the surface. This adds a unique and organic appearance to the planter. Cut the slab into the desired shape and gently curve it into a cylindrical form. Join the edges using slip, which is a mixture of clay and water, to ensure a strong bond.
Allow the planter to dry slowly to avoid cracks. Once it reaches a leather-hard stage, refine the shape and smooth the edges with a sponge. After bisque firing, apply glaze to enhance durability and add color. Choose earthy tones or vibrant glazes depending on your design preference.
Textured planters are both decorative and functional. They can hold indoor plants and add a natural touch to any space. This project also helps you understand slab construction techniques and surface design methods.
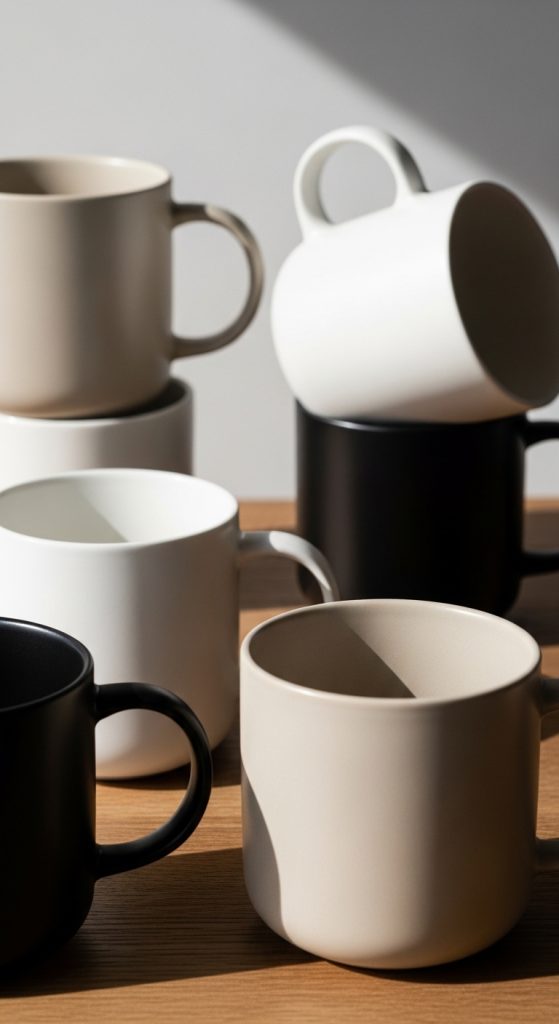
2. Minimalist Ceramic Mugs
Minimalist mugs are simple yet elegant pieces that focus on clean lines and functionality. To begin, prepare your clay and shape it using either a pottery wheel or hand-building techniques. If using a wheel, center the clay and pull it upward to form a cylindrical shape. Keep the walls even to ensure durability.
Once the mug body is formed, allow it to reach a leather-hard stage before attaching the handle. The handle can be made by pulling a strip of clay or shaping it manually. Attach it securely using slip and score both surfaces to create a strong bond.
Minimalist design emphasizes simplicity, so avoid excessive decoration. You may choose a smooth finish or subtle textures. Neutral glazes such as white, beige, or matte black work well for this style. Apply glaze evenly after bisque firing and fire the piece again to achieve the final finish.
These mugs are practical for everyday use and make excellent handmade gifts. This project helps you practice wheel-throwing skills, handle attachment, and achieving balanced proportions. It also introduces you to functional pottery design.
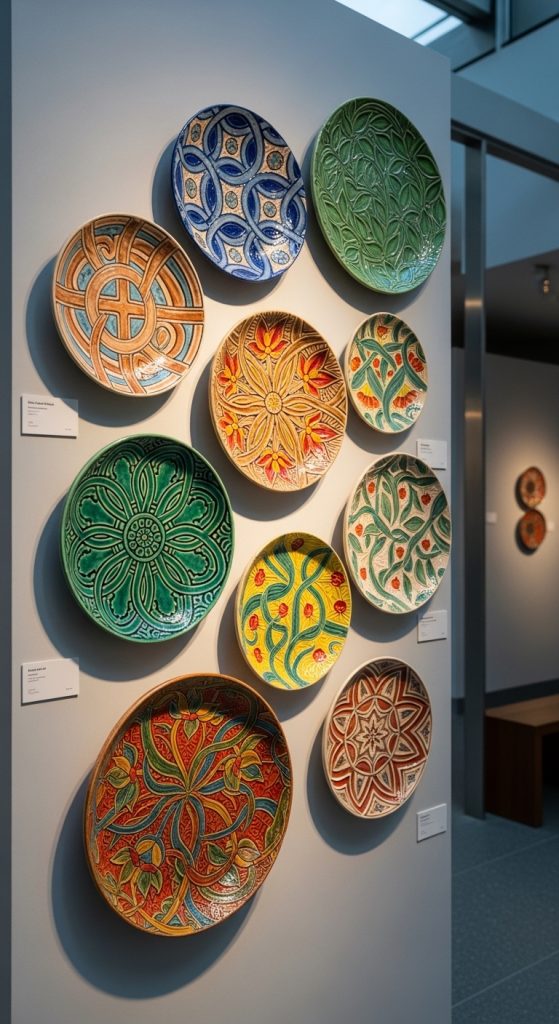
3. Decorative Wall Plates
Decorative wall plates allow you to explore artistic expression through ceramics. Start by rolling out a slab of clay and cutting it into a circular shape. You can use a template or a plate as a guide to ensure uniformity. Gently shape the slab into a shallow dish form by placing it over a mold.
At the leather-hard stage, you can begin decorating the surface. Techniques include carving patterns, painting with underglazes, or adding relief designs. You can also experiment with geometric shapes or nature-inspired motifs. Make sure to smooth any rough edges to prevent cracks during firing.
After drying completely, bisque fire the plate. Apply glaze according to your design, keeping in mind that decorative plates are often not used for food. Use bold or artistic glazes to create visual impact.
These plates can be hung on walls as art pieces, adding personality to your space. This project enhances your skills in slab construction, surface decoration, and artistic design. It is ideal for those who enjoy combining pottery with visual storytelling.
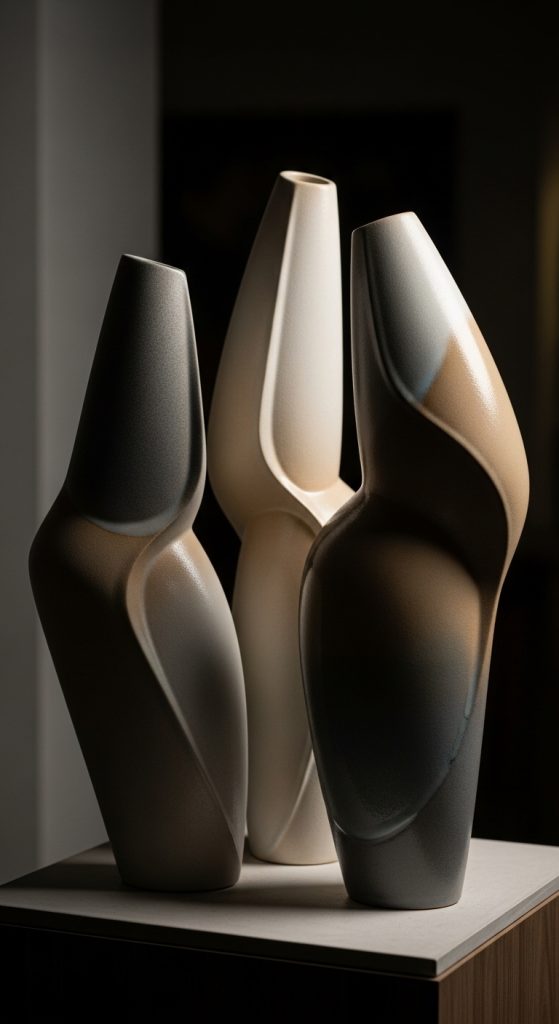
4. Sculptural Ceramic Vases
Sculptural vases go beyond functionality and focus on artistic form. Begin with well-prepared clay and decide on the shape you want to create. You can use coil-building techniques to construct unique, organic forms. Roll out coils and stack them layer by layer, blending them together to form a seamless structure.
Experiment with asymmetry, curves, and unusual openings to create a sculptural effect. Use tools to refine the surface and add subtle textures. Keep the walls thick enough to support the structure but not too heavy.
Allow the vase to dry slowly to avoid structural issues. After bisque firing, apply glaze selectively to highlight certain areas while leaving others raw for contrast. This adds depth and visual interest.
Sculptural vases are ideal for display and can serve as statement pieces in interior design. This project encourages creativity and helps you develop advanced hand-building techniques and an understanding of form and balance.
5. Personalized Name Plates
Personalized ceramic name plates are both decorative and meaningful. Start by rolling out a flat slab of clay and cutting it into a rectangular or custom shape. Smooth the surface carefully to prepare it for lettering.
Use carving tools or stamps to write names, quotes, or messages. You can also add decorative elements such as borders, patterns, or small sculpted designs. Ensure the lettering is clear and evenly spaced.
Allow the piece to dry slowly, then bisque fire it. Apply glaze to enhance the text and background contrast. You may use different colors to highlight the design.
These name plates can be used for home decor, office spaces, or as thoughtful gifts. This project helps you practice precision, lettering techniques, and design composition while creating something personal and unique.
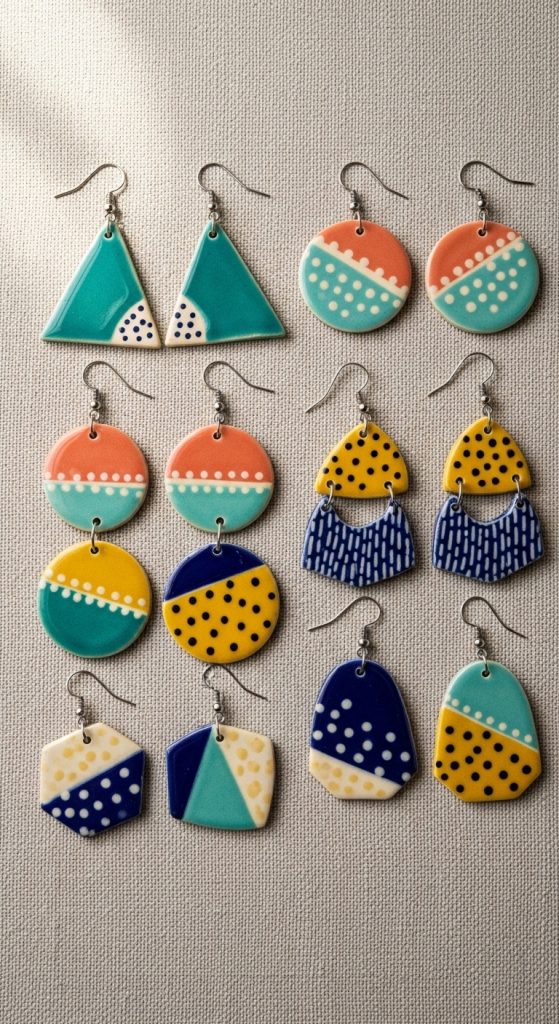
6. Ceramic Jewelry Pieces
Ceramic jewelry offers a lightweight and creative alternative to traditional materials. Begin by rolling out thin slabs of clay and cutting them into small shapes such as circles, triangles, or abstract forms. Use cutters or carve by hand.
Add texture or patterns using stamps or tools. Make small holes for attaching hooks or threads before the clay dries completely. Keep the pieces thin to ensure they remain lightweight after firing.
Once dry, bisque fire the pieces and apply glaze or paint. Bright colors, metallic finishes, or matte glazes can create different styles. After the final firing, attach metal findings such as hooks or chains.
Ceramic jewelry is versatile and allows for endless design possibilities. This project improves your attention to detail and introduces you to small-scale ceramic work.
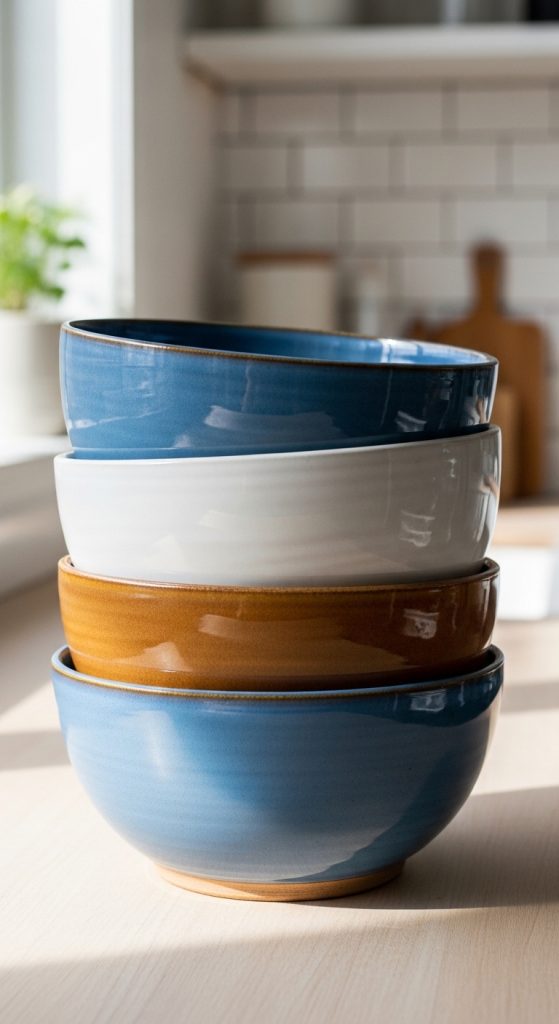
7. Functional Kitchen Bowls
Creating kitchen bowls is a practical and rewarding pottery project. Start by centering clay on a pottery wheel and shaping it into a bowl form. Focus on achieving even thickness and a smooth interior surface.
Once formed, trim the base to create a stable foot. Allow the bowl to reach leather-hard stage before refining its shape. Smooth any imperfections using a sponge.
After bisque firing, apply food-safe glaze to ensure the bowl is safe for everyday use. Choose colors that complement your kitchen style.
These bowls are useful for serving food and add a handmade touch to your kitchen. This project helps you develop wheel-throwing skills and understand functional pottery requirements.
8. Candle Holders
Ceramic candle holders combine aesthetics with function. Begin by shaping clay into cylindrical or sculptural forms. You can use a wheel or hand-building methods depending on your design.
Ensure the top has a secure space to hold a candle. You can also create cut-out patterns to allow light to pass through, creating beautiful shadows.
Allow the piece to dry slowly and bisque fire it. Apply glaze that complements the intended ambiance, such as warm tones or glossy finishes.
Candle holders are popular decorative items and make excellent gifts. This project encourages creativity while teaching you about structure and heat-resistant design.

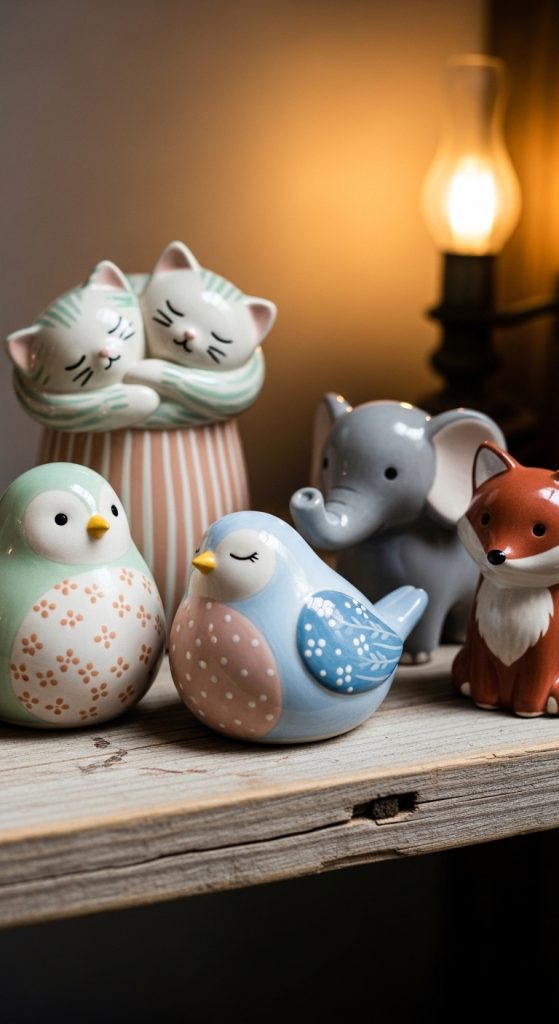
9. Animal Figurines
Animal figurines are a fun way to explore sculptural ceramics. Start with a solid piece of clay and shape it into the basic form of your chosen animal. Use tools to add details such as eyes, fur texture, and features.
Keep the proportions balanced and hollow out larger pieces to prevent cracking during firing. Allow the figurine to dry slowly before bisque firing.
Apply glaze or paint to bring the figure to life. Use natural colors or experiment with imaginative designs.
This project is ideal for developing sculpting skills and creativity. It allows you to express personality and storytelling through ceramics.
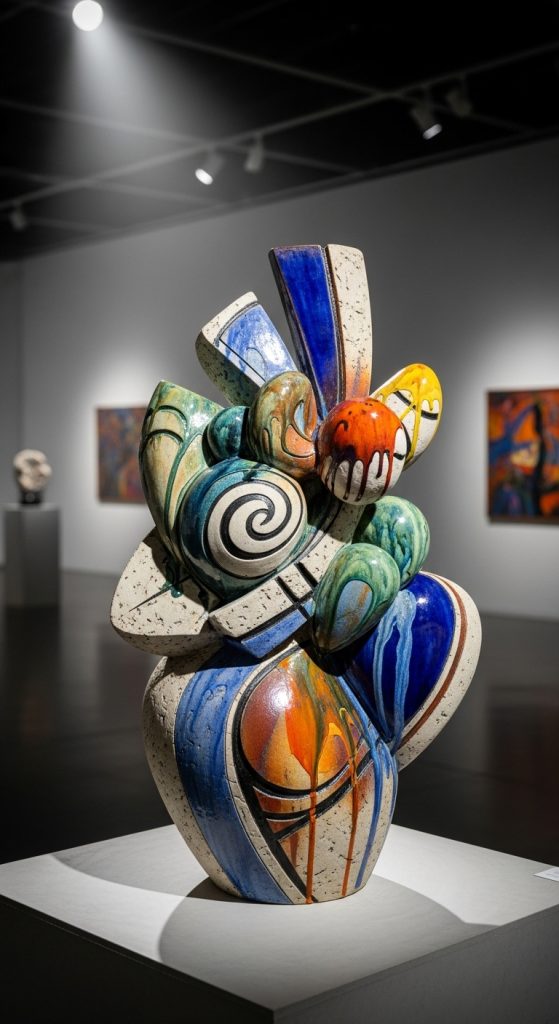
10. Abstract Ceramic Art Pieces
Abstract ceramic art pieces focus on creativity without strict rules. Begin with an idea or concept, then shape the clay using any technique you prefer. Combine slab, coil, and sculpting methods to create unique forms.
Experiment with textures, layers, and negative space. Abstract pieces often emphasize form, movement, and balance rather than function. Take your time refining the design.
After bisque firing, use glazes creatively to enhance the visual impact. You can combine colors, finishes, and techniques to achieve a distinctive look.
Abstract ceramics are perfect for artistic exploration and personal expression. This project encourages innovation and helps you push the boundaries of traditional pottery.