Planning a baby shower for a baby boy does not require expensive decorations or complex event styling. Many Pinterest ideas now focus on affordable DIY projects that create a polished and organized celebration using simple materials. Dollar Tree baby shower projects have become especially popular because they allow hosts to design coordinated decorations, party tables, and themed displays while staying within a controlled budget. These projects are practical for small home gatherings, backyard events, community halls, and apartment celebrations. They also support creative flexibility because many decorations can be customized with different colors, textures, and handmade details. In this article, readers will learn how to create ten detailed baby shower ideas specifically designed for boys using low-cost materials and beginner friendly methods. Each project focuses on practical decoration, organization, and visual presentation while maintaining a clean and modern aesthetic. The ideas include table centerpieces, balloon setups, treat stations, photo backdrops, and decorative storage concepts that work together to create a cohesive event environment. The goal is to provide realistic inspiration that combines affordability, creativity, and easy step by step execution for a memorable baby shower celebration.
Why This Idea Is Trending or Useful
Dollar Tree baby shower projects continue to trend across Pinterest inspiration boards because they combine affordability with strong visual impact. Many hosts now prefer budget ideas that still create a coordinated and aesthetic party environment without requiring professional event services. DIY decorations are especially useful because they allow complete customization of color themes, table arrangements, and handmade details. Baby shower styling for boys often includes soft blue palettes, neutral modern design elements, balloon decoration, and minimalist style centerpieces that can all be created using inexpensive materials. These projects are also highly accessible for beginners because most decorations require only simple tools and basic planning. Pinterest ideas focused on organization and easy project execution have increased in popularity as more people host celebrations at home or in smaller venues. Another reason these projects remain relevant is their flexibility. Decorations can be reused, rearranged, or adapted for birthdays and nursery home decor after the event. This practical value makes Dollar Tree baby shower ideas both visually appealing and cost effective for modern event planning.
Materials and Preparation
Preparing for Dollar Tree baby shower DIY projects begins with selecting a clear party theme and organizing materials before decorating starts. Common materials include balloons, foam boards, ribbons, plastic containers, artificial flowers, baby blocks, tissue paper, jars, disposable trays, wrapping paper, glue sticks, and printable signs. Additional decorative items such as blue tablecloths, white candles, wooden letters, miniature toys, and handmade banners help create a cohesive baby shower aesthetic. Basic tools include scissors, tape, glue guns, measuring tape, markers, and adhesive hooks. Preparation should also involve creating a layout plan for the event space. Identify where food stations, gift tables, photo areas, and seating arrangements will be placed before assembling decorations. This planning process helps maintain organization and prevents overcrowding. It is also useful to prepare color coordination in advance so that all decorations follow a consistent design direction. Most beginner friendly DIY projects become easier when materials are grouped by category and assembled step by step before the event day. Proper preparation improves efficiency and creates a more balanced and visually appealing baby shower setup.
Idea 1: Blue Balloon Arch Entrance
How to Create
A blue balloon arch entrance creates a strong visual focal point that immediately defines the baby shower theme. This decoration is commonly featured in Pinterest ideas because it transforms simple entryways into organized and festive spaces using inexpensive materials. The arch works especially well for baby boy celebrations because different shades of blue combined with white and silver balloons create a clean and modern aesthetic. This DIY project is beginner friendly since it relies on repetitive assembly rather than advanced decorating skills. The balloon arrangement also helps establish visual balance throughout the venue by introducing height and structure near the entrance. Many hosts combine this design with welcome signs or baby-themed banners to create a coordinated presentation. The overall effect feels polished while remaining affordable and realistic for home celebrations. Balloon arches are also flexible because they can be adjusted for small apartment spaces, outdoor events, or larger party halls. Their popularity continues to grow in modern baby shower decoration because they provide strong photographic appeal while maintaining simple execution methods suitable for budget ideas and creative planning.
Step-by-Step Guide
To create the balloon arch, begin by gathering balloons in three coordinating shades such as light blue, navy blue, and white. Inflate balloons in varying sizes to create depth and movement within the arrangement. Use balloon tape strips or fishing line to connect balloons securely while alternating colors evenly. Attach larger balloons first to establish the main structure, then fill gaps with smaller balloons for a fuller appearance. Secure the arch to the wall or doorway using removable adhesive hooks or strong tape. Add optional decorative details such as artificial greenery, baby-themed cutouts, or silver ribbon to increase texture without overcrowding the design. Position the arch around the entrance or behind the main table depending on available space. Proper spacing between balloon clusters prevents the arrangement from looking compressed. This easy project requires minimal materials and can usually be completed within a few hours. The final setup creates a welcoming and organized decorative statement that aligns with modern Pinterest inspiration and handmade celebration styling.

Idea 2: Baby Block Table Centerpieces
How to Make
Baby block table centerpieces are practical decorative pieces that combine organization with themed presentation. These centerpieces are commonly used in Pinterest ideas because they add height, structure, and recognizable baby shower symbolism to dining tables or dessert stations. The design typically uses lightweight boxes decorated with letters that spell baby-related words or initials. Soft blue and white tones create a clean visual effect suitable for modern design themes. This project works well because it can be customized using wrapping paper, ribbons, or painted surfaces while remaining inexpensive. The block arrangement also provides flexibility since the centerpieces can vary in size depending on table dimensions. Many hosts include flowers, balloons, or stuffed toys around the blocks for added decoration. This handmade setup creates visual consistency across the party environment while maintaining a beginner friendly assembly process. The structured shape of the blocks contributes to balanced table styling and supports coordinated event organization.
Execution Process
Start by collecting lightweight square boxes or foam cubes from discount craft sections. Cover each block with blue, white, or patterned wrapping paper using glue or double-sided tape. Cut large letters from cardstock or adhesive vinyl and attach one letter to each side of the block. Arrange blocks vertically or horizontally depending on table size and centerpiece height preference. Place the completed blocks on trays or decorative mats to create a finished appearance. Additional materials such as artificial flowers, tissue paper, or miniature baby items can be added around the base for texture and dimension. Ensure spacing remains balanced so the centerpiece does not obstruct guest interaction during the event. This step by step process supports efficient planning while maintaining visual simplicity. The completed centerpieces provide a polished decorative element that enhances the baby shower theme without requiring expensive supplies or complicated crafting methods.

Idea 3: DIY Dessert Table Backdrop
How to Create
A dessert table backdrop creates a dedicated visual zone that highlights cakes, snacks, and party treats while improving overall event presentation. This type of decoration is highly popular in Pinterest inspiration boards because it combines functionality with aesthetic styling. For a baby boy shower, the backdrop often includes blue fabrics, hanging paper decorations, banners, and baby-themed graphics arranged behind the dessert table. This decorative setup helps organize the space while directing attention toward the food display. It also enhances event photography by creating a clean and coordinated background. The DIY appeal comes from the ability to customize colors, wording, and decorative layering using low-cost materials. Beginner friendly assembly methods make this project practical for home decorators and first-time event planners. A well-designed backdrop strengthens the visual identity of the shower while maintaining affordability and realistic execution.
Setup Method
Begin by selecting a wall or open area behind the dessert table. Attach plastic tablecloths or lightweight fabric panels in coordinating blue and white tones to create the background layer. Add banners with baby-related phrases or the baby’s name using string and printed letters. Hang tissue paper fans, balloons, or paper pom-poms at varying heights for visual movement. Maintain even spacing between decorative elements to prevent clutter. Place the dessert table slightly forward from the backdrop to create depth and improve visibility. Additional lighting such as battery-operated string lights may be added for soft illumination. This easy project requires basic materials and minimal technical skill while producing a professional-looking result. The completed setup creates a cohesive focal point that supports both decoration and organization throughout the event.

Idea 4: Mason Jar Candy Station
How to Create
A mason jar candy station combines decorative styling with functional snack organization. This idea is frequently featured in Pinterest ideas because it creates a visually coordinated treat area using simple materials and clear containers. Blue candies, chocolates, marshmallows, and themed treats arranged in jars establish a clean and inviting display. The transparent containers also contribute to organization by making snacks easily accessible while maintaining decorative appeal. This project is particularly useful for small baby showers where space efficiency matters. The arrangement works well with minimalist style decoration because it relies on repetition and color consistency rather than excessive detailing.
Step-by-Step Guide
Collect glass jars or clear plastic containers in different sizes. Fill them with blue and white candies arranged by color or texture. Attach labels or handmade tags to each jar using ribbon or twine. Place jars on trays or risers to create varying heights within the candy station. Add small decorative signs and balloons around the display to strengthen the theme. Keep the arrangement symmetrical for a clean presentation. This beginner friendly setup requires limited tools and supports organized event styling.

Idea 5: Baby Onesie Banner Display
How to Create
A baby onesie banner display adds a personalized handmade element to the shower while serving as decorative wall art. Small paper or fabric onesies connected with ribbon create a playful and recognizable baby-themed feature. This idea remains popular in Pinterest inspiration because it combines simplicity with customization opportunities.
Execution Process
Cut onesie shapes from cardstock or patterned paper. Decorate them using markers, stickers, or printed baby phrases. Punch holes at the top and string them together using ribbon or twine. Hang the banner above tables or entryways. Maintain consistent spacing and color coordination for visual balance.

Idea 6: DIY Diaper Cake Centerpiece
How to Create
A diaper cake centerpiece combines practical gifts with decorative presentation. Rolled diapers arranged into tiered layers create a cake-like structure suitable for table decoration.
Step-by-Step Guide
Roll diapers individually and secure them with rubber bands. Arrange them in circular tiers using ribbon to hold the shape together. Add decorative bows, baby toys, or flowers between layers. Place the diaper cake on a tray for stability.

Idea 7: Wooden Crate Gift Table Styling
How to Create
Wooden crate styling creates an organized and rustic-inspired gift table arrangement. The layered crates add height variation while keeping gifts and cards neatly displayed.
Setup Method
Stack crates securely near the gift area. Add blue fabric liners, flowers, or baby signs inside the crates. Arrange gifts evenly to maintain balance. Decorative lighting can enhance the display.

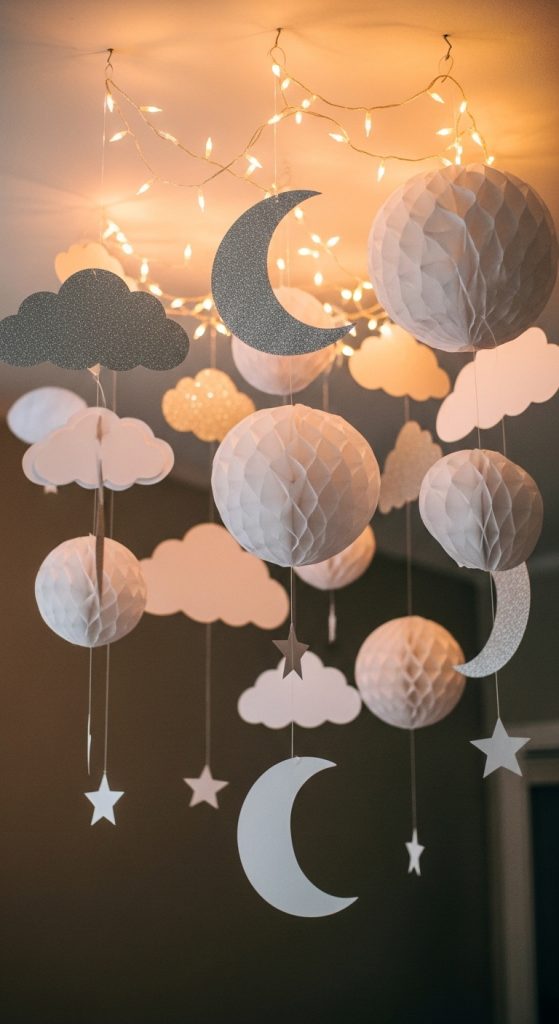
Idea 8: Cloud and Moon Hanging Decor
How to Create
Cloud and moon hanging decorations create soft overhead visual interest suitable for baby boy themes. This design supports modern and dreamy nursery-inspired aesthetics.
Execution Process
Cut cloud and moon shapes from foam board or cardstock. Paint them in white and silver tones. Attach clear string and suspend them from ceilings or wall hooks at different heights.
Idea 9: Personalized Photo Booth Corner
How to Create
A photo booth corner creates a dedicated photography space while improving event interaction and organization. This decorative area supports memorable guest experiences.
Step-by-Step Guide
Use fabric backdrops, balloons, and baby-themed props to build the booth area. Add signs and seating accessories. Maintain balanced lighting and open space for easy movement.

Idea 10: Blue Tableware Coordination Setup
How to Create
Coordinated blue tableware creates visual consistency across the dining area while supporting organized table presentation.
Setup Method
Use matching blue plates, cups, napkins, and utensils arranged evenly at each seat. Add simple centerpiece accents and folded napkins for a polished appearance.

Common Beginner Mistakes and How to Avoid Them
One common mistake is overcrowding the venue with too many decorative elements. Balanced spacing improves visual clarity and guest movement. Another issue is inconsistent color coordination, which weakens the overall theme. Maintaining a limited palette creates stronger design cohesion. Poor planning also leads to uneven table arrangements and incomplete setups. Organizing materials beforehand prevents delays and confusion during decoration.
Practical Tips for Better Results
Focus on repetition of colors and shapes to strengthen the baby shower theme. Prepare DIY materials in advance to reduce setup time. Use lightweight decorations for easier installation and repositioning. Keep major focal points such as dessert tables and entryways visually clear for stronger presentation.
Styling, Presentation, or Organization Ideas
Arrange decorations according to event zones including food areas, gift stations, and seating sections. Use height variation in centerpieces and displays to improve visual depth. Maintain open walking paths to support guest comfort and organization. Coordinated table linens and signage help unify the entire event design.
Budget or Time Planning
Dollar Tree baby shower projects are effective because they allow controlled spending while still producing aesthetic results. Prioritize large-impact decorations first, such as balloon arches and backdrops. Smaller accessories can then be added gradually. Preparing decorations several days before the event reduces stress and improves efficiency.
Creative Expansion and Advanced Inspiration
Advanced baby shower styling can include layered balloon installations, custom handmade signs, nursery-inspired lounge areas, and coordinated dessert displays. Combining rustic textures with minimalist style decoration creates modern visual contrast. Personalized keepsake stations and interactive guest activities can further expand the creative project while maintaining the affordable DIY structure.