Dollar Tree cutting board projects have become a strong presence in modern Pinterest ideas because they combine affordability, functionality, and creative transformation. A simple cutting board, typically designed for kitchen use, can be reimagined into decorative and organizational pieces through basic DIY techniques. These projects focus on turning low-cost materials into visually appealing home decor or practical household items. The appeal lies in accessibility, where beginners can achieve stylish results without advanced crafting experience or expensive supplies. This makes cutting board transformations a popular choice for easy project inspiration in home styling communities.
This article explores 10 structured cutting board project ideas that focus on practical application, design clarity, and beginner friendly execution. Each idea explains how a simple board can be repurposed into aesthetic and functional decor pieces. Readers will learn how to prepare materials, understand design direction, and execute step-by-step transformations that align with modern design trends. These projects can fit into kitchen styling, wall decoration, seasonal displays, or organization setups depending on the concept.
The usefulness of these projects lies in their versatility and budget friendly nature. A cutting board offers a strong base material that is easy to customize through painting, staining, engraving, or assembly techniques. With proper planning, these DIY concepts allow individuals to create handmade decor pieces that reflect minimalist style, rustic charm, or modern aesthetic design while maintaining practical household use.
Why This Idea Is Trending or Useful
Cutting board DIY projects are trending in Pinterest inspiration boards because they combine simplicity with creative transformation. A basic kitchen item becomes a foundation for artistic expression and home decoration. This aligns with current design preferences that focus on minimal effort with high visual impact. Many people look for budget ideas that allow them to refresh home spaces without large investments, and cutting board projects provide exactly that balance.
These projects are practical because they require minimal tools and can be completed using accessible materials. The concept supports beginner friendly crafting, where individuals can learn basic techniques such as painting, layering, and assembling without technical difficulty. This makes it suitable for those exploring DIY for the first time or looking for creative projects that do not require advanced skills.
The design relevance is also significant because cutting board transformations fit into modern home decor trends. Rustic, farmhouse, and minimalist style aesthetics all use wooden textures as foundational elements. By repurposing cutting boards, users can create decorative items that match current trending ideas in interior styling. The adaptability of these projects ensures they remain relevant across different seasonal and thematic decorations.
Materials and Preparation
Preparing for Dollar Tree cutting board projects requires a clear understanding of materials, tools, and workspace organization. The primary material is a wooden or bamboo cutting board, which serves as the base for all design transformations. Additional materials may include acrylic paint, wood stain, adhesive vinyl, stencils, rope handles, hooks, and decorative hardware depending on the chosen project. These materials support different styles ranging from modern design to rustic handmade aesthetics.
Essential tools include paintbrushes, sanding paper, hot glue gun, scissors, measuring tape, and a cleaning cloth. These tools help ensure smooth application and precise assembly. Sanding the surface lightly before starting is important to improve paint adhesion and create a clean working base. A stable flat workspace is also necessary to maintain accuracy during design application.
Preparation involves selecting a project concept before starting any physical work. This includes deciding whether the cutting board will be used as wall decor, kitchen signage, serving tray, or organizational tool. Planning helps determine material usage and prevents unnecessary adjustments during execution. Proper layout sketching is recommended for alignment and spacing accuracy. This preparation stage ensures that each DIY project follows a structured and intentional design process.
MAIN IDEAS SECTION
Idea 1: Rustic Kitchen Sign Cutting Board Decor
How to Create
This project transforms a simple cutting board into a rustic kitchen sign that enhances home decor with a farmhouse-inspired aesthetic. The concept focuses on using the natural wooden surface as a background for typography-based design. The cutting board becomes a decorative display piece that can be hung on kitchen walls or placed on countertops. The rustic style is achieved by combining distressed paint effects, neutral tones, and handwritten or stencil lettering. This idea fits well into Pinterest ideas that emphasize warm, homey, and handmade decoration styles.
The visual appeal comes from the contrast between raw wood texture and painted design elements. Common phrases such as kitchen labels or food-related words are often used to reinforce the theme. This project is suitable for minimalist style homes because it avoids heavy decoration and focuses on clean visual communication. It also supports seasonal decoration updates by allowing interchangeable signage designs.
To create this piece, the cutting board is first sanded lightly to smooth the surface. A base coat or stain is applied depending on the desired rustic tone. Once dry, lettering is added using stencils or freehand painting techniques. Distressing edges with sandpaper enhances the aged effect. A hanging rope or hook is attached at the top for display. The final result is a functional decorative sign that blends practicality with handmade creative ideas.

Idea 2: Hanging Wall Organizer Board
How to Create
This cutting board project turns a basic board into a wall-mounted organizer designed for lightweight storage. It is commonly used in kitchen or entryway spaces to hold keys, small tools, or decorative items. The structure focuses on combining hooks, small baskets, or clips attached to the board surface. This concept aligns with organization and home decor inspiration trends that emphasize functional design with aesthetic value.
The appeal of this project lies in its ability to transform a simple flat surface into a practical storage solution. It supports modern design principles by reducing clutter while maintaining visual harmony. The wooden texture of the cutting board adds warmth to interior spaces, making it suitable for both rustic and minimalist environments. This idea is especially useful for small spaces where efficient storage is essential.
To create this organizer, the cutting board is first cleaned and optionally stained for durability. Hooks or small hardware pieces are attached evenly across the surface using screws or strong adhesive. Additional elements such as mini baskets or clips can be mounted depending on storage needs. A mounting system is added at the back for wall placement. The final result is a compact, handmade organization tool that combines utility and aesthetic design.

Idea 3: Tiered Tray Style Display Board
Execution Process
This project converts a cutting board into a tiered tray style display piece used for decorative arrangements. It is designed for seasonal decor, small home accents, or tabletop styling. The cutting board serves as the base layer, often combined with a stand or elevated support structure. The focus is on creating height variation and layered visual appeal, which is a key element in Pinterest ideas related to table styling and home presentation.
The design is popular because it allows flexible decoration changes depending on seasons or themes. Items such as candles, small plants, or decorative objects can be arranged on the surface. This makes it suitable for creative project enthusiasts who enjoy frequently updating home displays. The wooden texture provides a neutral base that complements different color palettes and decorative elements.
To execute this project, the cutting board is secured onto a stable stand or pedestal base. The surface is then styled using arranged decor items in balanced groupings. Optional painting or staining can be applied to match seasonal themes. The final setup creates a layered decorative display that enhances table aesthetics and interior styling.

Idea 4: Farmhouse Recipe Holder Board
Step-by-Step Guide
This cutting board idea transforms the base into a functional recipe holder designed for kitchen use. It combines practical utility with decorative farmhouse styling. The board is modified to hold recipe cards, printed pages, or small books using clips or wire attachments. This design is popular in DIY tutorial communities because it blends cooking functionality with aesthetic home decor.
The appeal of this project lies in its ability to organize kitchen spaces while maintaining visual charm. It is often styled with rustic finishes, handwritten labels, or neutral tones to match farmhouse interiors. The structure supports easy access to recipes while keeping countertops organized. It is also beginner friendly due to its simple assembly process.
To create this piece, clips or wire holders are attached to the top section of the cutting board. The surface may be stained or painted depending on the desired aesthetic. A support stand is added to allow upright placement. The final result is a functional kitchen accessory that enhances organization and decor simultaneously.

Idea 5: Decorative Layered Frame Board
How to Create
This project uses a cutting board as a base for creating a layered decorative frame. It is designed to hold printed quotes, seasonal artwork, or textured backgrounds. The concept focuses on layering materials such as fabric, paper, or wooden accents onto the board surface to create depth. This aligns with modern design inspiration that emphasizes dimensional decor.
The layered frame approach allows flexibility in design changes. Users can update inserts depending on seasons or events, making it a versatile home decor solution. The wooden board acts as a sturdy foundation that supports various decorative overlays. This idea fits well into minimalist style interiors where simple yet structured decor is preferred.
To create this frame board, the surface is first prepared with a neutral base finish. Decorative layers are then attached using adhesive or framing borders. Clips or holders may be added to secure interchangeable designs. The final result is a customizable display board that supports creative decoration rotation.

Idea 6: Mini Kitchen Shelf Board Conversion
How to Create
This project transforms a cutting board into a small wall shelf designed for lightweight kitchen storage. It focuses on attaching brackets or supports to turn the flat board into a functional shelf. This idea is widely used in budget ideas for small space organization.
The shelf can hold lightweight items such as spice jars, small decor pieces, or kitchen accessories. It is ideal for compact spaces where additional storage is needed without installing large fixtures. The wooden texture enhances warmth and blends well with various interior styles.
To create this shelf, brackets are attached securely beneath the cutting board. The board is then mounted on the wall using screws. Optional staining or painting can be applied for aesthetic matching. The final result is a functional mini shelf that combines practicality and handmade design.

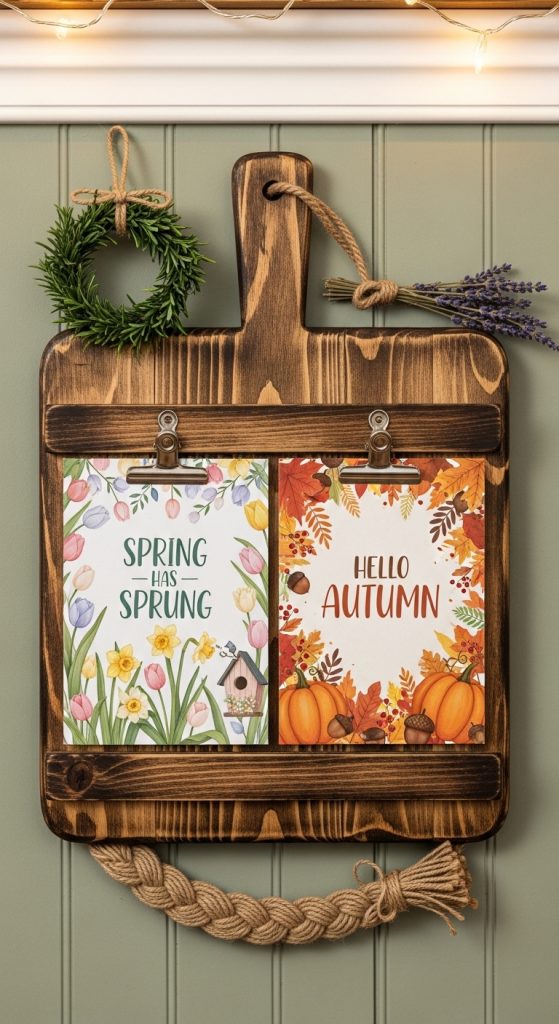
Idea 7: Seasonal Sign Rotation Board
How to Create
This cutting board project creates a rotating seasonal sign system. The board acts as a base for interchangeable decorative panels representing different seasons or holidays. This idea is popular in creative ideas collections due to its flexibility and reuse potential.
The concept allows users to refresh home decor without replacing the entire piece. It supports seasonal themes such as spring, summer, autumn, and winter through interchangeable designs. This aligns with trending ideas focused on sustainable and reusable decor.
To create this system, attachment points such as clips or slots are added to the board. Decorative panels are created separately and inserted based on season. The final result is a reusable seasonal display system.
Idea 8: Entryway Key Holder Board
How to Create
This project transforms a cutting board into an entryway key holder designed for daily organization. Hooks are attached to hold keys, small accessories, or lightweight items. It combines functionality with decorative home styling.
The design is suitable for modern households seeking organization solutions. The wooden base adds warmth and blends with entryway decor themes. It is simple yet highly practical for daily use.
To create it, hooks are evenly installed on the board surface. A mounting system is added for wall placement. Optional decoration enhances visual appeal. The final result is a functional entryway organizer.

Idea 9: Candle Display Accent Board
Step-by-Step Guide
This cutting board idea creates a decorative candle display platform. It is designed for tabletop styling and ambient decor arrangements. The board serves as a stable base for candles and small decorative elements.
The appeal lies in its ability to enhance atmosphere in living spaces. It fits well into minimalist and rustic interior themes. The wooden texture complements soft lighting effects.
To create this display, the board is cleaned and optionally stained. Candles and decor elements are arranged on top. The final result is a simple decorative accent piece.

Idea 10: Photo Display Memory Board
How to Create
This project converts a cutting board into a photo display board for personal memories. It uses clips, strings, or frames to hold printed photos. The design focuses on personalization and visual storytelling.
The concept is popular in Pinterest ideas because it blends emotion with decor. It allows flexible arrangement of images and decorative elements. It fits well into home decor themes focused on personalization.
To create it, clips or string lines are attached to the board. Photos are arranged in balanced layout. The final result is a handmade memory display board.

Common Beginner Mistakes and How to Avoid Them
A common mistake in cutting board DIY projects is skipping surface preparation, which affects paint or adhesive durability. Another issue is overcrowding designs, which reduces visual clarity. Improper alignment of hooks or attachments can also affect functionality. To avoid these problems, careful planning, measurement, and surface treatment are essential before starting any project.
Practical Tips for Better Results
Better results come from consistent preparation and controlled application of materials. Light sanding improves adhesion and finish quality. Using neutral base colors helps maintain modern design appeal. Balanced spacing ensures visual harmony. Testing layout before final attachment prevents errors and improves accuracy in DIY execution.
Styling, Presentation, or Organization Ideas
Cutting board projects can be styled in multiple ways depending on home decor themes. Rustic finishes create farmhouse appeal, while clean painted surfaces support minimalist style. Grouping multiple boards together enhances wall presentation. Seasonal decoration updates keep designs fresh and relevant. Thoughtful arrangement improves overall visual impact.
Budget or Time Planning
These projects are efficient in both time and cost. Most designs can be completed within a short timeframe using basic materials. Planning reduces unnecessary adjustments and material waste. Simple designs require fewer tools, making them accessible for beginners. Budget friendly execution is achieved through reuse and minimal supply usage.
Creative Expansion and Advanced Inspiration
Advanced variations include combining multiple cutting boards into layered wall art or integrating lighting elements for enhanced visual effect. Mixed material designs using fabric, metal, or rope can increase depth. Custom engraving or painted artwork adds personalization. These expansions support creative project development and long-term inspiration for DIY enthusiasts.