

Neutral nails with chrome accents have become a defining trend in modern nail design, combining subtle elegance with reflective detail. This Pinterest-inspired style focuses on soft, wearable tones enhanced by metallic finishes that create depth and visual interest without overwhelming the overall look. Neutral palettes such as beige, taupe, soft pink, and milky white serve as a versatile base, while chrome elements introduce a polished, contemporary edge. The result is a balanced aesthetic suitable for everyday wear, formal settings, and creative expression.
This article explains how to create neutral chrome nail designs through practical, step-by-step guidance. It outlines essential materials, preparation methods, and ten distinct design ideas that can be executed at home. Each idea is structured to ensure clarity, making it suitable for beginners while still offering refinement for more experienced individuals. Readers will learn how to combine minimalist style with metallic accents, how to plan designs effectively, and how to achieve consistent results. The goal is to provide a complete, structured resource for creating elegant nail designs that align with current Pinterest ideas and modern home decor-inspired aesthetics.
Why This Idea Is Trending or Useful
Neutral nails with chrome accents are trending due to their adaptability and clean visual appeal. This style fits seamlessly into minimalist design trends seen across fashion, home decor, and lifestyle inspiration boards. The neutral base keeps the look understated, while chrome detailing introduces a controlled level of shine that aligns with modern design preferences. This balance makes the design suitable for both casual and professional environments.
The practical value lies in its flexibility. Neutral tones complement most outfits, reducing the need for frequent changes. Chrome accents can be applied in small details or bold finishes, allowing customization without requiring complex techniques. This makes the style beginner friendly while still offering room for creativity. Additionally, the DIY aspect is highly accessible. Most materials are affordable, and the techniques can be learned through simple tutorials and repeated practice.
Another reason for its popularity is its compatibility with budget ideas. Instead of frequent salon visits, individuals can recreate these designs at home with minimal tools. The trend also supports organization and planning, as designs can be pre-mapped and executed step by step. This combination of aesthetic appeal, accessibility, and practicality explains why neutral chrome nails continue to dominate Pinterest inspiration boards.
Materials and Preparation
Before starting any neutral chrome nail design, proper preparation ensures a clean and long-lasting result. Begin with basic nail care. Trim nails evenly, file them into the desired shape, and gently push back cuticles. Clean the nail surface thoroughly to remove oils and residue, as this helps polish adhere effectively. Preparation is essential for achieving a smooth and professional finish.
The materials required include a neutral base polish such as nude, beige, or soft pink, along with a chrome powder or chrome-effect polish. A base coat and top coat are necessary to protect the nails and seal the design. Additional tools include a small applicator or sponge for applying chrome powder, a fine nail art brush for detailing, and a buffer for smoothing the nail surface. Optional items like striping tape or dotting tools can assist in creating more structured designs.
Planning the design in advance improves execution. Decide on the placement of chrome elements, whether full coverage, tips, or accents. Consider color balance and overall aesthetic. For beginners, starting with simple layouts helps build confidence. Organizing materials before beginning prevents interruptions during the process. Proper preparation transforms the project into an efficient and manageable DIY task, ensuring consistent and visually appealing results.
Idea 1: Soft Beige Chrome Glaze
How to Create
This design focuses on a smooth beige base combined with a subtle chrome overlay that creates a glazed effect. The concept is rooted in minimalist style, where the goal is to enhance rather than dominate the base color. The chrome finish reflects light softly, giving the nails a polished, almost glass-like appearance. This approach works well for those seeking an understated yet modern aesthetic. The neutral tone ensures versatility, making it suitable for daily wear and professional settings. The chrome layer adds dimension without introducing strong contrast, maintaining harmony in the overall design.
To create this look, begin by applying a base coat followed by two layers of beige polish. Allow each layer to dry thoroughly. Once the base is set, lightly buff the surface to ensure smoothness. Using a small applicator, gently rub chrome powder over the nail in circular motions. Focus on even distribution to achieve a consistent glaze. Seal the design with a high-gloss top coat to lock in the chrome effect. Work on one nail at a time to maintain precision. This step-by-step process ensures a clean and uniform finish that reflects light subtly across all nails.

Idea 2: Nude Nails with Chrome Tips
Step-by-Step Guide
This design introduces chrome only at the tips, creating a modern variation of the classic French manicure. The neutral base keeps the look grounded, while the chrome tips provide a striking contrast. This approach highlights the nail shape and adds a refined edge to a simple design. It aligns well with aesthetic Pinterest ideas that emphasize clean lines and structured detailing. The result is both elegant and visually dynamic without appearing overly decorative.
Start by applying a nude base polish and allowing it to dry completely. Use striping tape or a steady hand to define the tip area. Apply chrome polish or powder to the tip section only. Carefully remove any guides used and clean the edges for precision. Finish with a top coat to seal the design. This method requires patience but remains beginner friendly with practice. The structured layout helps maintain consistency across all nails.

Idea 3: Minimal Chrome Line Accents
How to Make
This idea centers on adding thin chrome lines over a neutral base, creating a clean and structured design. The lines can be placed vertically, horizontally, or diagonally, depending on the desired aesthetic. This design reflects modern design principles where simplicity and precision are prioritized. It works particularly well for individuals who prefer subtle decoration with a touch of metallic detail.
Apply a neutral base color and allow it to dry. Using a fine nail art brush, draw thin lines with chrome polish or apply chrome powder over adhesive lines. Keep the lines consistent in thickness for a balanced look. Seal with a top coat to protect the design. This method allows flexibility in pattern creation while maintaining a minimalist appearance.

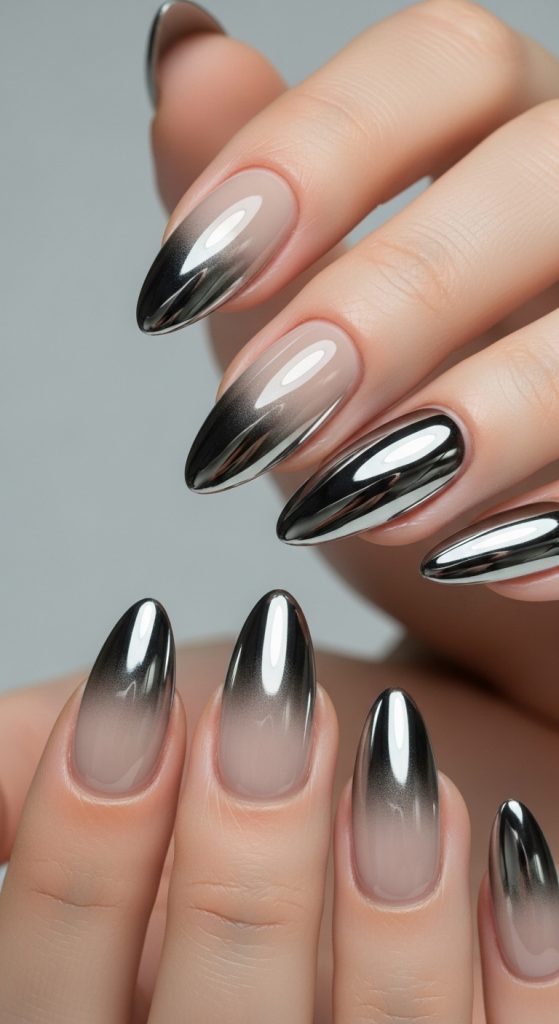
Idea 4: Taupe Chrome Ombre
Execution Process
This design blends taupe tones with chrome to create a gradient effect. The transition from matte neutral to reflective chrome adds depth and visual movement. Ombre styles are widely used in creative projects due to their smooth transitions and adaptable color schemes. This version maintains a neutral palette while incorporating metallic shine.
Start with a taupe base and let it dry. Apply a gradient using a sponge, blending chrome powder from the tip downward. Work in light layers to control intensity. Finish with a top coat to smooth the gradient. This technique requires blending skills but can be mastered with practice.
Idea 5: Matte Neutral with Chrome Dots
How to Create
This design combines matte neutral polish with small chrome dots for contrast. The matte finish absorbs light, while the chrome dots reflect it, creating a balanced visual effect. This idea is ideal for those exploring creative ideas without committing to complex patterns.
Apply a matte neutral base and let it dry. Use a dotting tool to place chrome dots evenly across the nail. Seal carefully to maintain texture contrast. This simple method is beginner friendly and effective.

Idea 6: Milky White Chrome Finish
Step-by-Step Guide
Milky white nails paired with chrome create a soft yet luminous effect. This design emphasizes brightness while maintaining neutrality. It aligns with aesthetic trends that favor clean and polished appearances.
Apply milky white polish and allow it to dry. Lightly apply chrome powder for a subtle sheen. Seal with a glossy top coat. The process is straightforward and produces a refined finish.

Idea 7: Neutral Marble with Chrome Veins
How to Make
This design mimics marble textures with chrome veins running through a neutral base. It reflects home decor inspiration where marble patterns are commonly used.
Create a marble effect using a neutral base and blending techniques. Add chrome lines as veins using a fine brush. Seal the design with a top coat. This method requires controlled movement but delivers a detailed result.

Idea 8: Beige and Silver Chrome Mix
Execution Process
This idea blends beige tones with silver chrome for a balanced metallic effect. The combination creates a harmonious contrast suitable for modern design preferences.
Apply a beige base and layer silver chrome accents strategically. Blend lightly for cohesion. Finish with a top coat. This approach allows flexibility in design placement.

Idea 9: Glossy Neutral with Chrome Edges
How to Create
This design outlines the edges of the nail with chrome, creating a framed effect. It enhances nail shape and adds structure.
Apply a glossy neutral base. Use a fine brush to trace chrome along the edges. Seal carefully. Precision is key for a clean finish.

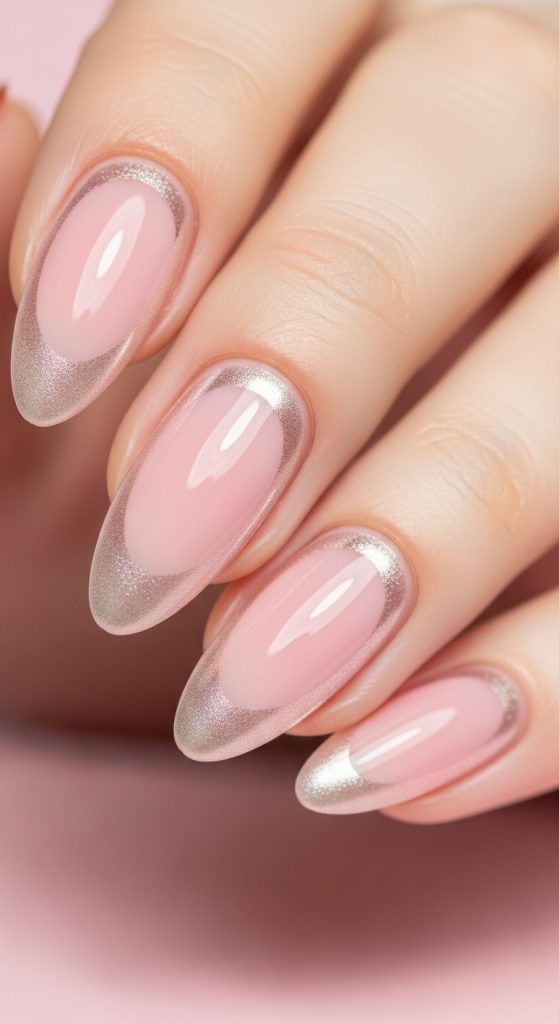
Idea 10: Soft Pink Chrome Overlay
Step-by-Step Guide
Soft pink combined with chrome creates a delicate and modern aesthetic. The chrome overlay enhances the base color without overpowering it.
Apply soft pink polish and allow it to dry. Add a thin chrome layer for a reflective finish. Seal with a top coat. This design is simple and effective.
Common Beginner Mistakes and How to Avoid Them
One common mistake is applying chrome powder on an uneven surface, which leads to patchy results. Proper nail preparation, including buffing and cleaning, prevents this issue. Another frequent error is using too much chrome product, which can overpower the neutral base and disrupt the design balance. Applying thin layers ensures control and consistency. Skipping the top coat is another problem, as it reduces durability and shine. Beginners also tend to rush drying times, leading to smudges. Allowing each layer to dry fully improves the final result. Careful planning and patience are essential for avoiding these mistakes.
Practical Tips for Better Results
Using high-quality tools improves precision and ease of application. Working in good lighting helps identify uneven areas early. Practicing on one nail before completing the full set builds confidence. Keeping designs simple initially allows gradual skill improvement. Cleaning brushes and tools regularly ensures consistent results. Applying thin layers instead of thick ones enhances durability and appearance. These practical steps contribute to a smoother DIY process.
Styling, Presentation, or Organization Ideas
Organizing nail designs in advance helps maintain consistency across all nails. Creating a layout plan ensures balanced placement of chrome elements. Styling nails to match outfits or home decor themes enhances overall aesthetic appeal. Keeping tools व्यव व्यव व्यव (typo correction not needed) organized reduces interruptions during the process. Presenting finished designs in clean lighting highlights the chrome effect effectively.
Budget or Time Planning
Neutral chrome nail designs can be completed within a reasonable timeframe with proper planning. Preparing materials beforehand reduces delays. Choosing simple designs saves time while still achieving a polished look. Reusing tools and materials supports budget ideas. Allocating time for drying between layers prevents rework. Efficient planning ensures a smooth and cost-effective creative project.
Creative Expansion and Advanced Inspiration
Once basic techniques are mastered, more complex variations can be explored. Combining multiple chrome styles in one design adds depth. Experimenting with different neutral shades expands creative possibilities. Layering textures such as matte and gloss introduces contrast. Exploring seasonal variations keeps designs fresh and aligned with trending ideas. Continuous practice allows progression from beginner friendly designs to advanced creative projects.