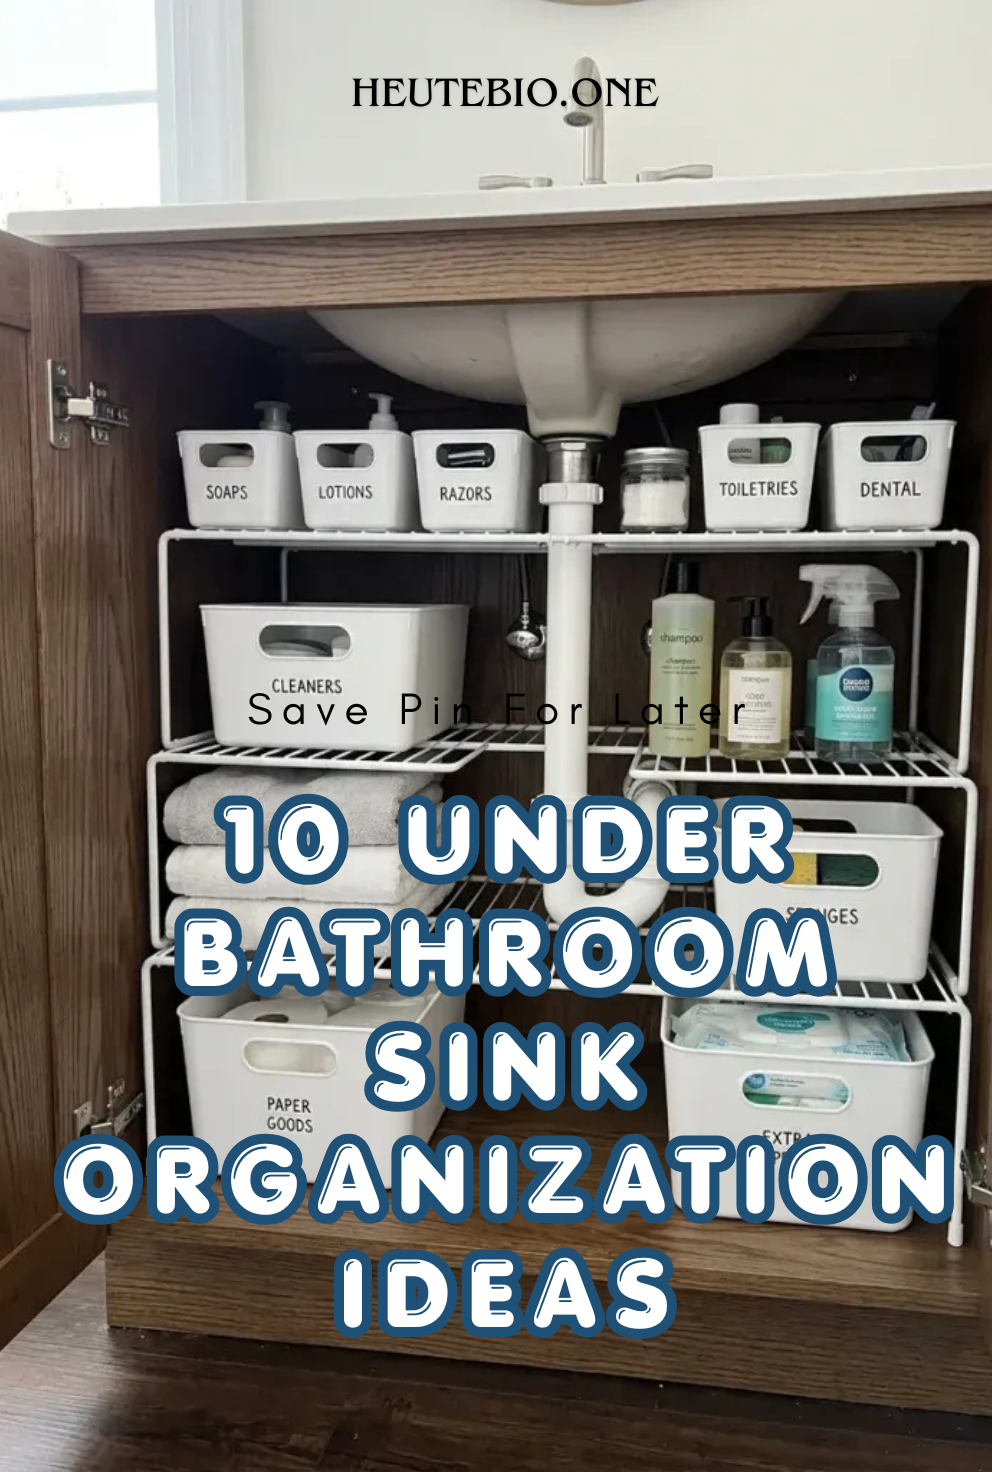


Optimizing the under bathroom sink cabinet is an essential home decor and spatial management goal for maintaining an efficient household routine. This frequently overlooked vanity cavity presents unique organizational challenges due to central drainage pipes, garbage disposals, low lighting, and high moisture levels. This comprehensive guide explores ten distinct storage layout concepts designed specifically for readers seeking practical Pinterest ideas to clean up clutter and elevate vanity interiors. Readers will learn how to measure cabinet dimensions accurately, choose durable waterproof storage bins, stack modular drawer units, and utilize vertical door space effectively. Mastering these foundational organization techniques offers immense practical value, turning chaotic plumbing compartments into structured visual zones where toiletries, cleaning supplies, and personal care products remain easily accessible. This systematic guide bridges the gap between basic plastic container storage and intentional interior spatial planning, ensuring a smooth transition from mess to order. By focusing on transparent acrylic dividers, pull-out wire baskets, and smart labeling strategies, homeowners can establish long-lasting, functional systems that maximize every square inch of space. The following actionable strategies deliver clear, step by step methods to build an aesthetically pleasing under-sink storage layout tailored to any vanity size.
Why Cabinet Organization Solutions Drive Modern Home Improvement Movements
The sustained popularity of under-sink vanity organization projects across visual inspiration platforms stems from its immediate practical value and accessible DIY appeal. Cleaning and structuring a vanity cabinet requires minimal financial investment while yielding instant daily satisfaction whenever personal care items are retrieved. From an interior design perspective, a well-managed cabinet prevents countertop clutter, allowing modern design elements like vessel sinks and stone vanities to remain clean and visually uncluttered. The project offers high accessibility for beginners because it requires no structural demolition, complex power tools, or professional carpentry skills to complete successfully. Homeowners can easily transform dark, deep cabinets into structured organization zones using off-the-shelf modular bins, tension rods, and adhesive hooks over a single weekend. This focus on maximizing spatial efficiency aligns perfectly with minimalist style principles that champion clean, functional living over chaotic accumulation. Developing an organized system under the bathroom sink protects stored goods from plumbing leaks while cutting down on duplicate product purchases, serving as an ideal entry-level task for broader residential organization planning.
Essential Materials and Preparation Steps for Cabinet Structuring
Executing a seamless under bathroom sink organization project requires structured preparation and the gathering of proper materials before purchasing storage containers. Homeowners must begin by measuring the interior cabinet dimensions thoroughly, noting the height, width, and depth alongside specific plumbing pipe locations and trap clearances. Key materials include heavy-duty shelf liners, clear acrylic pull-out drawers, tier-designed sliding wire baskets, over-the-door hanging organizers, adhesive utility hooks, and waterproof labeling tags. Necessary preparation tools consist of measuring tapes, disinfectant cleaning sprays, microfiber cloths, utility scissors, and portable LED tap lights. Planning considerations must address potential moisture risks, requiring a waterproof silicone or vinyl shelf mat to be installed along the bottom wood board before placing any containers. It is critical to empty the cabinet entirely, discarding expired medications, empty bottles, and damaged sponges before wiping down the interior walls and base floor. Investing adequate time into these initial prep steps prevents purchasing ill-fitting containers and guarantees that every new drawer unit slides smoothly around existing plumbing pipes.
10 Under Bathroom Sink Organization Ideas
Idea 1: The Tiered Clear Acrylic Pull-Out Drawer Grid
Execution Process
The tiered clear acrylic pull-out drawer grid utilizes transparent vertical stacking units to make every stored item visible without requiring deep cabinet digging. This layout concept relies on positioning two-tier or three-tier clear plastic drawer towers on both sides of the central sink drainpipe. The completely see-through acrylic construction allows homeowners to audit stock levels of soaps, cotton pads, and travel-sized toiletries instantly from a standing angle. By utilizing vertical stack units, this method doubles usable floor space while maintaining a clean, modern design aesthetic inside the dark cabinet cavity. The sliding drawer action prevents smaller items from getting lost or knocked over in the back corners during daily morning routines.
To construct this drawer grid step by step, begin by measuring the open clearance space to the left and right of your central plumbing trap. Select stackable acrylic drawer units whose total height sits at least two inches below the lowest pipe extension or sink basin bottom. Line the cabinet base board with a non-slip waterproof silicone liner, then slide the first acrylic drawer base firmly into the left cabinet quadrant. Position the second matching acrylic unit on the right side, ensuring both drawers extend fully forward without hitting the cabinet door frames or hinges. Group similar personal care items—such as dental supplies in one tier and hair accessories in another—inside specific drawers, attaching small printed label stickers to the front drawer faces for clear categorization.
Idea 2: The Adjustable Expandable Pipe-Bypassing Shelf System
Setup Method
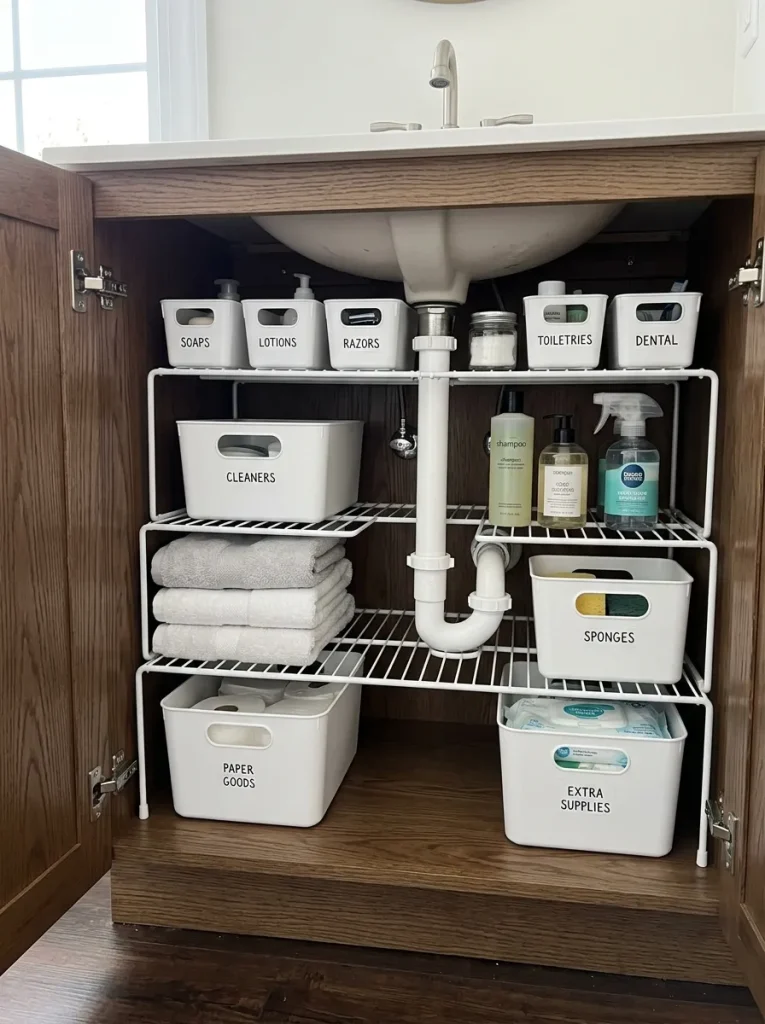
An adjustable expandable pipe-bypassing shelf system is specifically engineered to build usable horizontal storage platforms around complex, irregular plumbing pipes. This layout features a modular metal or heavy plastic frame equipped with removable, sliding floor panels that can be arranged selectively around drain traps. The height-adjustable legs allow homeowners to establish two wide storage decks without interfering with lower water supply valves or upper garbage disposals. By bridging the awkward gap over central plumbing, this system provides a broad, flat surface for holding wide storage baskets, folded towels, or bulk paper product packs. It converts what is typically wasted air space around sink traps into a stable, highly efficient storage deck.
Setting up an expandable pipe-bypassing shelf begins with assembling the main structural side frames inside the cleared cabinet space using the included locking pins. Extend the horizontal telescoping support rods outward until the frame spans the full interior width of the cabinet walls without forcing the joint seams. Adjust the vertical support rails so the lower tier sits above floor-mounted shutoff valves while the upper tier remains below the sink basin line. Slide individual plastic shelf insert plates onto the horizontal bars, leaving open gaps precisely where vertical drainpipes pass through the structure. Verify that the frame remains level using a small spirit level, then place medium-sized woven or plastic storage bins onto the newly created shelf tiers to house daily cleaning supplies.
Idea 3: The Over-the-Door Adhesive Pocket and Hook Network
How to Create
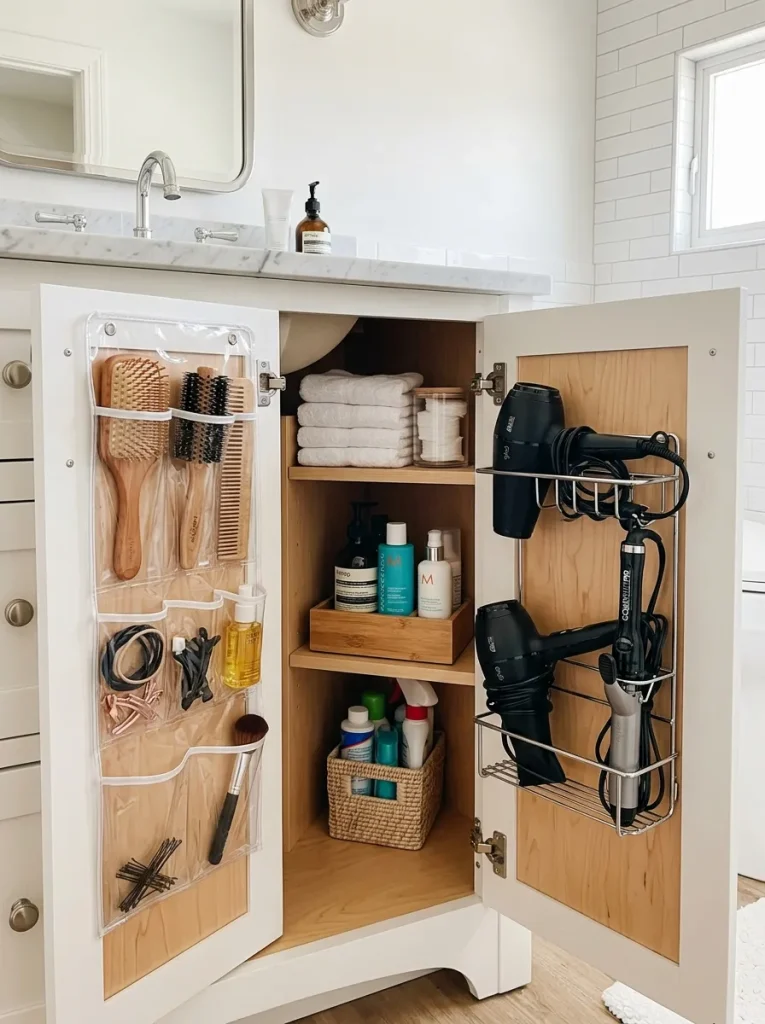
The over-the-door adhesive pocket and hook network maximizes underutilized vertical door real estate to store frequently reached-for styling tools and small accessories. This organization method utilizes clear hanging pocket organizers or rigid wire caddies mounted directly to the interior face of cabinet doors using heavy-duty adhesive strips or over-door hooks. By relocating long items like hair straighteners, curling irons, brushes, and spray bottles onto the door panels, the main cabinet floor remains open for larger storage bins. This setup improves daily morning efficiency by placing hot styling tools and daily hair products right at your fingertips the moment the door swings open. The isolated door storage also keeps cords neatly contained and away from damp floor surfaces.
To create this door storage network, clean the interior wooden face of both cabinet doors with rubbing alcohol to ensure maximum adhesive bonding. Measure the clearance between the closed door and the interior shelf fronts to select caddies that will not collide with inner bins when doors are shut. Apply heavy-duty waterproof adhesive strips to the back plate of a metal wire hair tool caddy, pressing it firmly onto the upper half of the right door for thirty seconds. Mount a multi-pocket clear vinyl organizer or a series of small adhesive utility hooks onto the left door face to hold hair ties, headbands, and microfiber face cloths. Test the swing clearance of both doors carefully, making sure the mounted items clear the cabinet frame smoothly without snagging.
Idea 4: The Sliding Metal Wire Basket Carousel
Step-by-Step Guide
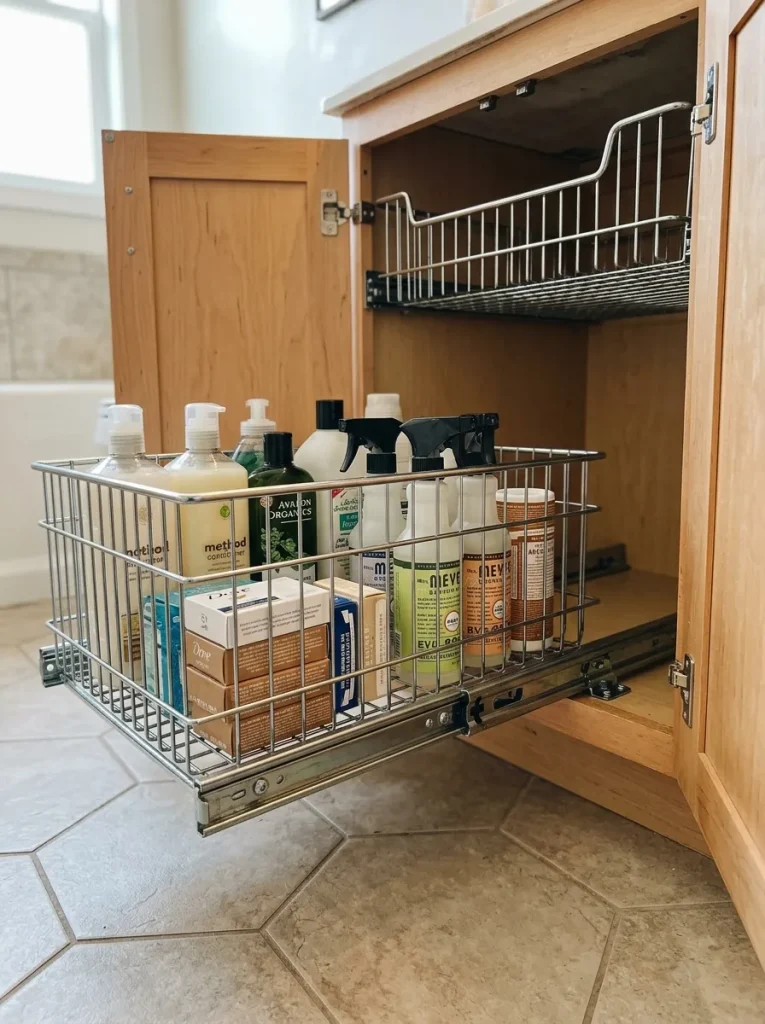
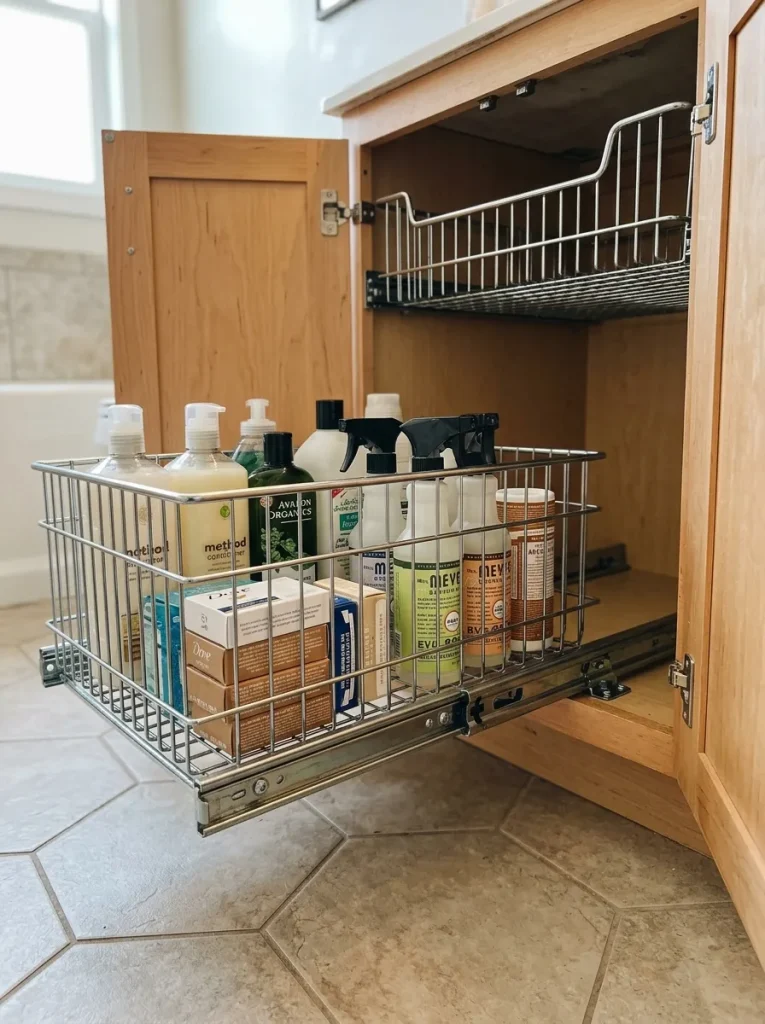
The sliding metal wire basket carousel installs industrial-grade rolling steel drawers directly onto the cabinet floor to bring deep, hidden storage forward effortlessly. This design utilizes heavy-duty ball-bearing slider tracks attached to ventilated wire baskets that can support heavy liquids like gallon refill bottles, cleaning sprays, and extra shampoos. The open wire mesh construction promotes continuous airflow, preventing moisture and mildew accumulation around stored damp sponges or bath products. Rolling the entire basket out into full view eliminates the need to kneel down or reach blindly into dark cabinet recesses, making it a highly accessible, ergonomic storage choice for all family members.
Executing this sliding wire basket installation starts with placing a firm piece of marine plywood or a heavy plastic mat across the cabinet floor to create a flat base. Position the bottom metal slider track frame onto the cabinet floor, aligning it parallel to the side wall with a two-inch setback from the front door frame. Secure the sliding track frame to the cabinet base board using four short wood screws driven through pre-drilled mounting brackets. Snap the deep wire storage basket onto the ball-bearing slider rails, pulling the unit forward and backward to test for smooth, frictionless operation. Fill the basket with heavy cleaning supply bottles, laundry detergents, and backup bath soaps, using plastic tub liners inside the basket bottom to catch occasional liquid drips.

Idea 5: The Color-Coded Modular Bin Sorting Layout
Execution Process
The color-coded modular bin sorting layout organizes vanity items into distinct, solid-colored plastic storage tubs that create a uniform, clutter-free aesthetic when the cabinet opens. This design concept relies on hiding busy, mismatched product packaging inside opaque white, gray, or cream-colored bins fitted with bamboo or natural wood lids. Assigning specific container colors or labeled handles to distinct category groups—such as skincare, first aid, dental care, and hair products—simplifies daily maintenance and inventory checks. The solid bin walls block visual chaos, creating a tranquil, minimalist style that matches modern residential interior decor trends. Stackable bin designs allow homeowners to build stable vertical columns that utilize the full height of the cabinet cavity.
To implement a modular bin sorting layout, gather six to eight uniform plastic storage bins featuring open handle cutouts and optional flat stacking lids. Group all your vanity supplies onto a nearby countertop, sorting items strictly into functional categories like health supplies, shaving goods, and nail care kits. Place similar items into designated bins, attaching pre-printed vinyl clip-on labels or chalk-style tags to the front handles of every container. Arrange the heaviest, least-frequently used bins across the bottom floor board of the cabinet, positioning daily care tubs on top for quick access. Stack secondary labeled bins directly on top of lower units, ensuring the top lids rest flat and secure to prevent tipping when pulling containers out.
Idea 6: The Suspended Tension Rod Spray Bottle Rack
Setup Method
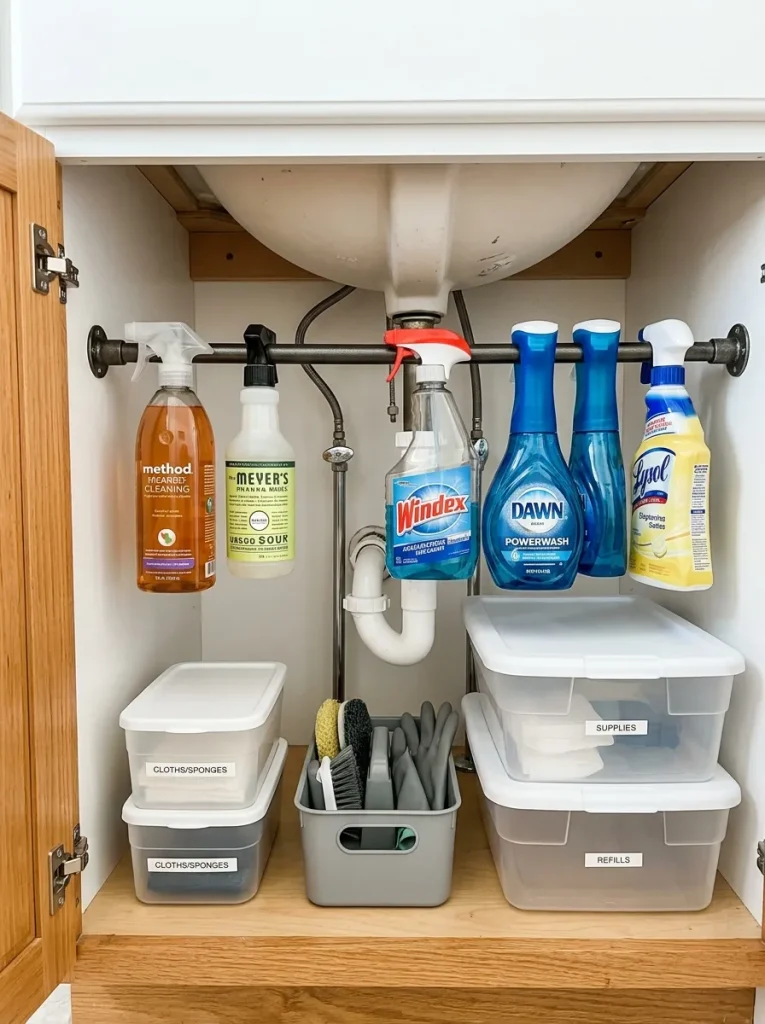
A suspended tension rod spray bottle rack utilizes a simple, tool-free spring rod to hang liquid cleaning bottles across the empty upper space of the cabinet. This clever spatial design takes advantage of the dead air space located directly beneath the sink basin, leaving the entire cabinet floor free for storage tubs and paper goods. By hooking the trigger nozzles of spray bottles over a sturdy metal tension bar, the bottles hang neatly in a row above floor level. This arrangement prevents spray bottles from tipping over, leaking liquid onto wood shelves, or crowding out lower storage bins, creating a highly organized utility zone.
Setting up a tension rod spray rack begins with selecting a heavy-duty spring-loaded metal tension rod capable of expanding across your cabinet’s interior width. Adjust the tension rod length so it spans the upper third of the cabinet space, positioning it roughly three inches below the bottom of the sink basin and four inches behind the door frame. Compress the internal spring firmly against one side wall, sliding the opposite rubber end cap into place until the rod sits completely horizontal and rigid. Test the weight capacity by pulling down lightly on the center of the bar before hanging your cleaning bottles by their plastic triggers along the rod. Arrange the hanging bottles by height and product type, leaving ample room beneath the bottle bases for floor-mounted storage crates.
Idea 7: The Lazy Susan Rotating Turntable Zone
How to Create
The Lazy Susan rotating turntable zone brings hard-to-reach items located in deep cabinet corners directly to the front with a simple fingertip spin. This organization layout uses single or double-tier rotating circular trays fitted with raised outer rims to prevent tall bottles from sliding off during rotation. Placing a turntable in the back corner of a vanity cabinet solves the common problem of knocking over front bottles to reach items stored in the rear. Turntables are particularly effective for housing daily liquid skincare products, lotions, hairsprays, and essential oil bottles that require vertical standing orientation.
To build a Lazy Susan rotating storage zone, measure the open corner depth of your cabinet floor to choose a turntable with a matching diameter, typically ten to twelve inches. Thoroughly clean the cabinet base board and verify that the turntable mechanism rotates smoothly without catching on side wall panels or plumbing pipes. Place a non-slip silicone liner inside the turntable tray to provide grip for standing glass and plastic bottles. Load the rotating tray with tall, slender items like hairsprays, body lotions, facial cleansers, and nail polish remover bottles, placing heavier containers toward the center for balanced rotation. Spin the turntable a full three hundred and sixty degrees to confirm that none of the stored bottle caps collide with overhead drainpipes during operation.

Idea 8: The Stackable Wooden Crate Rustic Storage Setup
Step-by-Step Guide
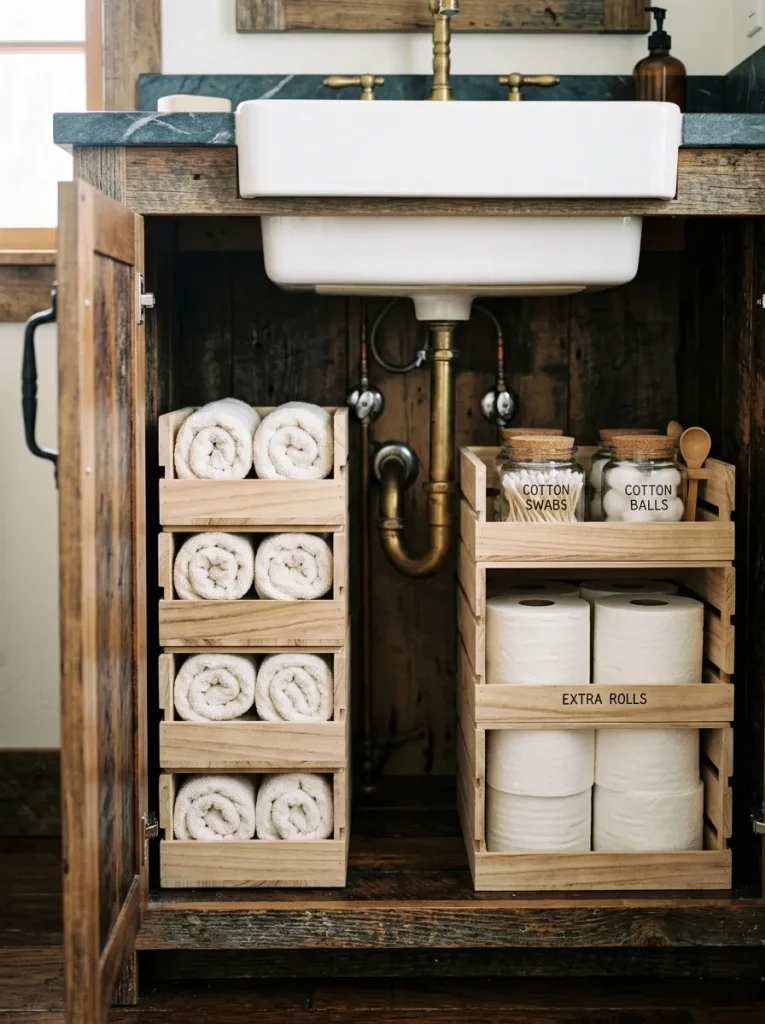
The stackable wooden crate rustic storage setup combines natural timber textures with practical modular organization to create a warm, farmhouse-inspired cabinet interior. This design uses small, sealed paulownia or bamboo wooden crates featuring open slatted sides that allow air circulation while hiding contents partially from view. Stacking light wood crates vertically creates a sturdy, rigid shelving structure that supports heavy guest towels, spare toilet paper rolls, and bath salt jars. The natural wood tones contrast beautifully against dark plumbing pipes and painted cabinet interiors, delivering a charming handmade aesthetic that elevates mundane storage spaces.
Executing this rustic crate setup begins with selecting light-colored, moisture-sealed wooden crates equipped with routed handle cutouts and interlocking base rims. Coat the bare wood surfaces with a clear waterproof polyurethane sealer if the crates are unvarnished, protecting the timber from ambient bathroom humidity. Stack two wooden crates vertically along the left cabinet wall, using small rubber bumper pads between the contact corners to prevent slipping. Place a third crate horizontally along the right cabinet floor, reserving its upper flat top as a display deck for small apothecary jars filled with cotton swabs and bath bombs. Fill the lower stacked crates with rolled spa towels, spare washcloths, and extra toilet paper rolls, keeping everyday textiles dry and organized.
Idea 9: The Pull-Out Fabric Drawer and Hamper Unit
Execution Process
The pull-out fabric drawer and hamper unit introduces soft textile storage options under the vanity sink to handle delicate items, dirty washcloths, or spare linens. This layout uses breathable, water-resistant canvas or felt drawer cubes set within a lightweight wire or plastic frame to keep items dust-free and contained. Incorporating a small, removable fabric hamper hamper tub under the sink offers a discreet place to deposit used face towels and damp washcloths immediately, keeping them off the main bathroom floor. The soft fabric walls flex slightly around minor pipe protrusions, making them an forgiving choice for tight, awkward plumbing spaces.
To implement a fabric drawer storage unit, measure the available clearance height beneath your lowest sink pipe to ensure the fabric frame fits without crushing the top drawers. Assemble a lightweight PVC or metal wire frame chassis inside the cabinet, placing non-skid rubber feet underneath to prevent the frame from shifting on the smooth cabinet floor. Insert water-repellent canvas drawer bins into the frame slots, selecting bins with clear front label windows or reinforced fabric handles. Reserve the bottom large fabric drawer as a dedicated hamper for damp washcloths, lining it with a mesh laundry bag that can be unhooked and carried directly to the washing machine. Fill upper smaller fabric drawers with dry hair towels, extra bath sponges, and packaged soap refills.

Idea 10: The Modern Pegboard and Modular Hook Wall
Setup Method
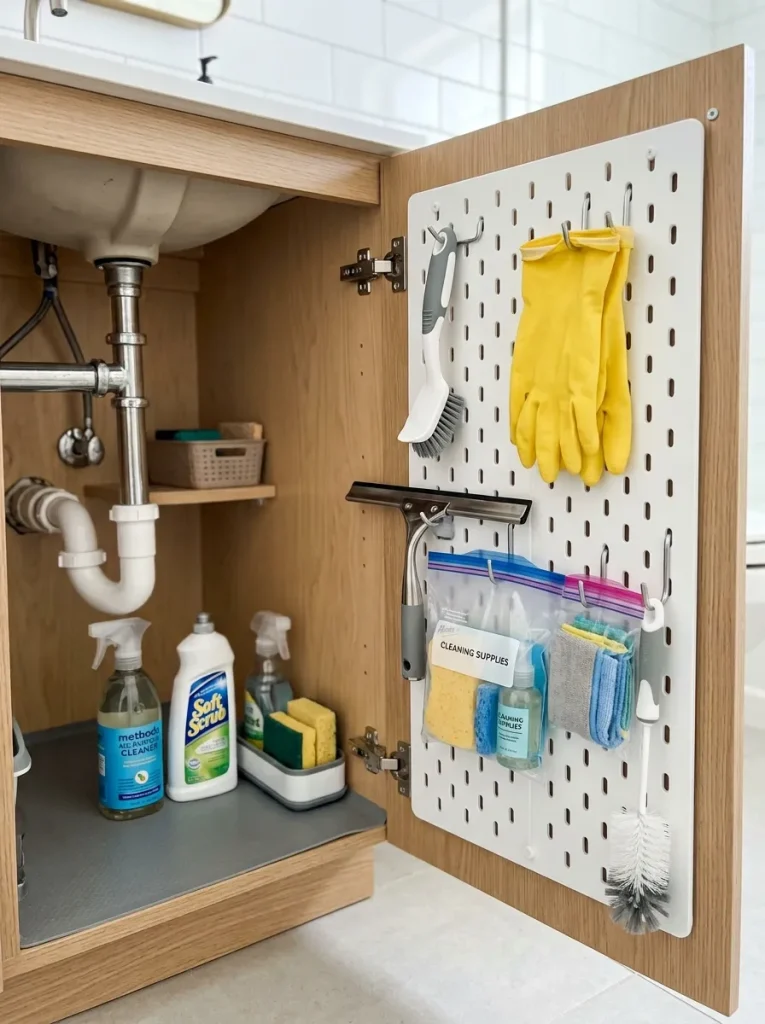
The modern pegboard and modular hook wall transforms the interior back and side cabinet walls into a customizable vertical hanging grid for tools and supplies. This advanced organization method mounts a waterproof plastic or aluminum pegboard sheet onto the flat wall panels surrounding the plumbing cutouts. By attaching movable pegs, small wire baskets, and shelf brackets to the pegboard grid, homeowners can design a custom layout that adapts continuously to changing storage needs. Hanging items like cleaning brushes, rubber gloves, handheld mirrors, and travel bags keeps them elevated off the cabinet floor, ensuring rapid drying and total floor clearance.
Setting up a cabinet pegboard wall begins with measuring the flat wall space available on the interior side and rear panels of the vanity cabinet. Cut a durable plastic pegboard sheet to size using a fine-tooth handsaw, ensuring the sheet avoids covering plumbing pipe cutouts or wall outlets. Mount the pegboard onto the interior wooden side wall using short wood screws fitted with plastic standoff spacers that hold the board one-quarter inch away from the wall. Insert heavy-duty locking metal or plastic peg hooks into the grid holes, spacing them out according to the items you plan to hang. Hang utility items like scrub brushes, rubber cleaning gloves, shower squeegees, and small zip-top travel bags directly onto the hooks, repositioning pegs as your supply inventory evolves.
Common Beginner Mistakes and How to Avoid Them
When executing an under bathroom sink organization project, homeowners frequently commit spatial and material errors that undermine the longevity of their storage systems. A primary error is buying storage bins before measuring the interior cabinet dimensions and plumbing clearances, resulting in ill-fitting containers that prevent cabinet doors from closing fully. Always measure the height, width, and depth of the cabinet space twice, paying close attention to low-hanging drain traps, water valves, and door hinges. Another widespread mistake is failing to install a waterproof liner over the bare wood floor board before adding bins, leaving the cabinet vulnerable to water damage from minor plumbing leaks. Protect your vanity investment by laying down a thick, heavy-duty silicone mat equipped with raised outer lip edges to catch drips. Furthermore, storing hazardous chemicals, heavy electrical tools, or unsealed paper products directly beneath active water pipes creates safety and mold hazards. Keep electrical hair appliances stored in elevated, dry caddies, and store aggressive cleaning chemicals in sealed, child-resistant containers equipped with leak-proof plastic bases.
Practical Tips for Better Results
+-------------------------------------------------------------------------+
|                UNDER-SINK ORGANIZATION QUALITY CHECKLIST                |
+-------------------------------------------------------------------------+
| [ ] Interior cabinet space measured twice (width, depth, pipe height).  |
| [ ] Waterproof silicone liner installed to catch potential water leaks. |
| [ ] Clear acrylic or labeled bins used to maintain total visibility.   |
| [ ] Vertical space utilized via stackable drawers or tension rods.     |
| [ ] Door interiors fitted with adhesive caddies for daily styling tools.|
+-------------------------------------------------------------------------+
Achieving professional, long-lasting results inside a vanity storage cabinet relies on integrating smart lighting, clear labeling, and routine maintenance habits into your organization plan. Installing a motion-activated, battery-powered LED puck light or light strip along the upper interior door frame illuminates dark cabinet corners instantly upon opening the door, making it easy to locate small items. Utilizing clear, waterproof vinyl labels on all opaque containers ensures every family member knows exactly where products belong, preventing items from being tossed randomly into bins. When storing liquids, always place paper towels or washable plastic liners inside container bottoms to catch accidental drips from soap pumps or oil bottles. Group products logically by usage frequency, placing daily essentials like toothpaste and face cleansers near the front, while reserving back corners for backup toilet paper and seasonal items. Finally, audit and clean out the cabinet every six months to discard expired medications, dried-out wipes, and empty bottles, keeping your under-sink layout pristine and fully functional.
Styling, Presentation, and Organization Ideas
The visual presentation of an organized vanity cabinet expands significantly when containers and color schemes are selected with intentional home decor principles in mind. Choosing a unified color palette for your storage bins—such as pairing crisp white containers with natural bamboo lids and clear glass jars—creates a cohesive, spa-like aesthetic inside the cabinet. Decanting bulk supplies like cotton balls, bath salts, and cotton swabs into clear apothecary jars equipped with wooden lids adds a touch of elegance to plain storage shelves. Grouping items by color or functionality—such as storing white towels together in a single woven basket—makes the space look systematically curated rather than randomly arranged. Using matching clip-on label tags across all fabric and wire baskets unifies different container textures into one seamless organizational theme. Maintaining a clean, uncluttered visual aesthetic inside your cabinets makes daily morning routines feel calmer and more luxurious, turning a practical chore into a rewarding interior design feature.
Budget and Time Planning
| Project Phase | Estimated Time | Percentage of Total Budget | Key Materials and Tools Needed |
|---|---|---|---|
| Cabinet Prep & Purging | 45 Minutes | 10% | Cleaning spray, microfiber cloths, trash bags |
| Measuring & Liner Install | 30 Minutes | 15% | Measuring tape, waterproof silicone shelf mat |
| Hardware & Drawer Setup | 60 Minutes | 45% | Acrylic drawers, wire baskets, tension rods |
| Bin Categorization & Filling | 45 Minutes | 20% | Plastic tubs, clear jars, woven baskets |
| Labeling & Motion Lighting | 30 Minutes | 10% | Vinyl label maker, motion LED puck lights |
Completing an under bathroom sink organization project efficiently requires structured budgeting and time management to avoid purchasing unnecessary containers or experiencing installation fatigue. Homeowners should allocate roughly forty-five percent of their total budget toward high-quality, durable hardware like sliding wire baskets, acrylic drawer grids, or pipe-bypassing shelf units, as these form the core functional framework. The remaining funds can be split between protective waterproof floor liners, clear labeling supplies, and aesthetic storage tubs. Time should be managed in distinct stages, starting with a thorough purges of expired goods and deep cleaning before any new containers are unpacked or installed. Completing all measuring and liner cutting steps first ensures that container placement goes smoothly without awkward adjustments mid-build. Adhering to a structured project timeline keeps the renovation organized, cost-effective, and completed within a single afternoon.
Creative Expansion and Advanced Inspiration
Once you master basic under-sink spatial management, you can explore advanced organizational features that bring smart technology and luxury convenience to your vanity setup. Consider installing an integrated pull-out electric power strip inside the cabinet, allowing hair dryers, hot curling irons, and electric toothbrushes to remain plugged in and ready for use inside dedicated heat-resistant metal sleeves. Incorporate smart water-leak sensor pucks onto the bottom silicone mat, which connect to your smartphone via Wi-Fi to alert you instantly at the first sign of a plumbing drip. Advanced organizers can also build custom wood drawer dividers tailored to the exact dimensions of specialized makeup palettes, grooming tools, and essential oil collections. For larger master bathroom vanities, installing dual sliding recycling and trash bin units under the sink keeps waste hidden discreetly away from open bathroom floor spaces. Sharing your completed organized cabinet transformations on visual platforms provides fresh inspiration to home organization communities seeking practical, creative ideas for compact living spaces.