
Water gun painting is a dynamic and visually engaging DIY activity that combines creativity with playful techniques. This approach transforms a simple tool into a unique painting method that produces abstract textures, splashes, and layered color effects. It has become increasingly popular among Pinterest ideas due to its accessibility, vibrant results, and adaptability for both indoor and outdoor creative projects. Whether used for home decor, art projects, or creative experimentation, water gun painting offers an alternative to traditional brushwork.
This article explores ten practical and beginner friendly water gun painting ideas that can be completed with basic materials and simple planning. Each idea includes clear explanations and step by step methods to help achieve consistent results. Readers will learn how to control spray patterns, select suitable surfaces, and build layered designs that suit modern design and minimalist style preferences. The focus remains on practical execution, allowing anyone to complete each creative project with confidence. By the end, readers will have multiple actionable ideas that can be used for decoration, organization, or artistic expression.
Why This Idea Is Trending or Useful
Water gun painting is trending across creative platforms because it blends DIY techniques with interactive design processes. Unlike traditional painting, it introduces movement and unpredictability, which creates visually appealing results without requiring advanced artistic skills. This makes it particularly suitable for beginners who want to explore creative ideas without complex tools or formal training. The process is simple, engaging, and adaptable to different age groups, making it widely accessible.
From a design perspective, water gun painting aligns with modern aesthetic trends that emphasize abstract textures, layered color combinations, and expressive patterns. These features make it ideal for home decor projects such as wall art, canvas displays, and customized decorative pieces. Additionally, the method supports budget ideas by using affordable materials like diluted paint and reusable tools. Its DIY appeal also lies in the ability to experiment freely, allowing each project to produce unique outcomes. As a result, it continues to gain popularity as both a creative outlet and a practical decoration technique.
Materials and Preparation
Before starting any water gun painting project, proper preparation ensures better control and cleaner results. The primary materials include water guns, liquid paint or acrylic paint diluted with water, large sheets of paper or canvas, protective coverings, and containers for mixing colors. Choosing the right paint consistency is essential, as overly thick paint may clog the water gun while overly diluted paint may result in faint patterns. A balanced mixture allows smooth spraying and visible color impact.
Preparation also involves selecting a suitable workspace. Outdoor areas are preferred due to potential splashes, but indoor setups can work with proper surface protection such as plastic sheets or newspapers. Planning color combinations in advance helps maintain a cohesive aesthetic, especially when working on decorative pieces. It is also important to test spray patterns before beginning the main project to understand how the water gun distributes paint. Wearing protective clothing and organizing materials beforehand improves efficiency and reduces interruptions during the creative process.
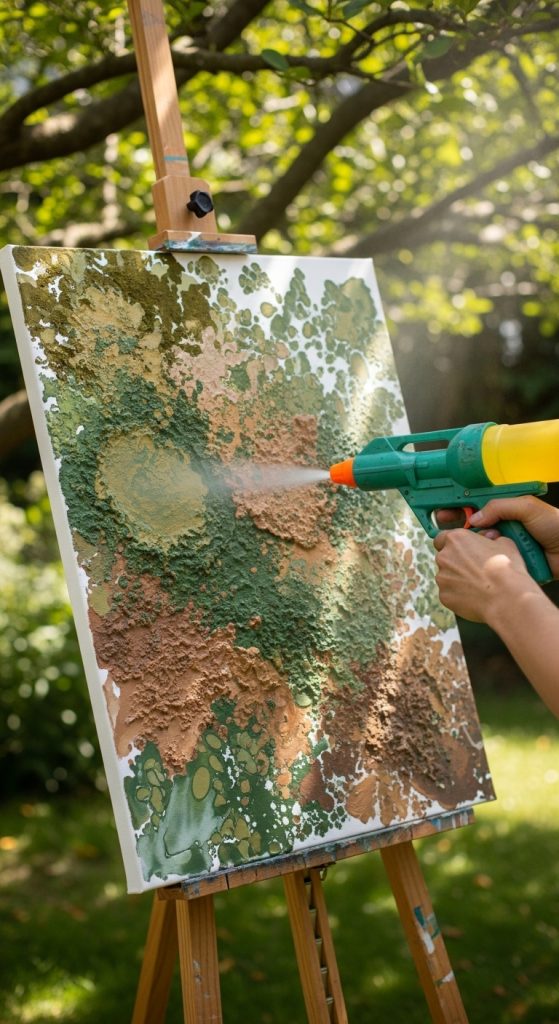
Idea 1: Abstract Canvas Splash Art
How to Create
Abstract canvas splash art focuses on creating expressive patterns using controlled bursts of color. This idea works well for modern home decor because it produces bold and visually dynamic designs that fit minimalist style interiors. The concept relies on layering colors in a way that creates depth without requiring detailed brushwork. By adjusting distance and spray pressure, different effects such as fine mist or bold splashes can be achieved. This flexibility allows beginners to experiment with composition while maintaining control over the final look.
To create this piece, start by placing a blank canvas on a flat protected surface. Fill the water gun with diluted acrylic paint and test the spray intensity. Begin with a base color and apply it evenly across the canvas. Gradually add contrasting colors in layers, allowing each layer to dry slightly before applying the next. Move around the canvas to create varied angles and patterns. Maintain balance by avoiding excessive overlap in one area. Once complete, let the artwork dry fully before displaying it as a handmade decoration piece.

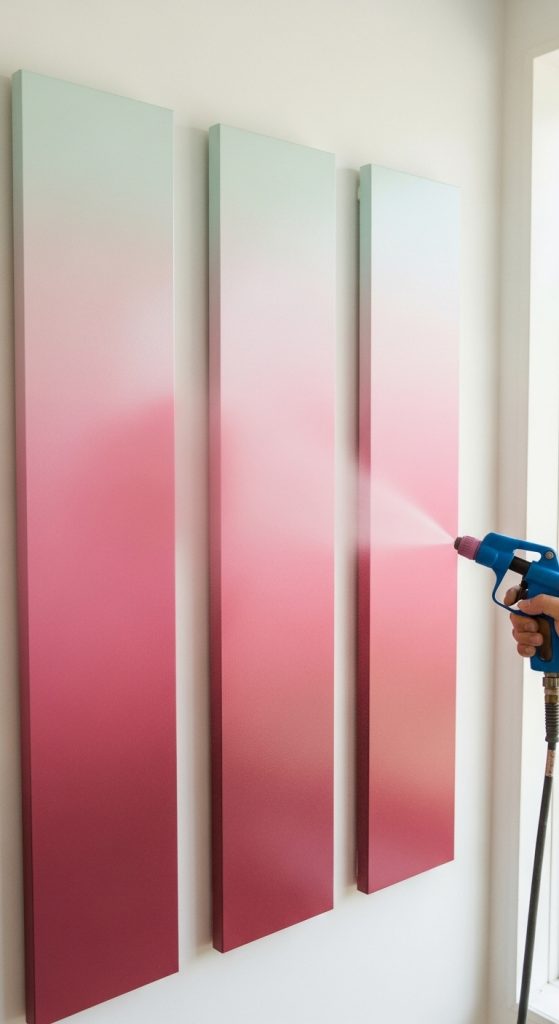
Idea 2: Ombre Wall Art Panels
Step-by-Step Guide
Ombre wall art panels use gradual color transitions to create a soft and cohesive design. This technique is popular in Pinterest ideas because it complements modern design trends and creates a calm visual effect. The concept involves blending colors seamlessly from light to dark or between complementary shades. Water gun painting simplifies this process by naturally diffusing color edges, making smooth transitions easier to achieve without advanced blending techniques.
To execute this project, prepare multiple panels or thick paper sheets. Mix paint in varying shades of the same color. Begin spraying the lightest shade at the top and gradually move downward, introducing darker shades as you progress. Maintain a consistent distance to ensure even blending. Overlap the edges slightly to create a smooth gradient effect. Allow each layer to settle before adding the next shade. Once complete, align the panels vertically or horizontally for a cohesive display that enhances interior decoration.
Idea 3: Galaxy-Themed Artwork
How to Make
Galaxy-themed artwork uses dark backgrounds combined with vibrant splashes to replicate cosmic visuals. This idea stands out due to its strong contrast and layered texture, making it ideal for statement decor pieces. The water gun technique allows for organic splatter effects that resemble stars and nebula formations. By controlling color intensity and layering, a realistic and visually appealing result can be achieved without detailed painting skills.
Begin by painting the canvas with a dark base color such as black or deep blue and let it dry completely. Fill water guns with bright colors like white, purple, and pink. Start spraying lightly to create small star-like dots, then add larger splashes for nebula effects. Use varied distances to achieve different spray sizes. Build layers gradually to avoid overpowering the design. Once finished, let the artwork dry fully. The final result can be used as a bold decorative piece or part of a themed art collection.

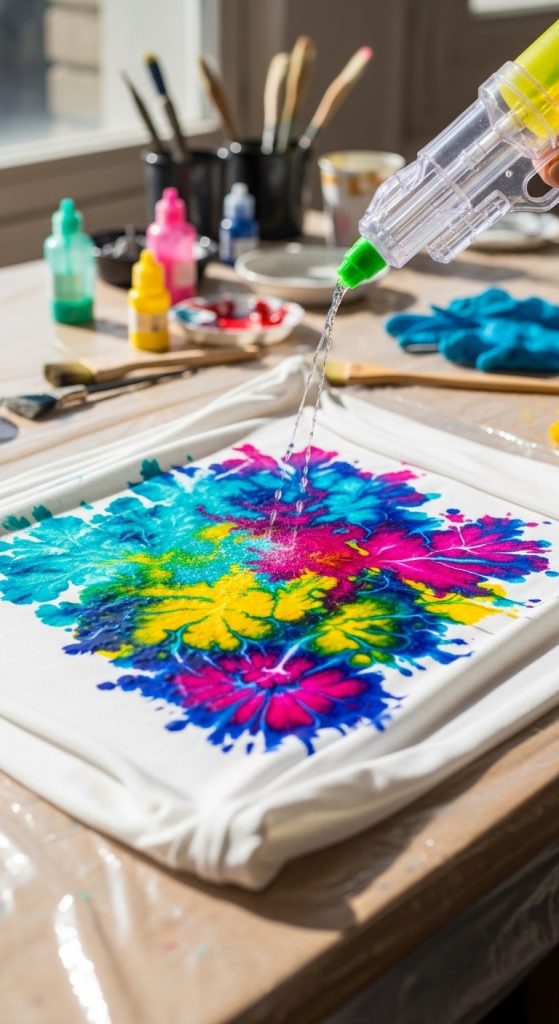
Idea 4: Custom Fabric Patterns
Execution Process
Custom fabric patterns created with water gun painting offer a creative way to personalize textiles. This idea is practical for items such as cushion covers, tote bags, or fabric panels used in home decor. The technique allows for random yet controlled patterns that add uniqueness to each piece. It aligns with handmade and DIY trends, making it a popular choice for creative projects.
To create fabric designs, use fabric paint mixed with water to ensure proper absorption. Lay the fabric flat on a protected surface and secure the edges. Fill the water gun with the prepared paint mixture and test the spray. Apply colors in layers, experimenting with different angles and distances. Avoid oversaturating one area to maintain even coverage. Allow the fabric to dry completely before heat setting the paint according to instructions. The finished product can be used as a decorative or functional item.
Idea 5: Layered Color Posters
Setup Method
Layered color posters focus on building depth through multiple transparent layers. This idea is suitable for creating modern wall decor that reflects minimalist style and artistic expression. The water gun technique enhances layering by naturally diffusing edges, creating soft transitions between colors. This approach is ideal for those seeking creative ideas that are both simple and visually appealing.
To create layered posters, start with a sturdy paper base. Apply the first layer using light colors and allow it to dry partially. Continue adding layers with different colors, adjusting spray intensity to create variation. Maintain a consistent pattern to avoid visual clutter. Rotate the paper occasionally to achieve balanced coverage. Once all layers are complete, allow the poster to dry fully before framing or displaying.

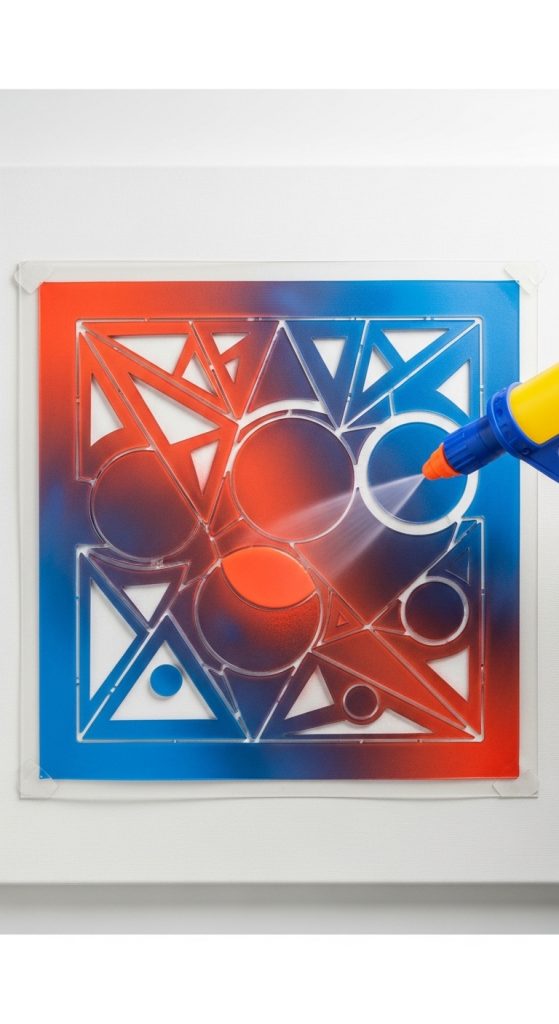
Idea 6: Geometric Spray Patterns
How to Create
Geometric spray patterns combine structured shapes with dynamic painting techniques. This idea merges precision with creative expression, resulting in visually striking designs. It is particularly suitable for modern home decor and organization projects where clean lines are preferred. Using stencils helps guide the spray, ensuring defined shapes while maintaining the artistic effect.
To execute this idea, place stencils on the painting surface and secure them firmly. Fill the water gun with paint and spray over the stencil areas. Remove the stencil carefully to reveal the geometric shapes. Repeat the process with different colors and patterns, allowing each layer to dry before adding the next. This method creates a balanced combination of structure and spontaneity, making it a versatile decoration option.
Idea 7: Nature-Inspired Splatter Art
Step-by-Step Guide
Nature-inspired splatter art uses earthy tones and organic patterns to reflect natural elements. This idea is suitable for calming decor themes and aligns with aesthetic trends focused on natural color palettes. The water gun technique helps replicate textures found in nature, such as foliage or landscapes.
Begin by selecting colors like green, brown, and blue. Spray the base layer lightly, then add darker tones for depth. Use varied spray distances to create texture. Focus on layering rather than precise placement to maintain an organic look. Allow the artwork to dry completely before displaying it in a natural-themed setting.
Idea 8: Personalized Name Art
How to Make
Personalized name art transforms simple text into a creative visual piece. This idea is widely used in decoration and organization projects, especially for personal spaces. The water gun technique adds a unique background effect that enhances the overall design.
To create this piece, place letter stencils on the surface. Spray paint around the letters using different colors. Carefully remove the stencils to reveal clean text against a vibrant background. Allow the artwork to dry before framing or displaying it. This method creates a customized decorative element that is both practical and visually appealing.

Idea 9: Color Burst Backgrounds
Execution Process
Color burst backgrounds focus on creating high-energy designs with bold color combinations. This idea is suitable for posters, photography backdrops, or creative displays. The technique emphasizes contrast and movement, resulting in visually impactful outcomes.
Start with a neutral base and apply bright colors using quick bursts. Layer contrasting shades to enhance depth. Adjust spray angles to create directional effects. Avoid overloading one area to maintain balance. Once complete, let the background dry fully before use. This approach is effective for creating dynamic visual elements.

Idea 10: Minimalist Monochrome Art
How to Create
Minimalist monochrome art uses a single color palette to create subtle yet sophisticated designs. This idea aligns with modern design and minimalist style preferences. The water gun technique allows for controlled variations within the same color, creating depth without complexity.
To create this piece, select one color and prepare multiple shades. Spray the lightest shade as a base and gradually add darker tones. Maintain even spacing and avoid excessive overlap. Focus on consistency to achieve a clean and balanced result. Once dry, the artwork can be used as a refined decorative element.

Common Beginner Mistakes and How to Avoid Them
One common mistake in water gun painting is using incorrect paint consistency. Paint that is too thick can block the spray mechanism, while overly diluted paint produces weak results. Testing the mixture before starting ensures proper flow and color intensity. Another frequent issue is uneven layering, which occurs when too much paint is applied in one area. This can be avoided by working in light layers and allowing partial drying between applications.
Improper workspace preparation can also affect the final outcome. Without protective coverings, unintended splashes may damage surrounding surfaces. Additionally, skipping test sprays often leads to inconsistent patterns. Beginners should always test spray distance and pressure before applying paint to the main surface. By focusing on preparation and controlled application, most common issues can be prevented effectively.
Practical Tips for Better Results
Maintaining consistent spray distance improves pattern control and ensures even coverage. Holding the water gun at varying angles can create different effects, but it is important to practice before applying these techniques to the final project. Using a limited color palette helps maintain visual harmony and prevents the design from appearing cluttered.
Allowing adequate drying time between layers enhances color clarity and prevents unwanted blending. Organizing materials in advance reduces interruptions and improves workflow efficiency. Experimenting on scrap surfaces before starting the main project provides valuable insights into spray behavior. These practical adjustments contribute to more refined and professional results.
Styling, Presentation, or Organization Ideas
Proper presentation enhances the visual impact of water gun painting projects. Framing artwork creates a polished look suitable for home decor displays. Grouping multiple pieces with similar color schemes can create a cohesive gallery wall. For fabric projects, integrating painted textiles into cushions or curtains adds a functional decorative element.
Organizing finished pieces based on theme or color improves overall aesthetic consistency. Minimalist arrangements work well for modern interiors, while layered displays can add depth to larger spaces. Placement should consider lighting, as natural light enhances color vibrancy. Thoughtful styling ensures that each project contributes effectively to the overall decor.
Budget or Time Planning
Water gun painting is a cost-effective creative project when materials are planned efficiently. Using reusable tools and purchasing paint in basic colors allows for mixing multiple shades without additional expense. Preparing all materials beforehand reduces time spent on setup and cleanup.
Breaking the project into stages helps manage time effectively. Completing one layer at a time and allowing proper drying ensures better results. Working in batches for multiple pieces can improve efficiency. By focusing on simple planning strategies, the project remains both affordable and manageable.
Creative Expansion and Advanced Inspiration
Advanced variations of water gun painting can include combining techniques such as stencil layering, mixed media, or textured surfaces. Experimenting with different materials like wood or textured paper adds depth to the design. Incorporating metallic or contrasting finishes can enhance visual impact.
Expanding into larger installations or themed collections allows for more complex creative expression. Combining water gun painting with other DIY methods creates unique hybrid designs. Continuous experimentation helps develop new creative ideas while maintaining the simplicity of the original technique.