
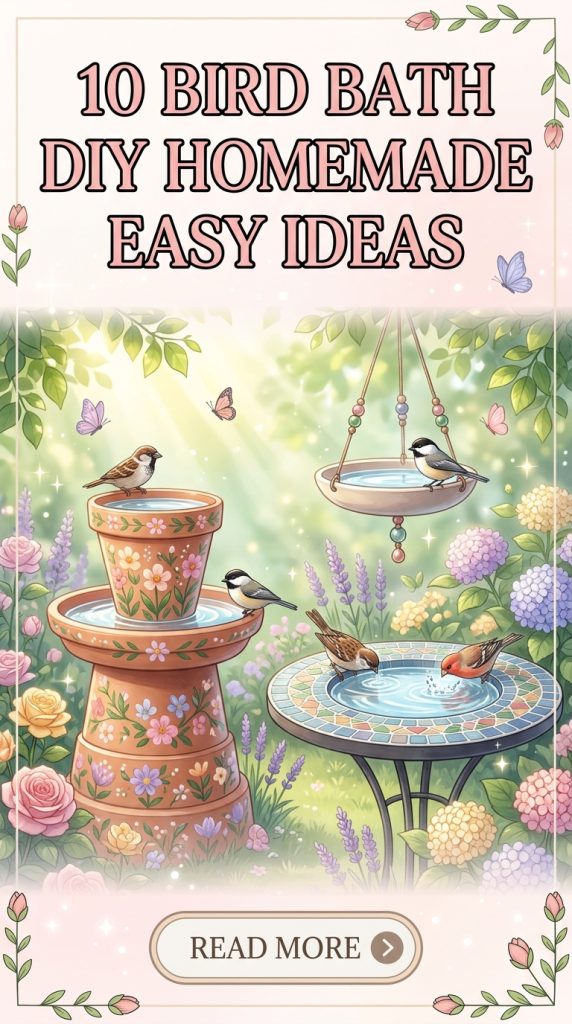
Creating a bird bath is one of the most practical and visually appealing DIY projects for outdoor spaces. A homemade bird bath supports local birds by providing a safe water source while also improving the aesthetic value of a garden, balcony, patio, or backyard. Pinterest ideas related to bird baths continue to gain popularity because they combine home decor, nature-friendly design, and beginner friendly crafting techniques into one creative project. Many people prefer handmade outdoor decorations because they allow greater flexibility in size, shape, and style without requiring expensive materials or advanced construction skills. A well-designed bird bath can also become a centerpiece in modern design landscapes, minimalist style gardens, rustic outdoor setups, or small urban patios.
This article explains ten original bird bath DIY homemade easy ideas that can be completed using accessible materials and simple planning methods. Readers will learn step by step techniques for creating functional and aesthetic bird baths using containers, recycled items, stones, planters, and decorative structures. Each project includes practical setup guidance, preparation details, and organization methods that help beginners complete the work efficiently. The ideas focus on realistic construction approaches that support easy maintenance, durability, and visual balance while keeping the projects affordable and adaptable for different outdoor environments.
Why This Idea Is Trending or Useful
Bird bath Pinterest ideas remain highly popular because they combine creative inspiration with practical outdoor functionality. Many homeowners and apartment residents now prioritize outdoor decoration projects that improve both visual appearance and environmental value. A DIY bird bath fits this trend because it supports wildlife while adding a handmade decorative feature to gardens and patios. The growing popularity of sustainable living and recycled decoration projects has also increased interest in homemade bird baths created from bowls, pots, stones, glass items, and unused household materials. These projects are widely shared because they are simple to personalize and adaptable to different outdoor styles.
Another reason bird bath tutorials continue trending is their accessibility for beginners. Most projects require only basic tools and affordable materials, making them suitable for people with limited crafting experience. The step by step construction process is straightforward and does not depend on advanced woodworking or landscaping knowledge. Many bird bath ideas can also be completed within a single afternoon, which makes them practical for people looking for easy project inspiration. Their decorative versatility adds further appeal because bird baths work well in minimalist style spaces, cottage gardens, modern patios, and small balcony setups. The combination of creativity, functionality, organization, and aesthetic outdoor improvement makes these projects consistently valuable for Pinterest audiences.
Materials and Preparation
Preparing properly before starting a bird bath DIY project improves both construction quality and long-term durability. The most common materials include shallow bowls, terracotta pots, ceramic plates, concrete mix, decorative stones, waterproof adhesive, metal trays, glass dishes, wooden stands, and outdoor-safe paint. Many homemade bird bath projects also use recycled household items such as plant saucers, old serving trays, buckets, or unused furniture pieces. The ideal bird bath should remain shallow enough for birds to stand safely while providing stable support that prevents tipping or wobbling during outdoor use.
Basic tools often include gloves, measuring tape, sandpaper, a small shovel, paintbrushes, sealant, and strong adhesive suitable for outdoor environments. Before beginning construction, it is important to choose a location with partial shade and nearby plants or trees where birds feel secure. The ground should remain level to keep water balanced and reduce structural instability. Cleaning the selected materials thoroughly before assembly helps improve adhesive strength and prevents dirt contamination. Planning also includes deciding on the final aesthetic style, such as rustic decoration, modern design, natural stone appearance, or minimalist outdoor decor. Proper preparation ensures smoother project execution while helping the finished bird bath remain functional, weather-resistant, and visually attractive throughout seasonal outdoor conditions.
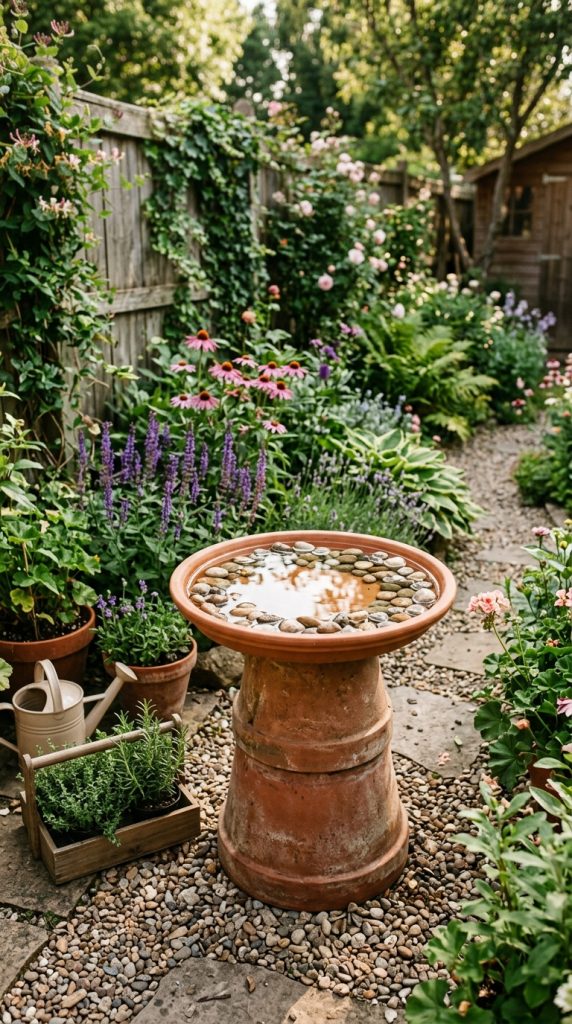
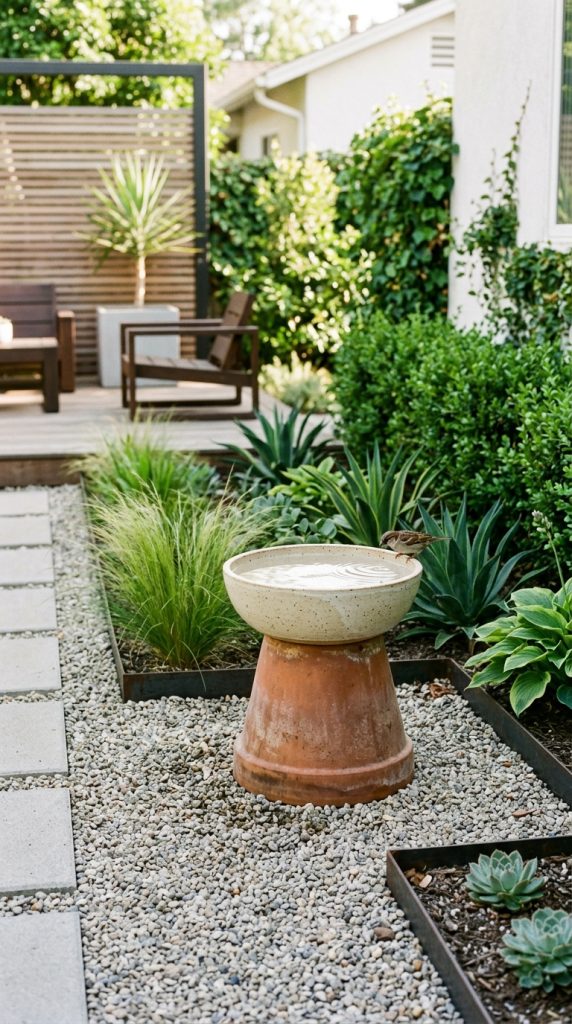
Idea 1: Terracotta Pot Pedestal Bird Bath
How to Create
A terracotta pot pedestal bird bath is one of the most beginner friendly DIY outdoor decoration ideas because it combines stability, affordability, and natural visual appeal. This project uses stacked terracotta pots and a wide saucer to create a raised water basin that blends well with garden landscapes. The earthy color and handmade appearance complement rustic decor, cottage-style patios, and minimalist garden arrangements. The structure also provides birds with a visible and secure water source while adding height variation to outdoor organization layouts. Terracotta materials naturally support outdoor use because they tolerate weather changes and maintain a balanced appearance without requiring excessive decoration.
The height of the pedestal can be adjusted depending on the size of the pots selected during planning. Larger pots create a stronger visual statement, while smaller arrangements work well for balcony setups and compact patios. Decorative stones, painted accents, or textured finishes can also be added to customize the appearance without making the project overly complex. Since the construction process is simple, this bird bath is often included in Pinterest inspiration collections focused on budget ideas and easy project tutorials. Its practical structure allows easy water replacement and cleaning, making it suitable for long-term outdoor use while maintaining a clean and organized appearance.
To create this bird bath, begin by selecting two or three terracotta pots in graduating sizes along with a large saucer or shallow bowl that will hold water. Clean all materials thoroughly and allow them to dry completely before assembly. Place the largest pot upside down on a level outdoor surface to form the foundation. If additional height is desired, stack a smaller pot above it using waterproof outdoor adhesive between each layer. Ensure the pots remain centered and balanced before the adhesive cures. Once the pedestal structure is stable, attach the wide saucer securely to the top surface using the same adhesive.
After assembly, allow the structure to cure for at least twenty-four hours before adding water. Decorative gravel or flat stones may be placed inside the basin to provide birds with secure footing. If desired, apply outdoor-safe paint or sealant to improve weather resistance while preserving the handmade aesthetic. Position the finished bird bath near plants or shrubs where birds can approach safely without obstruction. Regular cleaning helps maintain water quality and prevents algae buildup. This step by step method creates a durable and attractive bird bath using simple materials that remain accessible for beginners interested in creative ideas and functional outdoor decoration.
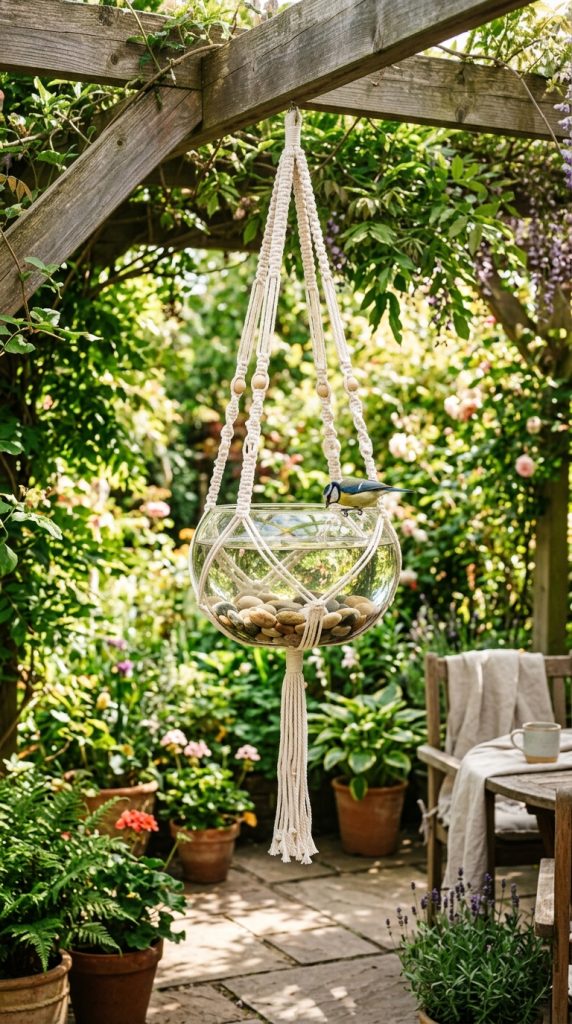
Idea 2: Hanging Glass Bowl Bird Bath
Step-by-Step Guide
A hanging glass bowl bird bath offers a lightweight and elegant solution for small outdoor spaces such as balconies, patios, and compact gardens. This project uses a transparent or colored glass bowl suspended with durable rope or chain to create a floating water feature that attracts birds while adding visual movement to outdoor decor. The suspended design creates a modern aesthetic often associated with minimalist style Pinterest ideas. The reflective quality of glass also increases visual brightness in outdoor environments by catching natural sunlight throughout the day.
This style works particularly well for people interested in creative project inspiration that does not require extensive construction or heavy materials. The hanging structure reduces ground clutter and helps maintain organized outdoor layouts. Decorative glass bowls can easily blend with modern design themes, natural greenery, or rustic garden settings depending on the selected shape and color. Since the bowl remains elevated, it may also discourage some ground pests from approaching the water source. The flexibility of this setup allows homeowners to install multiple hanging bird baths at different heights to create layered visual interest across larger patios or garden areas.
To make this bird bath, begin with a shallow glass bowl that has a wide surface area and smooth edges. Choose strong outdoor rope, macrame cord, or metal chain capable of supporting the bowl’s weight when filled with water. Create a secure hanging support by wrapping the cord evenly around the bowl in a balanced pattern. Macrame knotting techniques can improve stability while adding decorative texture. Attach all cords to a central hanging ring that will connect to a ceiling hook, tree branch, or pergola beam. Test the structure carefully before filling the bowl with water.
Place a few flat stones inside the bowl to provide birds with stable landing surfaces. Position the hanging bird bath in a partially shaded location to help maintain cooler water temperatures during warm weather. Regularly inspect the hanging cords or chains for signs of wear caused by outdoor exposure. Replacing the water every few days supports cleanliness and encourages continued bird activity. This easy project combines aesthetic decoration with practical functionality while remaining affordable and beginner friendly. Its lightweight structure and customizable appearance make it highly adaptable for many different outdoor organization and home decor styles.
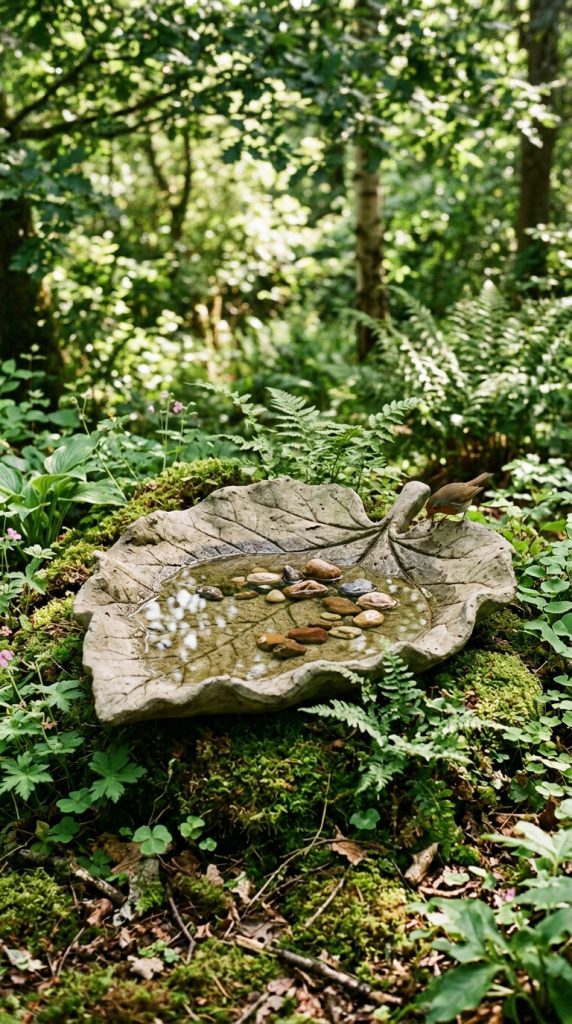
Idea 3: Concrete Leaf Mold Bird Bath
How to Make
A concrete leaf mold bird bath creates a natural and artistic outdoor feature using large textured leaves as shaping forms. This DIY project is popular in Pinterest inspiration collections because it combines organic design with durable construction materials. The finished basin resembles a giant leaf resting naturally within a garden environment, making it especially suitable for woodland landscapes, botanical patios, and rustic outdoor decoration themes. Each bird bath becomes visually unique because the natural vein patterns from the leaf transfer directly into the concrete surface during the molding process.
This handmade design supports both aesthetic appeal and practical outdoor use. Concrete offers strong weather resistance and long-term durability, making the bird bath suitable for year-round placement in many climates. The natural curves formed by the leaf mold also create shallow water areas that birds can safely access. Because the shape originates from an actual leaf, the finished texture appears highly realistic and decorative without requiring advanced artistic skills. This project appeals strongly to beginners interested in creative ideas that deliver professional-looking results while using simple materials and accessible construction methods.
Begin by selecting a large leaf with visible vein texture, such as rhubarb, elephant ear, or similar broad foliage. Prepare a flat work area covered with plastic sheeting and create a mound of damp sand to support the leaf during shaping. Place the leaf face down on the sand mound so the textured veins remain exposed upward. Mix concrete according to package instructions until it reaches a thick but spreadable consistency. Apply the concrete carefully over the leaf surface, maintaining an even thickness of approximately one inch while preserving the leaf edges and contours.
Allow the concrete to cure for at least twenty-four to forty-eight hours before gently removing the leaf material from the hardened surface. Sand any rough edges lightly to improve safety and appearance. Optional sealant may be applied to increase water resistance and reduce surface wear over time. Position the completed bird bath directly on the ground, on stacked stones, or on a short pedestal depending on the desired presentation style. Adding surrounding plants or decorative gravel can enhance the natural appearance further. This step by step tutorial creates a durable and highly aesthetic bird bath that combines modern DIY creativity with realistic outdoor functionality.
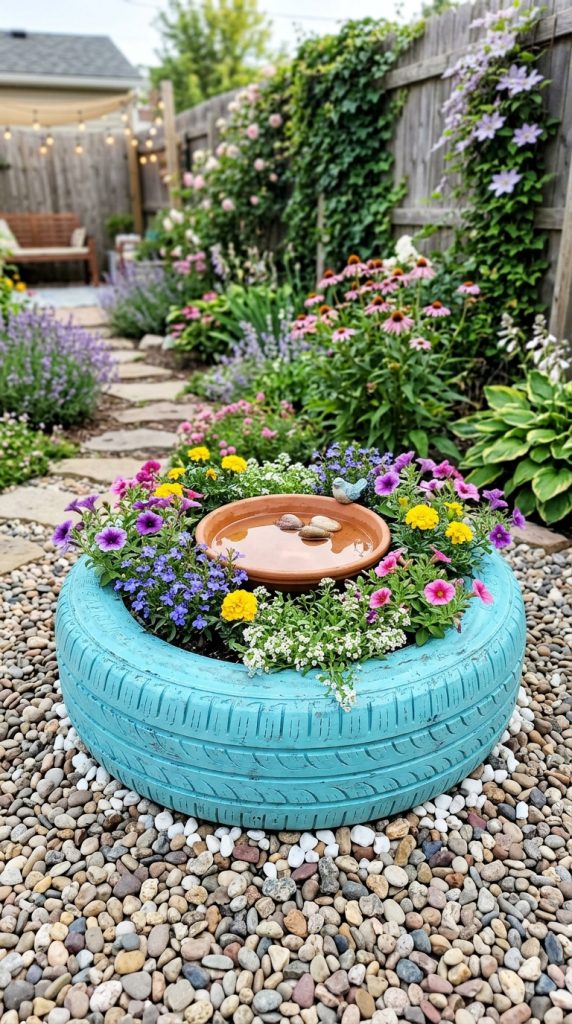
Idea 4: Recycled Tire Bird Bath Planter
Execution Process
A recycled tire bird bath planter combines multiple outdoor functions into one creative project by integrating a water basin with surrounding plant decoration. This idea supports sustainable DIY practices by repurposing an old tire into an attractive garden feature rather than discarding it. The rounded tire shape naturally forms a sturdy base that can support both shallow water containers and decorative flowers. Pinterest ideas featuring recycled outdoor materials continue trending because they encourage affordable home decor improvements while reducing waste through handmade construction methods.
The combination of water and greenery creates a balanced outdoor focal point that attracts birds while improving visual organization in garden spaces. Depending on the paint color and plant selection, the design can appear rustic, modern, colorful, or minimalist. The circular structure works particularly well in larger gardens where it can function as a central decorative element surrounded by stones, mulch, or pathways. Because the tire provides strong structural support, the project remains highly durable during changing weather conditions and requires minimal maintenance once completed.
To create this project, begin by cleaning the tire thoroughly to remove dirt and debris. Apply outdoor-safe primer and paint if a decorative finish is desired. Position the tire on a flat surface and fill the center opening partially with soil to support surrounding plants. Place a shallow bowl, planter saucer, or metal tray securely in the middle section to act as the bird bath basin. Ensure the water container remains level and stable before adding decorative stones inside for bird safety. Surround the basin with low-maintenance plants such as succulents, small flowers, or ornamental grasses.
The planting arrangement should not obstruct bird access to the water. Water-resistant sealant may be applied to painted surfaces to increase durability and reduce fading caused by sunlight exposure. Position the completed project in a partially shaded area where birds can easily approach while plants receive appropriate sunlight. Regular cleaning of the basin helps maintain healthy water conditions. This easy project combines organization, decoration, and environmental creativity into one functional outdoor installation while remaining accessible for beginners seeking budget ideas and practical Pinterest inspiration.
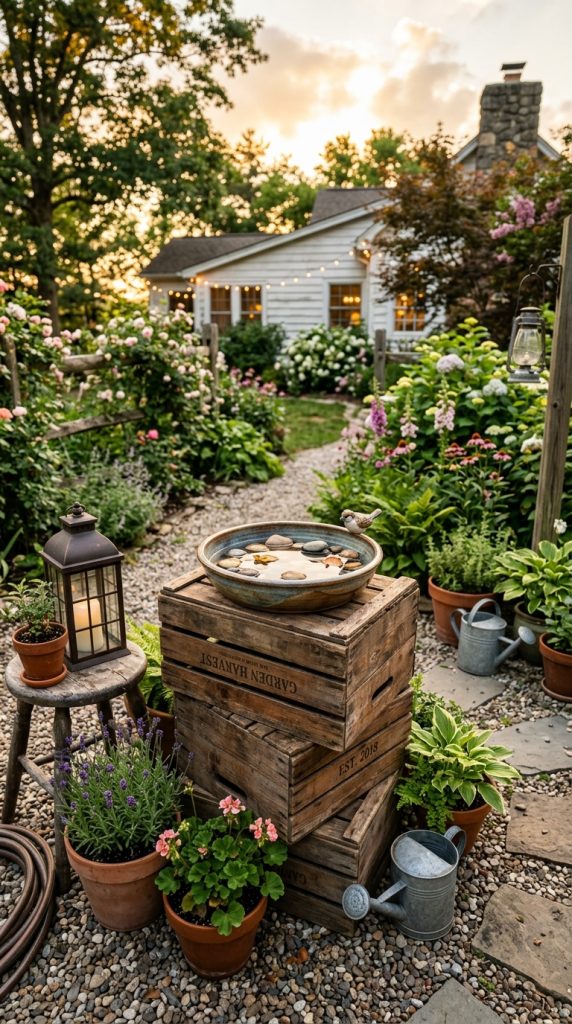
Idea 5: Wooden Crate Rustic Bird Bath
Setup Method
A wooden crate rustic bird bath creates a farmhouse-inspired outdoor decoration using simple woodworking materials and natural textures. This project combines the appearance of stacked wooden crates with a shallow water basin to produce a structured yet handmade garden feature. Rustic Pinterest ideas remain highly popular because they emphasize warmth, simplicity, and practical outdoor styling. The crate design also introduces storage and organization possibilities by allowing decorative plants, stones, or lanterns to be placed around the bird bath structure.
This design works especially well in cottage gardens, patio corners, and backyard seating areas where natural wood complements surrounding greenery. The rectangular crate form creates a stable base that supports heavier bowls or ceramic basins securely. Reclaimed wood can also be used to strengthen the handmade aesthetic while supporting sustainable DIY practices. Since wooden crates are widely available and easy to modify, the project remains beginner friendly while offering opportunities for personalization through stain, paint, or decorative hardware additions.
To build this bird bath, start with one or two sturdy wooden crates and sand all rough surfaces to prevent splinters. Apply outdoor wood sealant to improve resistance against moisture and weather exposure. Position the crates securely on level ground, either stacked vertically or placed side by side depending on the preferred height and design arrangement. Attach the crates together using screws if additional stability is required. Place a shallow ceramic, metal, or stone basin on the top surface, ensuring it remains centered and balanced before adding water.
Decorative gravel or small potted plants may be arranged around the base to improve presentation and integrate the structure into the surrounding landscape. Flat stones inside the basin help birds stand safely while drinking or bathing. The wood should be inspected periodically for moisture damage or structural weakening caused by long-term outdoor exposure. Reapplying sealant annually helps preserve durability and appearance. This step by step project creates a functional and visually organized bird bath that supports rustic decoration themes while remaining affordable, practical, and highly adaptable for different outdoor environments.
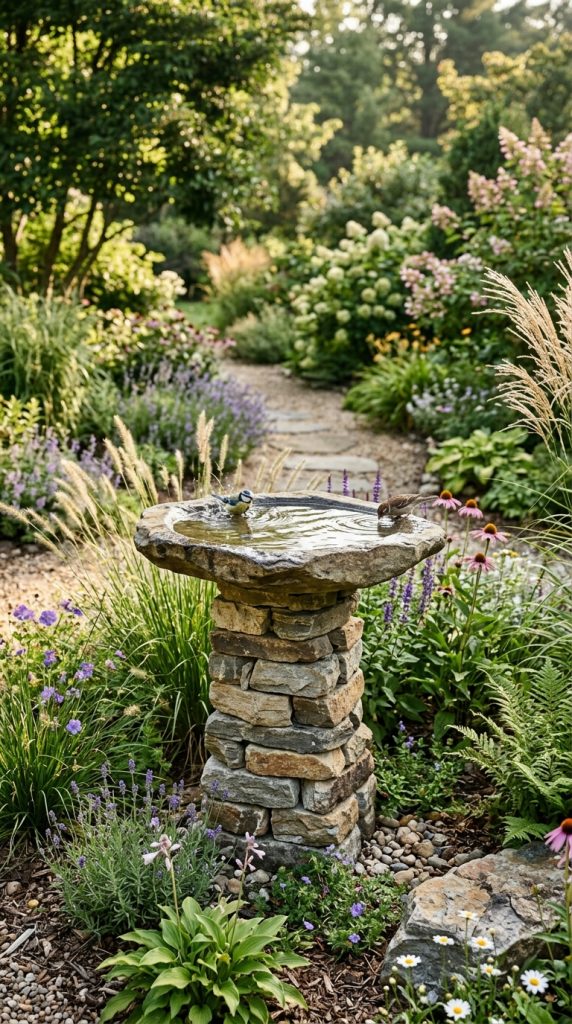
Idea 6: Stacked Stone Natural Bird Bath
How to Create
A stacked stone natural bird bath blends seamlessly into outdoor landscapes by using layered rocks to form both the pedestal and water basin support. This design focuses on creating an organic appearance that resembles naturally occurring garden features rather than manufactured decor. Pinterest inspiration often highlights stone-based DIY projects because they combine durability, minimalist style, and timeless visual appeal. The textured surfaces and earthy colors of natural stones also complement a wide range of outdoor themes including woodland gardens, modern patios, and desert landscaping.
The visual strength of stacked stones comes from their irregular shapes and layered arrangement. Each structure appears unique depending on the selected materials and placement technique. Large flat stones can be used to create stable platforms while rounded rocks add softness and visual contrast. This type of bird bath also requires very little decoration because the natural materials themselves provide aesthetic detail. The heavy structure increases weather resistance and minimizes the risk of tipping during strong wind or rain conditions.
To construct this bird bath, begin by selecting flat stones of varying sizes with stable surfaces suitable for stacking. Choose a shallow stone bowl, concrete dish, or ceramic basin for the water section. Prepare a level ground area and position the largest stones first to create a secure foundation. Continue stacking progressively smaller stones while checking balance after each layer. Waterproof construction adhesive may be used between stones for additional stability, although tightly fitted rocks can often remain secure naturally. Once the pedestal reaches the desired height, place the basin securely on top.
Add small stones inside the basin to provide safe footing for birds and improve water depth variation. Decorative gravel, mulch, or surrounding plants can help integrate the structure into the landscape design. Regular cleaning helps prevent algae accumulation and maintains water clarity. This easy project works especially well for people seeking low-maintenance outdoor decoration ideas with a highly natural appearance. The combination of stone texture, organic structure, and practical functionality makes this bird bath a durable and visually balanced addition to many outdoor spaces.
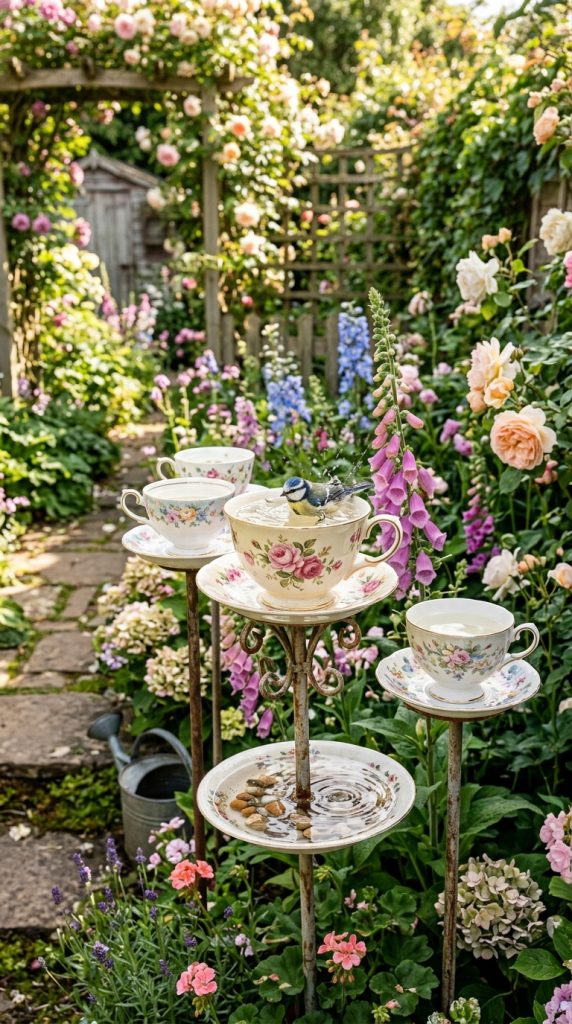
Idea 7: Teacup Garden Bird Bath
Step-by-Step Guide
A teacup garden bird bath transforms oversized cups, saucers, or vintage dishware into delicate decorative water features suitable for small gardens and balcony spaces. This project emphasizes aesthetic charm and creative presentation while remaining simple enough for beginners interested in easy DIY ideas. The smaller scale works especially well in compact outdoor areas where large bird baths may feel overwhelming or impractical. Pinterest trends frequently feature teacup garden projects because they combine handmade decoration with repurposed household materials in visually appealing ways.
The elegant shapes and decorative patterns found on ceramic dishware contribute to a soft and inviting garden atmosphere. Floral designs, pastel colors, and vintage textures support cottage-style decoration themes while maintaining functionality for small birds. This project also allows extensive customization because different dish combinations create entirely unique visual arrangements. Teacup bird baths can be grouped together at varying heights to form layered decorative displays throughout patios or flower gardens.
To make this bird bath, begin by selecting an oversized teacup, shallow bowl, or decorative saucer with smooth edges and sufficient width for birds to access comfortably. Attach the dish securely to a stable pedestal such as a metal rod, stacked plates, wooden post, or upside-down planter using waterproof adhesive. Allow the adhesive to cure completely before moving the structure outdoors. Ensure the final setup remains balanced and resistant to tipping when filled with water.
Place several small pebbles inside the cup or saucer to improve bird footing and create shallow water areas. Position the finished bird bath near flowers or shrubs where birds feel protected while maintaining clear visibility for observation. Cleaning should occur regularly because smaller basins require more frequent water replacement. This beginner friendly tutorial combines creative ideas, vintage decoration, and practical outdoor styling into a highly aesthetic project suitable for patios, balconies, and compact garden spaces.
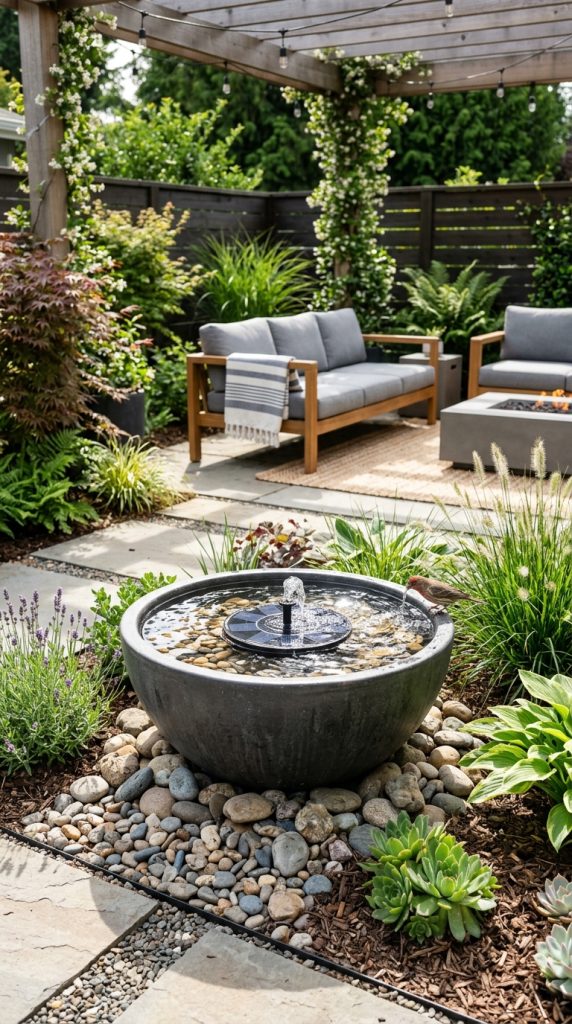
Idea 8: Solar Fountain Bowl Bird Bath
How to Make
A solar fountain bowl bird bath combines moving water with sustainable outdoor design to create a dynamic and visually engaging garden feature. Flowing water often attracts birds more effectively than still water, making this project both decorative and functional. Pinterest ideas featuring solar-powered outdoor elements continue gaining popularity because they reduce electrical requirements while supporting environmentally conscious DIY projects. The gentle sound of circulating water also improves the atmosphere of patios and garden seating areas.
This bird bath style works particularly well in modern design landscapes and minimalist outdoor spaces because of its clean structure and organized presentation. A wide bowl paired with a compact solar fountain creates subtle movement without requiring complicated installation. Since the fountain operates using sunlight, the project remains accessible for beginners who prefer simple setup methods without electrical wiring. Different bowl materials such as ceramic, stone, or metal can also be selected to match various outdoor decoration styles.
To build this project, start with a shallow waterproof bowl large enough to support a small solar fountain attachment. Place the bowl on a stable pedestal, stand, or leveled ground area depending on the desired height. Fill the basin with clean water and position the solar fountain unit in the center according to manufacturer instructions. Most compact fountain attachments float directly on the water surface and activate automatically under sunlight exposure. Ensure the fountain spray remains gentle enough to prevent excessive water loss from the basin.
Flat stones may be added around the fountain to create safe landing spots for birds while improving the visual arrangement. Position the bird bath in a location that receives consistent sunlight throughout the day for reliable fountain performance. Regular cleaning of the solar panel and water basin helps maintain efficient operation and water quality. This step by step project combines aesthetic movement, modern outdoor decoration, and practical bird-friendly functionality into an easy project suitable for beginners seeking trending ideas and sustainable inspiration.
Idea 9: Upside-Down Planter Bird Bath
Execution Process
An upside-down planter bird bath uses common garden containers in an unconventional arrangement to create a simple yet visually balanced outdoor feature. This project involves flipping a large planter upside down to form a pedestal while attaching a shallow basin above it. The clean geometric shape works especially well in minimalist style gardens and modern patio layouts where simple forms and organized decoration remain important design elements. Pinterest inspiration frequently highlights inverted planter projects because they are affordable, easy to customize, and accessible for beginners.
The smooth curves and tapered shape of planters naturally create strong visual structure without requiring complicated construction techniques. Different planter materials such as terracotta, resin, or ceramic can dramatically change the final appearance while maintaining the same overall concept. The simplicity of the design also allows homeowners to coordinate colors and textures with existing outdoor furniture, pathways, or landscaping arrangements. Since planters are built for outdoor durability, the pedestal remains stable and weather-resistant throughout seasonal changes.
To create this bird bath, begin with a large planter that has a wide stable base when inverted. Clean the planter thoroughly and apply outdoor-safe paint if customization is desired. Position the planter upside down on level ground and check for wobbling before proceeding. Attach a shallow bowl, saucer, or decorative tray securely to the top using waterproof adhesive suitable for outdoor environments. Allow sufficient curing time before adding water to ensure structural stability.
Place decorative stones or gravel inside the basin to improve bird safety and reduce slipping. The surrounding area may be enhanced with potted plants or mulch to integrate the structure into the broader landscape design. Water should be replaced frequently to maintain cleanliness and discourage insect buildup. This easy project creates a clean, organized, and highly adaptable bird bath using accessible materials and straightforward construction methods suitable for a wide range of outdoor decoration styles.
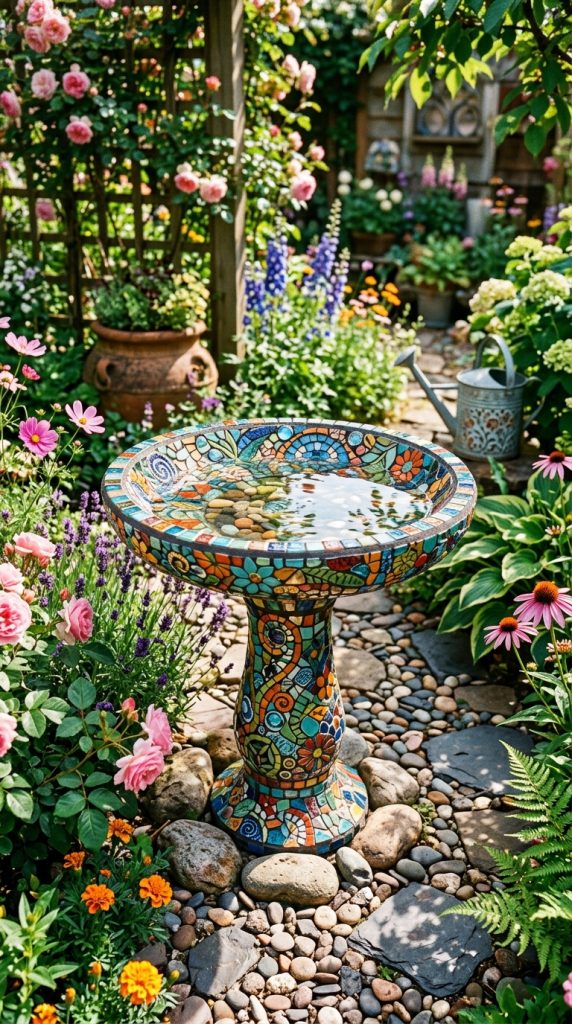
Idea 10: Mosaic Tile Bird Bath
How to Create
A mosaic tile bird bath introduces color, texture, and artistic detail into outdoor spaces through decorative tile patterns arranged around a water basin. This DIY project combines functional bird-friendly design with handmade visual craftsmanship, making it highly popular within Pinterest creative ideas collections. Mosaic surfaces reflect sunlight beautifully and allow extensive personalization using geometric patterns, floral arrangements, or abstract color combinations. The decorative appearance works especially well in vibrant gardens, artistic patios, and eclectic outdoor seating areas.
The mosaic technique also allows damaged or leftover tiles to be reused effectively, supporting sustainable DIY practices and budget ideas. Different tile colors and textures create depth and movement across the bird bath surface while maintaining structural durability. Because the decorative elements are sealed into place, the finished project remains weather resistant and suitable for long-term outdoor display. This style appeals strongly to people interested in combining creative project techniques with practical garden decoration.
To make this bird bath, begin with a plain concrete, ceramic, or metal basin supported by a stable pedestal. Clean the surface thoroughly and arrange mosaic tiles before attaching them permanently to plan the final design. Apply outdoor tile adhesive section by section and press the tiles firmly into position while maintaining even spacing. Once the adhesive cures, spread grout between the tiles and wipe away excess material carefully to reveal the completed pattern. Allow the structure to dry fully before applying waterproof sealant over the mosaic surface.
Flat stones can be added inside the basin to improve bird safety and water accessibility. Position the finished bird bath where sunlight can highlight the reflective tile surfaces while maintaining partial shade for cooler water temperatures. Occasional cleaning helps preserve the brightness of the mosaic and prevents dirt accumulation in grout lines. This beginner friendly tutorial creates an eye-catching outdoor decoration piece that combines artistic craftsmanship with practical bird bath functionality in a durable and highly aesthetic design.
Common Beginner Mistakes and How to Avoid Them
One of the most common mistakes in bird bath DIY projects is selecting basins that are too deep for safe bird access. Birds prefer shallow water where they can stand comfortably, so adding flat stones or reducing water depth improves functionality significantly. Another frequent issue involves unstable construction caused by uneven surfaces or weak adhesive connections. Ensuring that all pedestals remain level and properly cured before adding water helps prevent tipping and structural failure. Many beginners also place bird baths in fully exposed sunlight, which causes water to heat quickly and evaporate faster during warm weather.
Poor material preparation can also reduce durability. Dirt, moisture, or oily residue on surfaces often weakens adhesive performance and leads to separation over time. Thorough cleaning before assembly improves long-term stability. Some projects fail because decorative elements obstruct bird access or create overly slippery surfaces. Functional design should remain the priority even when focusing on aesthetic presentation. Another mistake involves neglecting regular maintenance. Dirty water discourages birds and increases algae growth, insects, and debris buildup. Replacing water frequently and cleaning the basin regularly maintains both hygiene and appearance. Careful planning, stable construction, proper placement, and consistent maintenance help beginners create safer, longer-lasting bird baths with improved visual organization and outdoor functionality.
Practical Tips for Better Results
Using textured materials inside a bird bath improves bird safety by providing secure footing while reducing slipping risks. Flat stones, gravel, or rough ceramic surfaces work especially well for this purpose. Positioning the bird bath near shrubs or small trees also encourages bird activity because nearby cover provides protection from predators and sudden disturbances. However, maintaining some open visibility around the basin helps birds monitor their surroundings comfortably. Choosing partial shade locations further improves water quality by reducing evaporation and overheating during warmer months.
Selecting weather-resistant materials increases the lifespan of handmade outdoor projects significantly. Sealants suitable for concrete, wood, or mosaic surfaces help protect structures from moisture damage and temperature changes. Layering decorative elements carefully also improves presentation without overwhelming the design. Simpler arrangements often create stronger visual balance in minimalist style landscapes and modern design patios. Regular maintenance should become part of outdoor organization routines because fresh water attracts birds more consistently than stagnant water.
Experimenting with height variations can also improve the visual impact of multiple bird baths across larger gardens. Elevated structures work well near pathways while ground-level basins integrate naturally into landscaped environments. Consistency in color palette and material texture helps unify different decorative elements throughout the outdoor space. These practical improvements support better durability, stronger functionality, and more refined aesthetic presentation while keeping the projects beginner friendly and easy to maintain.
Styling, Presentation, or Organization Ideas
Bird baths become more visually effective when integrated thoughtfully into broader outdoor decoration arrangements. Surrounding a bird bath with gravel, mulch, or decorative stones helps define the space clearly while improving organization within the landscape. Layering nearby plants at varying heights also creates a more natural appearance that blends the structure into the surrounding environment. Low ornamental grasses, flowering plants, and small shrubs work particularly well for framing bird baths without obstructing bird access. Consistent use of materials such as terracotta, stone, or wood further strengthens design cohesion across patios and gardens.
Lighting can also improve evening presentation. Solar lanterns, pathway lights, or subtle landscape illumination draw attention to the bird bath while maintaining a calm outdoor atmosphere. In minimalist style spaces, simpler arrangements with neutral tones and clean lines create stronger visual balance. Rustic decoration themes benefit from weathered textures, natural materials, and handmade accessories. Multiple bird baths placed strategically throughout larger gardens can establish visual rhythm and improve overall organization.
Seasonal styling adjustments add additional creative flexibility. Decorative stones, seasonal plants, or subtle color changes help refresh the appearance throughout the year without rebuilding the structure entirely. Matching nearby seating areas, planters, or pathways with the bird bath design creates a more intentional and professionally organized outdoor environment. Careful presentation transforms a simple DIY project into a highly aesthetic focal point suitable for Pinterest-worthy home decor inspiration.
Budget or Time Planning
Most bird bath DIY projects can be completed affordably by using recycled household materials, secondhand containers, or leftover garden supplies. Planning the project budget before purchasing materials helps prevent unnecessary spending and supports more organized execution. Terracotta pots, bowls, stones, and reclaimed wood are often inexpensive while still providing strong visual appeal and long-term durability. Reusing items such as planters, trays, or ceramic dishes further reduces overall project costs while supporting sustainable creative ideas.
Time planning also improves construction efficiency. Simpler projects like upside-down planter bird baths or hanging glass bowl designs can often be completed within a few hours, while concrete or mosaic projects require additional drying and curing time. Separating preparation, assembly, and decoration into different stages prevents rushed construction and improves final quality. Gathering all tools and materials before beginning reduces interruptions during the building process.
Beginners often benefit from starting with smaller easy projects before attempting more detailed designs involving concrete molds or tile work. Choosing one clear design direction during the planning phase also prevents unnecessary material purchases and conflicting decoration choices. Long-term maintenance costs remain low because bird baths generally require only regular cleaning and occasional sealant reapplication. Effective budget management and realistic scheduling allow homeowners to complete attractive outdoor DIY projects without excessive expense or complicated construction timelines.
Creative Expansion and Advanced Inspiration
Once basic bird bath projects become familiar, more advanced creative expansion ideas can introduce additional visual complexity and outdoor functionality. Combining bird baths with planters, fountains, pathways, or seating areas creates larger integrated garden designs with stronger aesthetic impact. Multi-level bird bath arrangements using stacked pedestals or layered basins also provide visual depth while accommodating different bird species. Decorative mosaic work, sculpted concrete textures, and carved stone elements can further personalize the finished structures for highly artistic outdoor presentation.
Seasonal customization offers another creative opportunity. Temporary decorative accents such as flowers, lanterns, pebbles, or themed color palettes can refresh the appearance throughout the year without requiring major reconstruction. Advanced DIY enthusiasts may also experiment with integrated water circulation systems, natural filtration concepts, or rainwater collection methods to improve sustainability and reduce maintenance requirements. Combining bird baths with pollinator-friendly gardens creates a broader wildlife-supporting outdoor environment that increases ecological value while enhancing visual organization.
Exploring different design influences such as Japanese gardens, Mediterranean courtyards, modern minimalist landscapes, or rustic farmhouse decor can inspire highly distinctive handmade projects. Larger outdoor spaces may also benefit from coordinated groups of bird baths connected through pathways or decorative stone arrangements. These advanced creative ideas transform simple bird bath tutorials into comprehensive outdoor decoration projects that combine artistic inspiration, practical landscaping, and long-term aesthetic improvement.