Bird bath DIY upcycle lamp bases combine outdoor garden elements with creative interior decoration techniques to produce functional and visually interesting home decor pieces. This type of DIY project transforms old bird baths into stylish lamp bases using accessible materials, basic tools, and practical planning methods. The process supports sustainable decorating practices by repurposing unused garden items into decorative lighting suitable for living rooms, patios, bedrooms, entryways, and reading corners. Pinterest ideas focused on upcycling projects continue to gain popularity because they combine creativity, budget planning, and personalized design in a beginner friendly format.
This article explains how to create ten unique bird bath lamp base designs using step by step methods suitable for different interior themes and aesthetic preferences. Readers will learn how to prepare materials, choose proper lighting components, stabilize structures, and style finished lamps for modern design or minimalist style spaces. Each idea includes practical instructions and realistic setup guidance that supports safe and organized project execution. The designs range from rustic handmade decoration styles to clean contemporary home decor arrangements. These creative ideas provide inspiration for anyone interested in DIY lighting, sustainable decoration, or easy projects that combine function and artistic presentation.
Why This Idea Is Trending or Useful
Bird bath upcycle projects have become popular because they support sustainable decorating methods while offering affordable alternatives to traditional decorative lighting. Pinterest inspiration increasingly focuses on handmade decoration ideas that transform forgotten objects into functional interior features. Old bird baths often contain durable materials such as concrete, metal, ceramic, or stone, making them suitable foundations for sturdy lamp bases. Instead of discarding weathered garden pieces, many DIY enthusiasts use them as creative project materials that support both indoor and outdoor styling concepts.
Another reason this idea is trending involves the flexibility of design possibilities. Bird bath structures can support minimalist style lighting, vintage-inspired home decor, rustic arrangements, or modern design aesthetics depending on paint finishes, lampshade selection, and decorative details. The project also appeals to beginners because the construction process requires simple tools and accessible planning techniques. Most setups involve cleaning, stabilizing, drilling, and basic electrical assembly rather than advanced woodworking or specialized construction knowledge.
The visual impact also contributes to the popularity of this DIY tutorial category. Bird bath lamp bases create sculptural lighting pieces that function as both decoration and practical illumination. Their elevated shape naturally draws attention in living spaces, making them effective statement pieces for Pinterest boards focused on organization, aesthetic interiors, and budget ideas for personalized home decor.
Materials and Preparation
Successful bird bath DIY lamp projects begin with careful preparation and organized material selection. The first requirement is a stable bird bath structure made from concrete, metal, ceramic, resin, or stone. Vintage garden bird baths work particularly well because their aged texture adds visual character to the finished lamp base. Before beginning the project, inspect the bird bath for cracks, weak joints, or uneven surfaces that may affect stability during installation. Cleaning the surface thoroughly helps paint, adhesive, and decorative finishes adhere properly during the setup process.
Basic tools for this easy project include sandpaper, cleaning brushes, protective gloves, measuring tape, adhesive, primer, paint, sealant, and a drill suitable for the bird bath material. Electrical materials usually include a lamp kit, threaded rod, wiring components, socket assembly, harp support, and lampshade hardware. Preparation also involves choosing the intended placement area because indoor and outdoor lamps require different protective coatings and moisture considerations.
Planning the final aesthetic before construction helps maintain consistent design results. Rustic styles may require distressed paint finishes and textured shades, while modern design setups often use matte coatings and simple geometric lampshades. Measuring lamp height, base width, and cord placement before assembly prevents imbalance or awkward proportions. Organized preparation improves safety, simplifies execution, and supports professional-looking handmade decoration results.
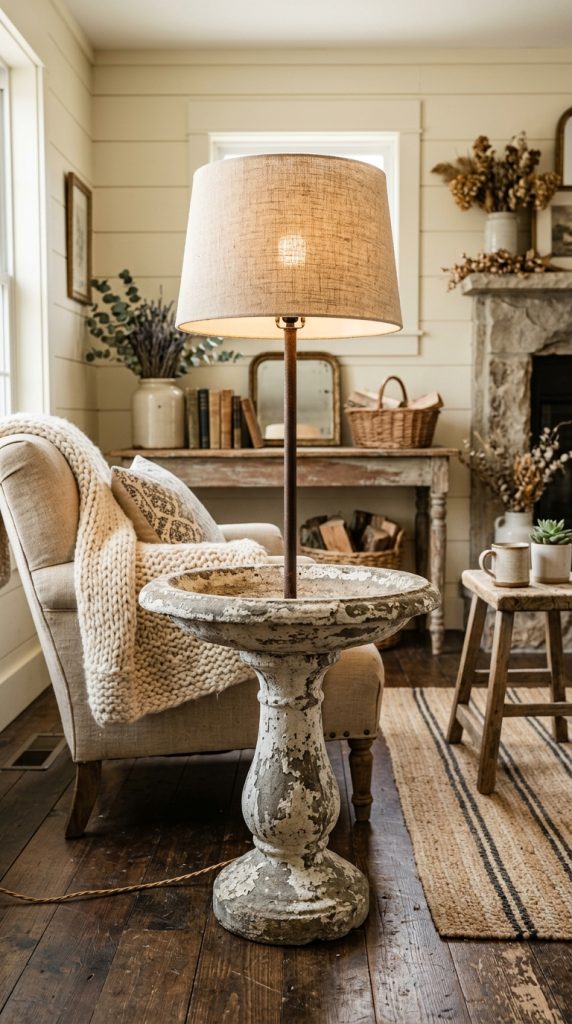
Idea 1: Rustic Garden Stone Lamp
How to Create
A rustic garden stone lamp transforms an aged concrete bird bath into a decorative lighting piece suitable for farmhouse-inspired interiors or covered patio spaces. The natural texture of weathered stone creates visual depth that supports earthy home decor arrangements and handmade decoration aesthetics. This Pinterest idea works especially well with neutral paint finishes, linen lampshades, and lightly distressed surfaces. Instead of hiding imperfections, the design emphasizes cracks, texture variations, and aged coloration to produce a naturally authentic appearance. A wider bird bath pedestal also helps create a stable lamp base that complements oversized shades and warm ambient lighting.
Begin by cleaning the bird bath thoroughly using a stiff brush and mild detergent to remove dirt, moss, or loose debris. Allow the surface to dry completely before sanding rough edges or unstable areas. Drill a centered opening through the basin and pedestal to accommodate lamp wiring and threaded support rods. Apply matte primer followed by soft gray, beige, or weathered white paint using dry-brush techniques for a layered rustic effect. Insert the lamp kit components carefully and secure the threaded rod inside the pedestal using adhesive or hardware fasteners. Finish the project with a fabric lampshade in natural tones such as cream or light brown. Seal the entire surface with a protective matte coating to preserve the finish and improve durability for long-term decorative use.
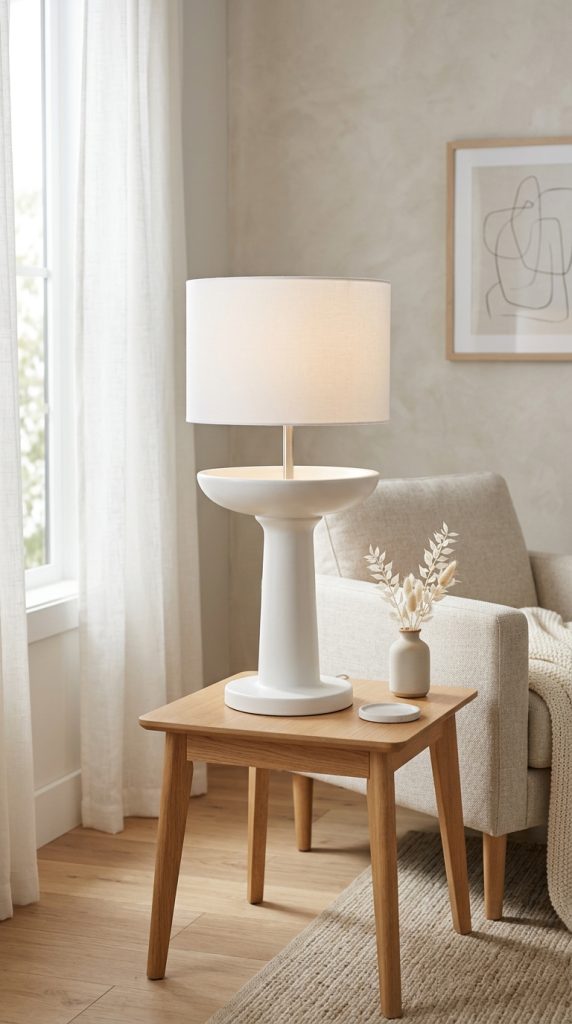
Idea 2: Minimalist White Ceramic Lamp
Step-by-Step Guide
A minimalist white ceramic lamp focuses on clean lines, smooth surfaces, and balanced proportions to create a modern design statement suitable for contemporary interiors. Ceramic bird baths often contain elegant curves and symmetrical forms that naturally support minimalist style decoration. This DIY tutorial emphasizes simplicity by limiting excessive ornamentation and maintaining a consistent neutral color palette throughout the entire project. White finishes increase brightness while helping the lamp blend naturally into bedrooms, offices, or Scandinavian-inspired living areas. The result is an aesthetic lighting piece that supports uncluttered organization and visually calm interior arrangements.
Preparation begins by washing the ceramic bird bath carefully to remove surface residue and oils that may interfere with paint adhesion. Repair visible chips using filler designed for ceramic materials before lightly sanding the entire structure for a smooth finish. Apply a high-quality white primer followed by several thin coats of matte white paint to achieve consistent coverage without visible brush marks. Drill a discreet center opening for the lamp hardware and feed wiring through the pedestal carefully to maintain clean visual presentation. Install a simple lampshade with straight edges or cylindrical shaping to reinforce the minimalist concept. Avoid excessive decorative additions and instead focus on proportion, symmetry, and surface quality. Position the finished lamp near neutral furniture, textured fabrics, or soft natural lighting to maximize its modern home decor impact.
Idea 3: Vintage Floral Bird Bath Lamp
How to Make
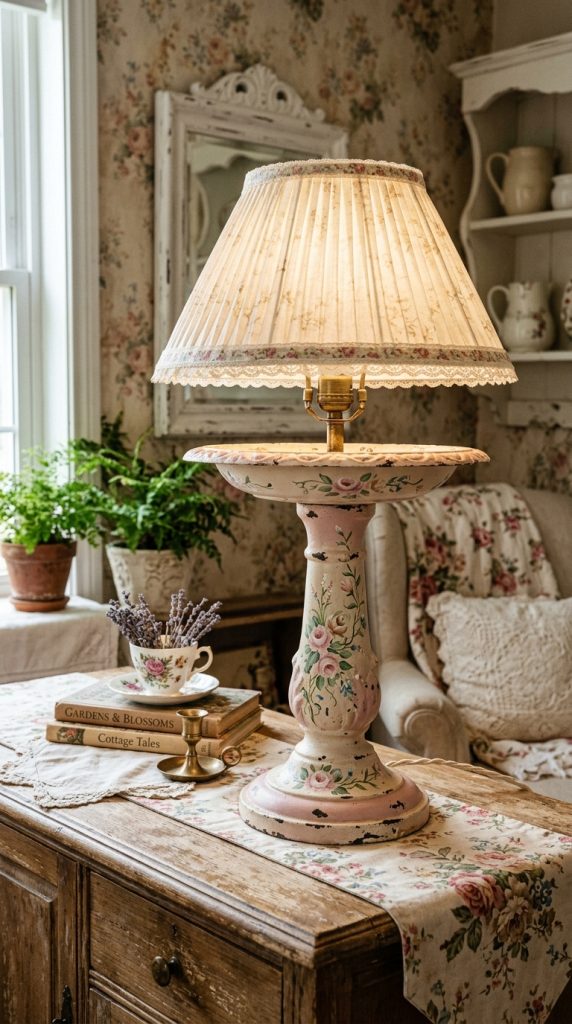
A vintage floral bird bath lamp combines delicate decorative painting with traditional lighting elements to create a soft and romantic home decor feature. Ceramic or metal bird baths with curved basins and ornamental detailing work especially well for this creative project because they already contain vintage-inspired structure and texture. Floral patterns painted around the basin or pedestal help introduce color and decorative interest without overwhelming the overall design. Pinterest ideas centered on cottage interiors, antique-inspired decoration, and handmade DIY aesthetics frequently use floral motifs because they create warmth and nostalgic visual appeal.
Start by preparing the bird bath surface with gentle sanding and a complete cleaning process to remove rust, dirt, or old paint layers. Apply a soft pastel base color such as cream, muted blue, or dusty pink before sketching floral patterns around the pedestal using chalk or removable markers. Acrylic paint works well for creating layered flowers, leaves, and vine details with controlled precision. Once the artwork dries, protect the decorative surface with a clear matte sealant. Drill an opening for electrical hardware and insert the lamp kit carefully through the center structure. Choose a pleated fabric lampshade or lightly textured shade to complement the vintage aesthetic. Position the completed lamp near antique furniture, lace textiles, or natural wood surfaces to strengthen the decorative presentation and maintain visual consistency throughout the room.
Idea 4: Industrial Metal Bird Bath Lamp
Execution Process
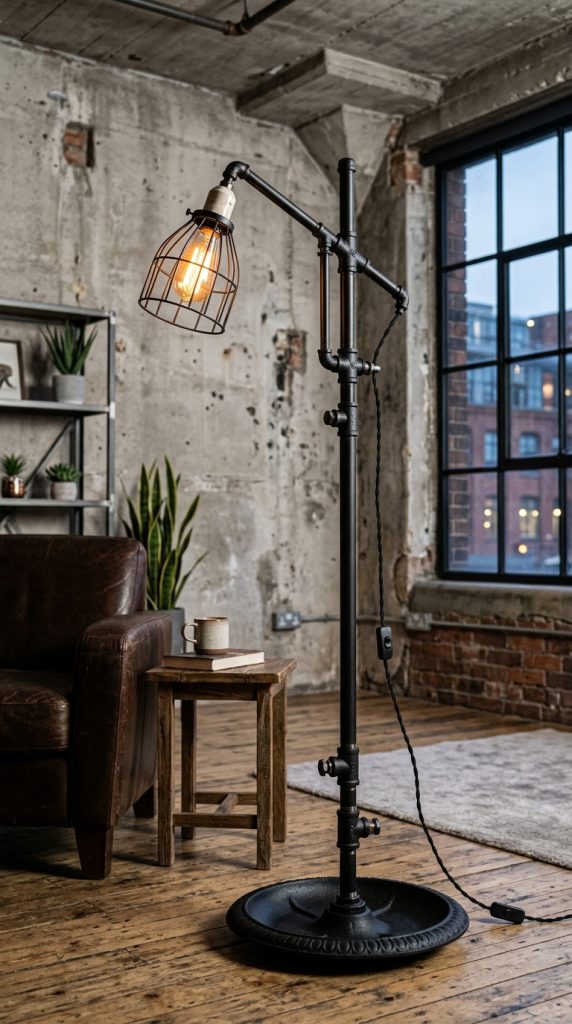
An industrial metal bird bath lamp uses raw finishes, dark surfaces, and exposed hardware to create a strong modern lighting feature inspired by warehouse and loft-style interiors. Metal bird baths provide an excellent foundation for this Pinterest inspiration because they naturally support industrial textures such as aged iron, brushed steel, or weathered bronze. This design prioritizes structural simplicity and practical function rather than decorative detailing. Matte black finishes, exposed bolts, and neutral lampshades contribute to the bold visual character associated with industrial home decor trends.
The setup process begins with removing rust and unstable paint from the metal bird bath using wire brushes and sanding tools. After cleaning the structure completely, apply rust-resistant primer followed by matte black or dark gray metal paint. Drill openings carefully for wiring and reinforce weak joints using metal brackets or industrial adhesive if necessary. Feed electrical components through the pedestal and secure the lamp socket firmly at the top of the structure. A simple drum shade or exposed bulb configuration works effectively for maintaining the industrial style. For additional visual texture, wrap sections of the pedestal with dark rope or use brushed metal fittings around the socket area. This easy project works particularly well in offices, reading corners, or modern apartments where strong architectural decoration complements the surrounding environment.
Idea 5: Coastal Blue Driftwood Style Lamp
Setup Method
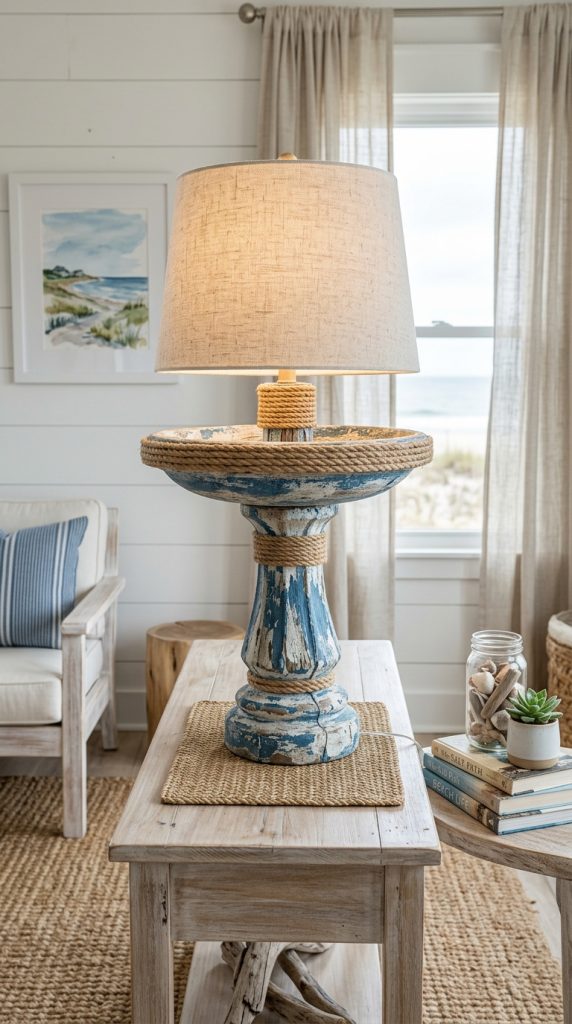
A coastal blue driftwood style lamp introduces relaxed beach-inspired decoration into indoor spaces using weathered paint techniques and soft natural color combinations. Bird baths with rounded forms and textured surfaces work especially well for this aesthetic because they resemble natural shoreline materials once painted and distressed properly. Pinterest ideas connected to coastal interiors often emphasize light colors, natural textures, and relaxed visual balance. This beginner friendly DIY project creates soft ambient lighting while supporting calm and organized room arrangements suitable for bedrooms or sitting areas.
Preparation starts by cleaning the bird bath thoroughly and applying a light sanding treatment to improve paint adhesion. Use layered paint techniques with white, pale blue, and sandy beige shades to imitate weathered driftwood texture. Dry brushing and light sanding between paint layers creates natural variation and aged surface depth. Install the lamp hardware carefully through the center structure and secure all wiring components safely inside the pedestal. Select a woven or linen lampshade in neutral tones to strengthen the coastal aesthetic. Decorative rope wrapped around the base or subtle shell-inspired accents can add additional texture without overpowering the design. Position the finished lamp near natural wood furniture, soft fabrics, or light-colored walls to maintain a cohesive and airy home decor presentation.
Idea 6: Mosaic Tile Bird Bath Lamp
How to Create
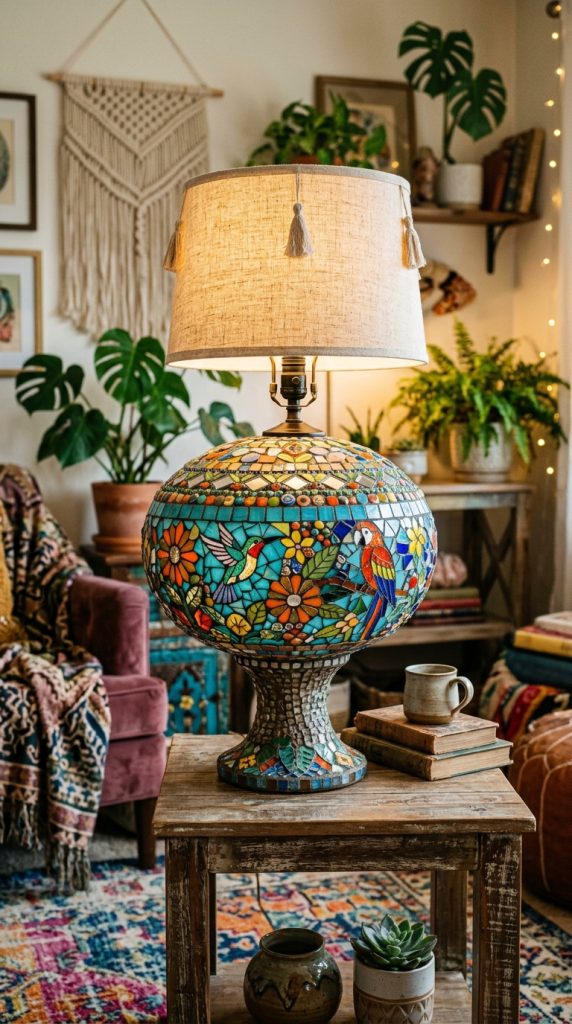
A mosaic tile bird bath lamp transforms a plain surface into a colorful decorative centerpiece using patterned glass, ceramic, or stone tile arrangements. This creative project supports artistic expression while producing a functional lamp suitable for entryways, patios, or eclectic interior spaces. Mosaic surfaces create visual movement and reflective texture that enhance ambient lighting once the lamp is illuminated. Pinterest inspiration focused on handmade decoration frequently includes mosaic projects because they allow customization through color selection, geometric arrangements, and surface composition.
Begin by cleaning and priming the bird bath surface to create a stable foundation for adhesive application. Arrange small mosaic pieces in advance to establish balanced patterns before attaching them permanently to the structure. Use tile adhesive to secure each piece carefully around the pedestal and basin while maintaining even spacing throughout the design. After the adhesive dries completely, apply grout between the tiles and wipe away excess material using a damp sponge. Allow the entire surface to cure fully before sealing it for protection against moisture and wear. Install the lamp hardware through a centered opening and choose a simple lampshade that does not compete visually with the mosaic detailing. Soft neutral shades help balance the decorative intensity while allowing the colorful tile work to remain the primary aesthetic feature.
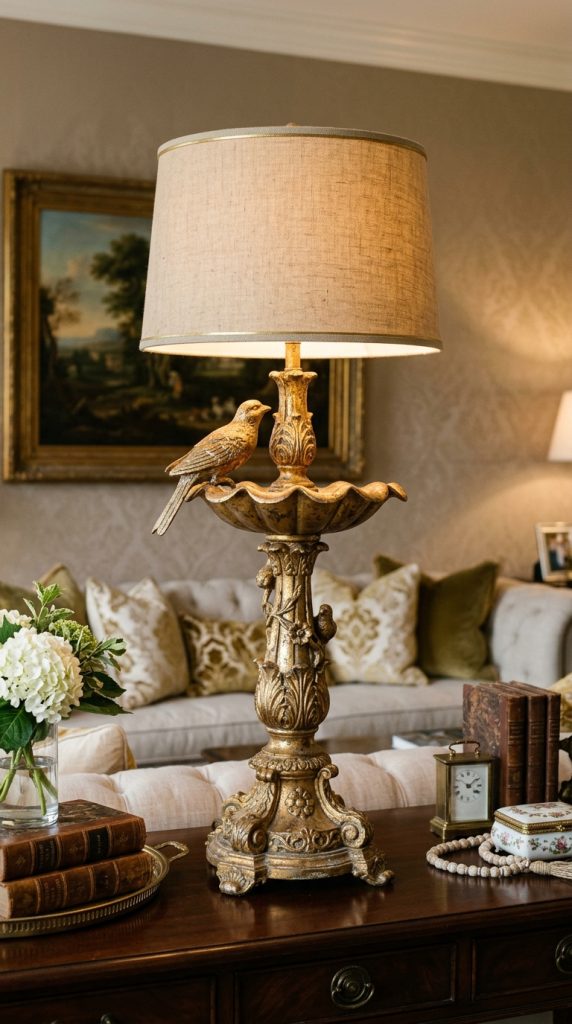
Idea 7: Antique Gold Statement Lamp
Step-by-Step Guide
An antique gold statement lamp creates an elegant decorative focal point using metallic finishes and classical styling techniques. Ornamental bird baths with carved details, curved pedestals, or layered basin edges work especially well for this aesthetic because they naturally resemble vintage architectural features. Gold finishes add warmth and sophistication while helping the lamp function as both practical lighting and decorative sculpture. Pinterest ideas centered on luxury-inspired interiors often incorporate metallic accents because they reflect light effectively and enhance overall room presentation.
Start by cleaning and sanding the bird bath thoroughly to prepare the surface for primer and metallic paint application. Apply a dark undercoat first because deeper base colors improve the richness of antique gold finishes. Use metallic gold paint sparingly in layered applications to create depth rather than a flat reflective appearance. Distressing raised details lightly with dark wax or glaze can increase the aged antique effect while emphasizing ornamental textures. Drill the necessary opening for wiring and install the lamp components securely through the pedestal. A black, cream, or textured neutral lampshade balances the metallic finish and prevents visual overload. Position the finished lamp near mirrors, neutral walls, or elegant furniture pieces to maximize reflected light and strengthen the decorative impact within the space.
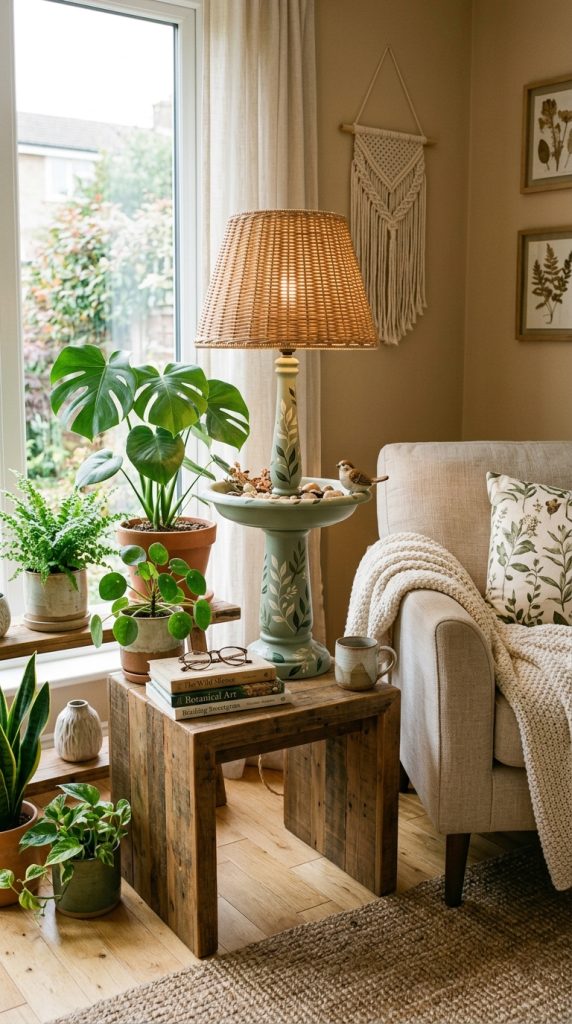
Idea 8: Botanical Green Garden Lamp
How to Make
A botanical green garden lamp combines natural color palettes with plant-inspired decoration to create a fresh and calming lighting feature. Bird baths originally designed for outdoor use already contain garden-related visual associations, making them ideal foundations for botanical-themed DIY decoration. Soft green finishes, leaf patterns, and organic textures help this project integrate naturally into interiors focused on nature-inspired organization and aesthetic home decor. This beginner friendly project works well for sunrooms, reading corners, and indoor plant arrangements.
The execution process begins by cleaning the bird bath surface thoroughly and repairing cracks or unstable sections before painting. Apply a muted sage, olive, or eucalyptus green base coat using matte exterior-grade paint for durability and smooth coverage. Decorative stencils or hand-painted leaf patterns can be added around the pedestal for subtle botanical detail. After sealing the painted surface, drill a center opening and install the lamp wiring securely through the structure. Select a lampshade made from woven natural materials or light fabric to maintain the organic aesthetic. Additional styling can include positioning the lamp near indoor plants, wooden furniture, or woven baskets to create cohesive visual balance. The completed project provides soft decorative lighting while supporting calming and nature-focused interior design arrangements.
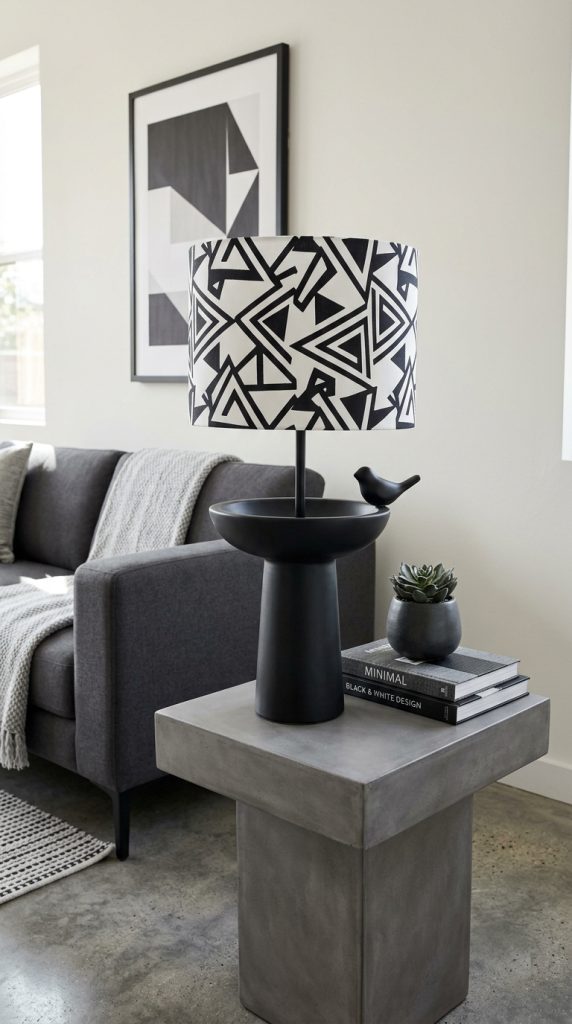
Idea 9: Black and White Modern Contrast Lamp
Execution Process
A black and white modern contrast lamp emphasizes bold visual balance through high-contrast color combinations and geometric simplicity. Bird baths with clean shapes and symmetrical structures work effectively for this design because they support contemporary styling without excessive decorative interference. This Pinterest idea suits minimalist style interiors where strong contrast creates visual structure and organized presentation. The project also works well in monochromatic spaces because the lamp introduces dramatic lighting and sculptural interest without requiring complicated decorative additions.
Preparation begins by sanding and priming the bird bath carefully to create smooth paint coverage. Divide the structure visually into sections before applying matte black and crisp white paint in clean geometric arrangements. Painters tape helps create precise lines and consistent separation between colors. After the paint dries fully, seal the surface using a protective matte coating to preserve the modern finish and prevent scratches. Install the lamp hardware through the center opening and choose a structured lampshade with simple cylindrical or rectangular shaping. Avoid ornate textures or decorative trim because clean design consistency strengthens the visual effect. This easy project fits effectively into offices, entryways, or contemporary living rooms where bold modern design elements support organized and aesthetic home decor arrangements.
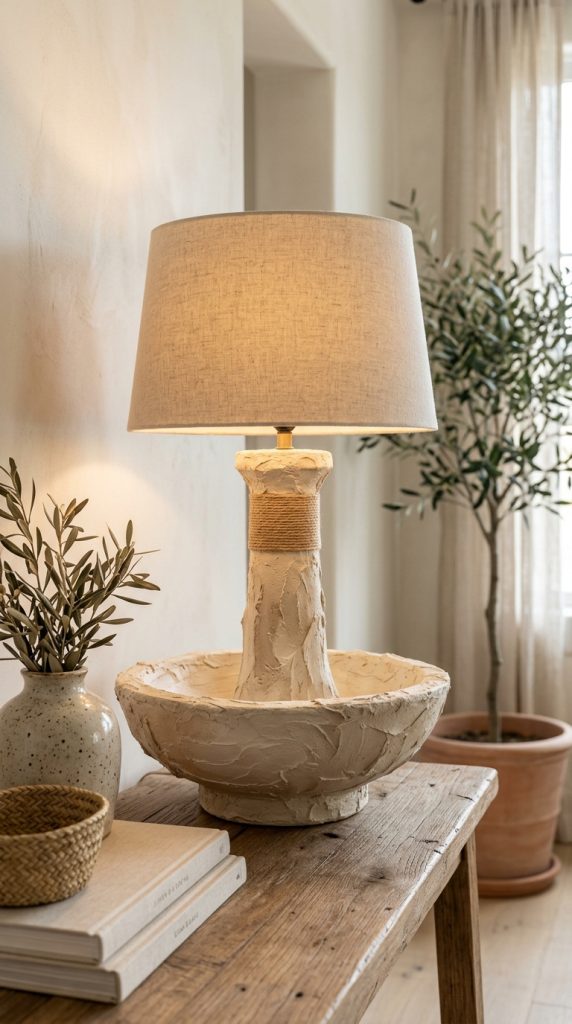
Idea 10: Textured Plaster Artistic Lamp
How to Create
A textured plaster artistic lamp transforms a simple bird bath into a sculptural lighting feature using layered surface treatments and handmade finishing techniques. This creative project focuses on tactile texture rather than bright color or heavy ornamentation, making it suitable for modern design interiors that emphasize natural materials and artistic decoration. Cement or stone bird baths work particularly well because their durable surfaces support layered plaster applications and sculptural detailing. Pinterest inspiration connected to Mediterranean, organic modern, and artisan-style interiors frequently includes textured surfaces because they create subtle visual movement and handcrafted character.
Begin by cleaning the bird bath completely and roughening smooth areas lightly with sandpaper to improve plaster adhesion. Apply textured plaster in thin layers using spatulas or palette knives to create organic surface variation around the pedestal and basin. Allow each layer to dry partially before adding additional texture to prevent cracking or instability. Once the plaster cures fully, apply neutral paint washes in beige, ivory, or soft gray to highlight the dimensional texture without overwhelming the design. Drill the necessary opening carefully through the structure and install the lamp hardware securely. A neutral fabric shade with soft edges complements the sculptural base while maintaining visual balance. Position the completed lamp near textured fabrics, natural wood, or minimalist furniture to strengthen the artistic and handmade presentation.
Common Beginner Mistakes and How to Avoid Them
One of the most common beginner mistakes in bird bath DIY lamp projects involves selecting unstable or damaged structures without proper reinforcement. Cracked pedestals, uneven bases, or loose basin connections can create safety issues once electrical components and lampshades are installed. Careful inspection before beginning the project helps prevent instability during assembly and long-term use. Another frequent problem involves skipping surface preparation steps such as cleaning, sanding, or priming. Paint and adhesive materials do not bond effectively to dirty or glossy surfaces, leading to peeling finishes and weak decorative results.
Improper electrical installation is another issue that affects many beginner friendly projects. Loose wiring, incorrect socket positioning, or unsecured threaded rods can reduce safety and structural stability. Using complete lamp kits and following organized setup methods improves reliability throughout the process. Overdecorating is also common when attempting Pinterest-inspired designs. Excessive embellishments can overpower the original shape of the bird bath and create cluttered presentation rather than balanced aesthetic decoration.
Many DIY projects also fail because of poor planning regarding lamp size and proportion. Oversized lampshades may make the structure appear unstable, while very small shades create awkward visual balance. Measuring dimensions carefully before purchasing materials helps maintain proper proportions and supports a polished final appearance.
Practical Tips for Better Results
Achieving professional-looking results in bird bath lamp projects depends heavily on preparation quality, material selection, and surface finishing techniques. Choosing a bird bath with solid structural integrity simplifies the entire process and reduces the need for extensive repairs during construction. Before painting, always test cleaning methods and primer compatibility on a small hidden section to ensure proper adhesion and color consistency. Thin paint layers generally produce smoother finishes than thick applications, especially on textured stone or ceramic surfaces.
Balanced proportions are essential for successful home decor presentation. Lampshades should complement the height and width of the bird bath rather than overpower the structure visually. Neutral lampshades often work best because they allow decorative textures and painted surfaces to remain the primary focal point. When drilling through concrete or ceramic materials, use proper drill bits and moderate pressure to reduce the risk of cracking.
Protective sealants also improve durability and maintain appearance over time. Matte finishes support rustic and minimalist style projects, while satin coatings enhance metallic or decorative surfaces. Organizing all tools and materials before beginning the setup method improves efficiency and prevents interruptions during construction. Testing electrical components before final assembly is another important step because it allows adjustments before decorative finishes are permanently completed.
Styling, Presentation, or Organization Ideas
Bird bath lamp bases can become strong decorative features when styled thoughtfully within a room arrangement. Placement near seating areas, side tables, entryways, or reading corners allows the lamp to function as both practical lighting and aesthetic decoration. For minimalist style interiors, positioning the lamp against neutral walls with limited surrounding decor helps emphasize the sculptural quality of the upcycled design. Rustic and vintage-inspired projects pair effectively with wood furniture, woven textiles, and layered fabric textures.
Organization also affects the visual impact of DIY lighting projects. Concealing electrical cords using cable covers, baskets, or furniture placement creates cleaner presentation and improves room structure. Lamps with botanical or coastal styling often work best alongside natural materials such as wood, linen, stone, or indoor plants. Metallic or industrial designs can be strengthened through nearby black accents, geometric furniture, or exposed texture elements.
Layered lighting arrangements improve overall room atmosphere while highlighting the handmade decoration qualities of the lamp base. Combining bird bath lamps with soft overhead lighting or smaller accent lights creates balanced illumination throughout the space. Decorative trays, books, ceramics, or textured fabrics placed nearby can help integrate the lamp naturally into existing home decor arrangements without making it appear isolated or disconnected from the room design.
Budget or Time Planning
Bird bath DIY lamp projects remain popular partly because they support budget ideas and flexible planning methods suitable for different experience levels. Many bird baths can be found through secondhand markets, garage sales, storage areas, or unused garden spaces, significantly reducing material expenses. Reusing existing paints, brushes, and decorative supplies also lowers total project cost while supporting sustainable DIY practices. Planning the complete design before purchasing additional materials helps avoid unnecessary spending on decorative elements that may not suit the final aesthetic.
Time management is equally important for achieving organized and efficient project execution. Surface preparation usually requires the most time because cleaning, sanding, repairing, and drying stages must be completed carefully before assembly begins. Rushing these steps often leads to unstable finishes and weaker long-term durability. Breaking the project into separate phases such as preparation, painting, assembly, and styling can make the process more manageable for beginners.
Simple minimalist designs generally require less construction time than mosaic or heavily textured projects. Planning drying and curing periods between paint or adhesive layers also improves workflow efficiency. Creating a clear materials checklist before starting helps prevent interruptions and allows smoother execution from beginning to end. Organized planning ultimately improves both the visual quality and practical success of the finished lamp.
Creative Expansion and Advanced Inspiration
After mastering basic bird bath lamp construction methods, more advanced creative ideas can expand the project into larger decorative collections or themed interior arrangements. Matching pairs of bird bath lamps can create symmetrical styling for bedrooms, entryways, or living rooms. Layered texture techniques such as plaster sculpting, metallic glazing, or multi-tone distressing can also introduce more artistic depth into future projects. Advanced Pinterest inspiration often combines lighting with seasonal decoration concepts or integrated shelving and display arrangements.
Outdoor adaptations represent another creative expansion opportunity. Weather-protected bird bath lamps can be incorporated into patios, covered porches, or garden seating areas using moisture-resistant materials and exterior-rated electrical components. Larger bird baths may even support floor lamp designs rather than tabletop arrangements. Decorative additions such as carved patterns, raised stencil work, or embedded mosaic elements can create highly customized handmade decoration results.
Experimenting with lighting temperature also changes the mood and presentation of finished projects. Warm bulbs create softer rustic ambiance, while cooler lighting supports modern design aesthetics. Coordinating lamp finishes with surrounding furniture, textiles, or wall textures can strengthen visual harmony throughout the room. These advanced approaches allow simple beginner friendly projects to evolve into fully personalized creative home decor collections with strong aesthetic consistency.