
Ballet-inspired bun hairstyles are widely recognized for their clean structure, elegance, and functional design. These hairstyles are not limited to dancers alone; they are also used in everyday styling, formal events, and minimalist fashion aesthetics. The appeal of ballet buns lies in their ability to keep hair securely in place while maintaining a polished and refined appearance. In Pinterest ideas, these hairstyles often appear as inspiration for school, work, performances, and creative styling projects. The focus of this topic is to explore different variations of ballet buns that can be adapted for various hair lengths and textures.
This article presents detailed step-by-step tutorial-style explanations for different bun designs inspired by ballet traditions. Each idea is designed to be beginner friendly and practical, requiring simple materials and basic styling tools. Readers will learn how to create structured buns, smooth finishes, and decorative variations that align with modern design preferences. The goal is to provide creative ideas that combine functionality with aesthetic appeal, making them suitable for both daily use and special occasions.
Why This Idea Is Trending or Useful
Ballet bun hairstyles remain consistently popular in modern styling because they combine simplicity with elegance. On Pinterest ideas, they are often shared as timeless examples of minimalist style and practical hair management. These styles are trending due to their adaptability across different settings such as home decor inspiration shoots, professional environments, dance training, and formal events. The structured appearance of a bun creates a clean silhouette, which aligns with modern minimalist style trends that emphasize neatness and control.
Another reason these hairstyles are widely used is their accessibility. Most bun variations require only basic materials and can be achieved without advanced hairstyling skills. This makes them suitable for DIY tutorials and beginner friendly learning. They also support creative expression because small changes in placement, tightness, or accessories can transform the overall look. As a result, ballet buns continue to appear in creative project boards, aesthetic inspiration collections, and practical styling guides across digital platforms.
Materials and Preparation
Creating ballet bun hairstyles requires a small set of essential materials that support structure, hold, and smoothness. Common items include a hairbrush or comb for detangling, elastic bands for securing the hair, and bobby pins for holding the bun in place. Hair spray or styling gel may also be used to maintain a smooth finish and reduce flyaways. For some variations, hair doughnuts or bun forms can help create volume and shape, especially for thicker or longer styles. These tools are widely available and suitable for DIY styling at home.
Preparation is an important step before starting any bun hairstyle. Hair should be clean, brushed, and free from tangles to ensure a smooth base. Light dampening or applying styling cream can improve manageability, especially for frizzy hair types. It is also helpful to decide the bun placement beforehand, whether high, mid, or low, depending on the desired look. Proper planning ensures the final result appears balanced and secure. This preparation stage is essential for achieving professional-looking results in a simple and organized way.
MAIN IDEAS SECTION
Idea 1: Classic High Ballet Bun
How to Create
The classic high ballet bun is one of the most recognized and structured hairstyles in ballet styling. It is positioned at the crown of the head and designed to create a clean, lifted appearance. This style is often associated with discipline and elegance because it keeps all hair tightly secured away from the face and neck. It works well for formal performances, school activities, and minimalist style inspiration. The high placement also elongates the neck visually, making it a popular choice in aesthetic Pinterest ideas and creative project styling. Its simplicity is what makes it timeless and widely used across different hair types.
To create this hairstyle, start by brushing the hair thoroughly to remove all knots. Gather the hair into a high ponytail at the crown and secure it tightly with an elastic band. Twist the ponytail firmly and wrap it around the base to form a circular bun shape. Use bobby pins to secure the bun evenly from all sides. Finish with light hairspray to hold the structure in place. This step by step method ensures a neat and professional finish suitable for both beginners and advanced styling routines.
Execution Process
The execution of a classic high ballet bun requires attention to symmetry and tension control. The ponytail must be centered properly to avoid imbalance in the final bun shape. Hair tension should be firm but not overly tight to prevent discomfort while maintaining structure. Wrapping the hair evenly around the base helps create a smooth circular form without visible gaps. This technique is often used in dance tutorials and beginner friendly hair styling guides due to its reliability and simplicity.
After forming the bun, securing it properly is essential for long-lasting hold. Pins should be inserted in a crisscross pattern to anchor the bun securely. Any loose strands can be smoothed using gel or a fine brush. This hairstyle can also be adapted with accessories such as ribbons or minimalist pins for decorative variation. It remains one of the most practical and widely used creative ideas for structured hair styling.

Idea 2: Low Sleek Ballet Bun
How to Create
The low sleek ballet bun is a refined hairstyle positioned at the nape of the neck, offering a softer and more elegant variation of the traditional bun. It is commonly used in formal settings, professional environments, and aesthetic home decor inspiration photography. This style focuses on smoothness and simplicity, making it ideal for minimalist style lovers. The low placement creates a calm and balanced appearance, suitable for both casual and formal looks. It is often featured in Pinterest ideas for its clean and sophisticated finish.
To create this bun, begin by brushing the hair thoroughly and applying a small amount of smoothing gel. Gather the hair at the base of the neck and secure it into a low ponytail. Twist the ponytail tightly and wrap it around its base to form a compact bun. Secure it with bobby pins, ensuring even distribution around the shape. A finishing spray helps maintain smoothness and reduces flyaways. This step by step process is simple yet effective for achieving a polished appearance.
Setup Method
The setup method for a low sleek ballet bun focuses on control and precision. Hair must be evenly smoothed before securing the ponytail to avoid uneven texture. The low position requires careful alignment with the center of the neck to maintain symmetry. Using a fine comb helps achieve a sleek surface, which is essential for this style’s polished look. This method is widely used in beginner friendly tutorials because it requires minimal tools.
Once the bun is formed, adjustments should be made to ensure a tight and secure structure. Pins should be placed strategically to prevent shifting during movement. This hairstyle is particularly suitable for long wear situations such as events or workdays. Its simple yet elegant structure makes it a strong choice for creative project inspiration and modern design aesthetics.

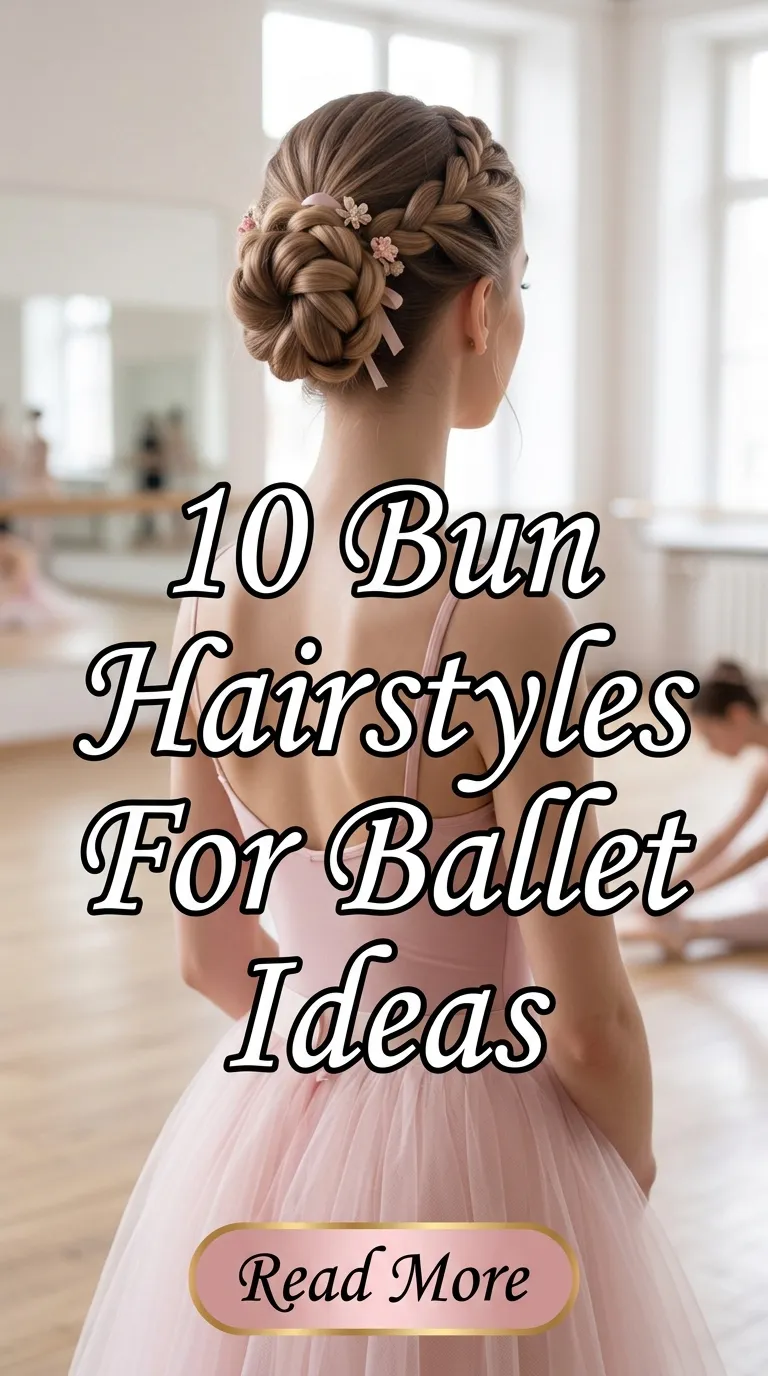
Idea 3: Braided Ballet Bun
How to Create
The braided ballet bun adds texture and detail to the traditional bun structure by incorporating braiding techniques before forming the final shape. This style is popular in creative ideas because it combines elegance with intricate design. It is suitable for both performances and decorative styling inspiration. The braided element enhances visual interest while maintaining the clean silhouette associated with ballet hairstyles. It works well for medium to long hair and is often featured in beginner friendly tutorials.
To create this style, begin by brushing the hair and securing it into a ponytail. Divide the ponytail into sections and braid it tightly from top to bottom. Once the braid is complete, wrap it around the base of the ponytail to form a bun. Secure the structure with bobby pins and ensure the braid is evenly distributed. Light hairspray helps maintain shape and hold. This method is practical and adds creative variation to standard bun designs.
Step-by-Step Guide
The step-by-step guide focuses on maintaining braid tension and bun stability. The braid must be tight enough to hold its shape but flexible enough to wrap smoothly around the base. Uneven braiding can affect the final appearance, so consistent sectioning is important. This hairstyle is often used in DIY tutorials because it allows creative customization while remaining easy to learn.
After forming the bun, securing the ends of the braid is essential. Pins should be hidden beneath the structure to maintain a clean finish. Decorative accessories can be added if desired, but the style is equally strong in its simple form. This bun is ideal for those looking for creative yet structured hair inspiration.

Idea 4: Twisted Ballet Bun
How to Create
The twisted ballet bun is a simple yet elegant hairstyle created by twisting sections of hair before forming the bun. It is widely used in minimalist style inspiration due to its smooth and controlled appearance. This style is suitable for beginners and requires minimal tools, making it a popular choice in DIY tutorials. The twisting technique adds subtle texture without compromising the clean ballet aesthetic.
To create this bun, divide the hair into two sections and twist each section tightly. Wrap both twisted sections around each other and form a circular bun at the back or top of the head. Secure with bobby pins evenly distributed around the structure. Light styling gel can be used to smooth the surface and reduce flyaways. This process is quick and effective for achieving a polished look.
Execution Process
The execution process focuses on maintaining consistent twist tension throughout the hair sections. Uneven twisting can result in loose areas, affecting the overall shape of the bun. Proper alignment ensures a balanced and symmetrical design. This hairstyle is commonly used in creative project styling due to its simplicity and elegance.
Once completed, the bun should be checked for stability and secured further if needed. Pins should be placed at strategic points to reinforce the structure. This style is ideal for quick styling needs and remains a strong example of easy project hair inspiration.

Idea 5: Messy Ballet Bun
How to Create
The messy ballet bun offers a relaxed variation of the traditional structured bun while maintaining an elegant silhouette. It is commonly featured in Pinterest ideas for its soft and effortless appearance. This hairstyle is ideal for casual settings, creative environments, and beginner friendly styling practice. Unlike strict buns, this version allows controlled looseness for a more natural look.
To create this bun, gather the hair loosely into a ponytail and twist it lightly. Wrap the twisted hair around the base without tightening too much. Secure with pins while allowing small strands to remain loose. This creates a soft, textured bun with a relaxed finish. Light hairspray can be used to maintain shape without removing natural movement.
Setup Method
The setup method emphasizes controlled looseness rather than strict structure. Hair should not be overly smoothed before styling, as slight texture enhances the final look. The placement of the bun can vary depending on preference, making it versatile for different styles.
After forming the bun, minor adjustments can be made to enhance volume and shape. Pulling small sections gently creates a fuller appearance. This hairstyle is widely used in creative inspiration boards due to its balance between structure and natural flow.

Idea 6: Double Ballet Bun
How to Create
The double ballet bun consists of two buns placed symmetrically on the head, creating a balanced and playful variation of the classic style. It is often used in creative projects and themed styling inspiration. This hairstyle is suitable for medium to long hair and offers a unique aesthetic compared to single bun designs.
To create this style, divide the hair into two equal sections and secure each into separate ponytails. Twist each ponytail and wrap them into individual buns. Secure with bobby pins and ensure both buns are even in size and placement. This step by step method creates a structured yet creative look.
Execution Process
The execution process focuses on symmetry and equal distribution of hair volume. Each bun must be balanced to maintain a cohesive appearance. Proper sectioning at the beginning is essential for achieving a professional finish.
Once completed, both buns should be checked for stability. Additional pins can be added if needed. This hairstyle is commonly used in creative inspiration and beginner friendly tutorials due to its visual appeal.

Idea 7: Rope Twist Ballet Bun
How to Create
The rope twist ballet bun uses a twisting technique similar to rope structure before forming the bun shape. It is known for its tight and polished appearance, making it suitable for formal styling inspiration. This hairstyle is efficient and works well for structured looks.
To create this bun, divide hair into two sections, twist each tightly, and then twist both sections together. Wrap the combined twist into a bun shape and secure with pins. This method creates a firm and smooth structure.
Setup Method
The setup method ensures consistent tension throughout the twists. Proper twisting is essential to maintain structure. This hairstyle is commonly used in beginner friendly tutorials due to its simplicity.
After forming the bun, adjustments can be made for symmetry and smoothness. It is a reliable option for practical styling needs.

Idea 8: Donut Ballet Bun
How to Create
The donut ballet bun uses a circular base to create a voluminous and structured bun shape. It is widely used in professional styling and creative inspiration boards. This style provides a uniform and polished appearance.
To create this bun, place a hair doughnut at the base of a ponytail and wrap the hair evenly around it. Secure with pins and smooth the surface for a clean finish.
Execution Process
The execution process focuses on even distribution of hair around the doughnut base. Proper coverage ensures a full and balanced shape. This hairstyle is often used in formal and aesthetic styling.
Once completed, smoothing techniques can be applied for refinement. It is a practical and visually appealing hairstyle.

Idea 9: Side Ballet Bun
How to Create
The side ballet bun is positioned to one side of the head, offering a modern variation of the traditional bun. It is often used in creative inspiration and casual styling.
To create this style, gather hair to one side and form a bun using twisting or wrapping techniques. Secure with pins.
Setup Method
The setup method focuses on placement balance and secure pinning. This hairstyle adds variation to classic designs.
After forming the bun, adjustments can be made for alignment and smoothness.

Idea 10: Knotted Ballet Bun
How to Create
The knotted ballet bun uses knotting techniques before forming the bun structure, adding texture and uniqueness. It is suitable for creative styling ideas.
To create this bun, tie sections of hair into loose knots and wrap them into a bun shape. Secure with pins.
Execution Process
The execution process focuses on controlled knotting and balanced placement. This hairstyle offers a creative variation of traditional buns.
Once completed, minor adjustments ensure stability and aesthetic balance.

Common Beginner Mistakes and How to Avoid Them
Beginners often struggle with uneven bun placement, loose structures, and improper pinning techniques. These issues can be avoided by ensuring proper hair preparation before styling. Brushing hair thoroughly and securing a strong base ponytail helps improve stability. Another common mistake is using too many or too few bobby pins, which can affect hold and shape. Balanced pin distribution is essential for long-lasting results. Taking time to plan bun placement also helps prevent asymmetry. These adjustments improve overall styling quality and ensure a clean finish suitable for creative project inspiration.
Practical Tips for Better Results
Improving ballet bun hairstyles requires attention to detail and consistent practice. Using light styling products helps maintain smoothness without making hair stiff. Sectioning hair properly before twisting or braiding ensures better control during styling. It is also helpful to practice different bun placements to understand what works best for individual hair types. Beginners benefit from starting with simple styles before moving to complex variations. These small adjustments improve results and make DIY styling easier and more effective over time.
Styling, Presentation, or Organization Ideas
Ballet buns can be styled in multiple ways depending on occasion and preference. Accessories such as minimal pins or ribbons can enhance visual appeal without overwhelming the design. Sleek finishes are ideal for formal settings, while softer textures work well for casual looks. Organizing hair tools before starting ensures a smoother styling process. Presentation also depends on symmetry and cleanliness of the final bun shape. These factors contribute to a polished appearance suitable for modern design inspiration.
Budget or Time Planning
These hairstyles are highly budget friendly because they require minimal materials such as elastics, pins, and basic styling tools. Most variations can be completed within 10 to 20 minutes, making them suitable for daily routines. Proper planning reduces styling time and improves efficiency. Beginners may take slightly longer initially, but consistent practice reduces overall effort. This makes ballet buns an accessible and practical option for everyday use and creative DIY styling.
Creative Expansion and Advanced Inspiration
Ballet bun hairstyles can be expanded into more advanced designs by combining multiple techniques such as braiding, twisting, and knotting. Adding layered textures or combining buns with decorative elements creates unique variations. Advanced styling may include asymmetrical placements or mixed bun designs for artistic expression. These creative expansions are often featured in modern Pinterest ideas and aesthetic inspiration collections. Experimenting with structure and volume allows for personalized and innovative hairstyles suitable for creative projects and professional styling inspiration.