
Prom bun hairstyles remain one of the most versatile and timeless choices for formal occasions, especially for school proms, evening events, and special celebrations. These styles combine elegance with structure, allowing long, medium, and even layered hair types to be transformed into refined updos that stay secure throughout the event. The popularity of bun hairstyles on Pinterest continues to grow because they offer a balance between simplicity and sophistication while allowing endless personalization through braids, twists, accessories, and parting techniques.
This article explores 10 prom bun hairstyle ideas designed for step-by-step application. Each idea focuses on practical execution, beginner friendly methods, and clear styling direction so that anyone can recreate these looks at home. Whether the goal is a soft romantic bun, a sleek modern design, or a textured voluminous style, these tutorials provide structured guidance. The emphasis is on realistic techniques that do not require professional salon tools, making them suitable for DIY hairstyling inspiration and everyday creative projects.
Why This Idea Is Trending or Useful
Prom bun hairstyles continue to trend across Pinterest ideas because they align with modern beauty preferences that emphasize natural elegance, minimal effort styling, and adaptable design. Many people seek easy project hairstyles that can be created at home without professional assistance, and bun styles provide exactly that flexibility. They also suit a wide range of face shapes, hair textures, and outfit styles, making them a universal choice for formal occasions.
Another reason for their popularity is their strong presence in aesthetic and minimalist style trends. A well-structured bun can elevate an entire look without requiring excessive decoration. At the same time, these styles allow creative freedom through braiding, twisting, and layering techniques. This combination of practicality and visual appeal makes prom buns highly relevant in modern home decor-inspired beauty trends, where simplicity and refinement define the overall aesthetic direction.
Materials and Preparation
Creating prom bun hairstyles requires a small set of basic materials and proper preparation to ensure a smooth styling process. Essential items include a brush or comb for detangling, hair ties for securing sections, bobby pins for structure, and styling clips for sectioning hair. Optional tools may include a curling tool for added texture, a smoothing brush for sleek finishes, and lightweight styling products to maintain hold and reduce frizz.
Preparation begins with clean, dry, or slightly textured hair depending on the desired bun style. Straight hair benefits from light curling for volume, while naturally textured hair may only require detangling. Planning the bun placement is also important, whether it is high, mid, or low. Sectioning the hair properly before starting ensures better control during styling. This preparation stage helps create a stable foundation for all bun variations and supports long-lasting results suitable for formal events.
MAIN IDEAS SECTION
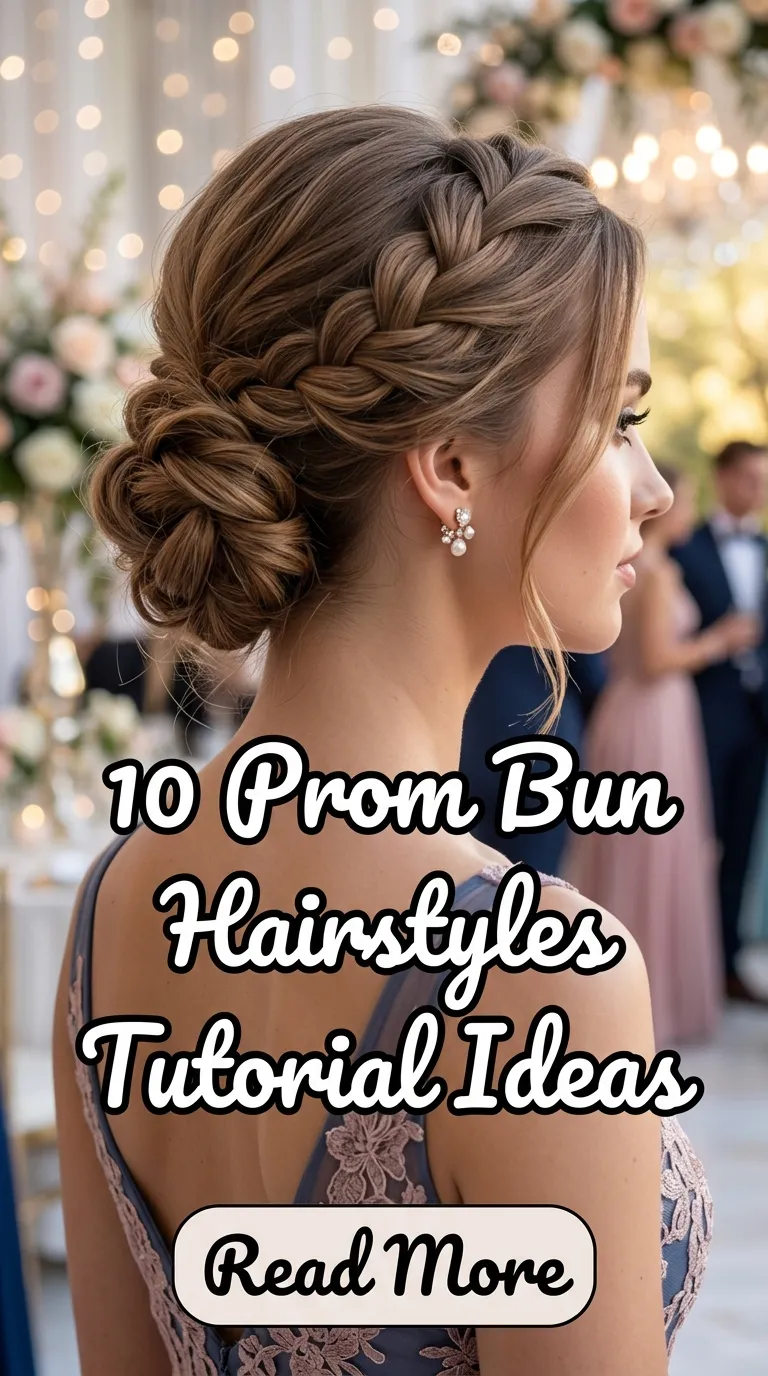
Idea 1: Classic Low Elegant Bun
How to Create
The classic low elegant bun is a timeless hairstyle often chosen for prom due to its smooth silhouette and refined finish. This style focuses on simplicity and structure, creating a polished appearance that sits at the nape of the neck. It works well for medium to long hair and is suitable for both straight and slightly wavy textures. The appeal lies in its understated elegance, making it a strong foundation for formal styling inspiration. On Pinterest, this look is often associated with minimalist style aesthetics and clean beauty trends. It complements almost any dress design and allows facial features to remain the focal point of the overall appearance.
To create this style, the hair is first brushed thoroughly to remove tangles and then gathered into a low ponytail at the base of the neck. The ponytail is twisted tightly and wrapped around its base to form a coil shape. Pins are inserted strategically to secure the bun and maintain structure. Light smoothing helps eliminate flyaways for a neat finish. The final look can remain simple or be enhanced with soft texture adjustments for a more relaxed DIY appearance suitable for beginners.
How to Create
The second step focuses on refining the structure and ensuring long-lasting hold. Once the bun is secured, small adjustments are made by gently pulling sections to add softness if desired. This creates a slightly voluminous effect while maintaining the elegant base shape. Hair spray or light holding methods can be used to preserve the style throughout the event without making it stiff. The goal is balance between control and natural movement.
To complete the style, optional decorative elements such as subtle pins or simple twists can be added. However, the emphasis remains on clean execution and smooth alignment. This bun is particularly effective for those seeking easy project hairstyles that require minimal tools yet deliver a professional result. It remains one of the most reliable prom bun hairstyles for beginners.

Idea 2: High Voluminous Bun with Lift
How to Create
The high voluminous bun is designed to create height and drama, making it a standout choice for prom hairstyles. This style focuses on volume at the crown, giving the illusion of fuller hair and a more lifted facial appearance. It is especially popular in modern design trends where bold yet elegant looks are preferred. The bun sits high on the head and is often paired with soft strands or structured edges depending on the desired finish.
To begin, hair is brushed and divided into sections. The crown area is gently teased or lifted to create volume before gathering the hair into a high ponytail. This step is essential for achieving the elevated structure that defines the style. The ponytail is then wrapped into a bun shape and secured with pins. The foundation must be firm to support the height, making it suitable for long-lasting wear during formal events.
How to Create
The second stage involves refining volume and shaping the bun evenly. The wrapped hair is adjusted to ensure balanced fullness around the bun’s base. Some sections may be slightly loosened to enhance texture and prevent a flat appearance. This step is important for achieving a natural yet structured look that aligns with trending ideas on Pinterest.
Finishing touches include smoothing the edges while maintaining crown volume. This contrast between sleek sides and lifted top creates a visually striking result. The hairstyle can be adapted for different face shapes by adjusting height placement. It remains a beginner friendly option with strong aesthetic impact, ideal for creative prom styling.

Idea 3: Braided Wrap Bun
How to Create
The braided wrap bun combines texture and structure, making it a highly detailed prom hairstyle. This design incorporates braiding techniques into the bun base, adding visual interest and depth. It is suitable for those who want creative project hairstyles that feel more intricate without requiring advanced skills. The braid element enhances the bun’s appearance while maintaining a secure structure.
The process begins with dividing the hair into sections and creating a basic braid from one or more parts of the hair. The remaining hair is gathered into a ponytail and prepared for bun formation. The braid is then wrapped around the bun base, adding decorative texture while reinforcing the structure. This combination of braid and bun creates a balanced and elegant style suitable for formal occasions.
How to Create
In the second stage, the bun is shaped and secured with pins to ensure stability. The braid is carefully positioned to highlight its pattern, wrapping evenly around the bun. Adjustments are made to maintain symmetry and prevent loose sections from disrupting the overall design.
The final look can be customized by loosening braid sections slightly for a softer aesthetic or keeping them tight for a more structured appearance. This hairstyle is ideal for DIY enthusiasts looking for creative ideas that blend traditional and modern styling elements.

Idea 4: Messy Romantic Bun
How to Create
The messy romantic bun is a soft and effortless hairstyle that emphasizes texture and natural movement. It is widely featured in Pinterest ideas due to its relaxed yet elegant appearance. This bun style works well for individuals seeking a beginner friendly option that does not require precision styling. Its charm comes from its imperfect structure, which creates a natural and airy finish.
To create this style, hair is loosely gathered into a low or mid ponytail and twisted gently into a bun. Instead of tight wrapping, sections are allowed to remain loose to form a soft silhouette. The bun is secured with pins while maintaining intentional looseness. This approach creates a romantic and effortless aesthetic suitable for prom settings.
How to Create
The second stage focuses on enhancing texture. Small strands are pulled around the face and bun area to create softness. This step is essential for achieving the romantic effect that defines the style. The bun is adjusted slightly to maintain balance while preserving its relaxed structure.
The final result is a soft, textured bun that feels natural and wearable. It is ideal for those seeking easy project hairstyles that prioritize comfort and aesthetic flow.

Idea 5: Sleek Center-Part Bun
How to Create
The sleek center-part bun is a modern prom hairstyle that emphasizes symmetry and smooth structure. It is often associated with minimalist style aesthetics and clean beauty trends. The defining feature is the sharp center part combined with a tightly controlled bun shape.
Hair is parted precisely in the center and brushed flat to remove all flyaways. It is then gathered into a low or mid ponytail depending on preference. The ponytail is twisted tightly and wrapped into a compact bun. This creates a polished base that reflects structured elegance.
How to Create
The finishing stage focuses on refining smoothness. Edges are carefully controlled to maintain a sleek surface. The bun is adjusted to ensure symmetry on both sides of the center part.
This hairstyle is ideal for formal events where a refined and modern appearance is desired. It remains one of the most practical DIY prom hairstyles for beginners.

Idea 6: Twisted Rope Bun
How to Create
The twisted rope bun introduces a spiral-like texture created through twisting sections of hair. It offers a visually dynamic alternative to traditional buns while remaining simple to construct.
Hair is divided into sections and twisted individually before being combined into a ponytail. The twisted strands are then wrapped around each other to form a bun shape. This technique adds depth and movement to the hairstyle.
How to Create
The bun is secured with pins while maintaining visible twist patterns. Adjustments are made to enhance texture without losing structure.
The final look is a balanced blend of structure and creativity, suitable for modern prom styling.

Idea 7: Low Bun with Side Braid Accent
How to Create
This hairstyle combines a low bun with a side braid for added detail. The braid acts as an accent that enhances the bun’s visual interest.
Hair is braided along one side and incorporated into a low bun structure. The combination creates a layered effect that feels elegant and creative.
How to Create
The bun is shaped and secured while ensuring the braid remains visible. Adjustments are made for balance and smoothness.
This style is ideal for those exploring creative ideas with simple execution methods.

Idea 8: Textured Knotted Bun
How to Create
The knotted bun uses hair sections tied into knots to form the bun base. This creates a textured and structured appearance.
Hair is divided and knotted systematically before being shaped into a bun form. This method adds depth and uniqueness.
How to Create
The knots are secured and shaped into a cohesive bun. Adjustments ensure stability and symmetry.
The result is a distinctive prom hairstyle with artistic structure.

Idea 9: Double Bun Low Style
How to Create
The double bun style features two connected buns for a layered effect. It creates visual balance and uniqueness.
Hair is divided into two sections and styled into separate buns placed closely together.
How to Create
Both buns are secured and adjusted for symmetry. The style remains playful yet elegant.
It is suitable for creative prom inspiration.

Idea 10: Floral-Inspired Bun
How to Create
The floral-inspired bun uses arranged sections to resemble petal-like shapes. It is decorative and elegant.
Hair is styled into overlapping loops to create floral texture.
How to Create
The bun is shaped carefully to maintain floral structure and secured with pins.
This design is ideal for artistic prom styling.

Common Beginner Mistakes and How to Avoid Them
Many beginners struggle with uneven bun placement, loose securing, and lack of structure. These issues often result from insufficient preparation or improper sectioning. Ensuring hair is properly detangled and evenly divided before styling helps prevent imbalance. Using the right number of pins also improves stability. Another common mistake is over-tightening, which can reduce comfort and natural appearance. Balanced tension is essential for achieving a polished result.
Practical Tips for Better Results
Improving prom bun hairstyles involves focusing on texture control and section precision. Lightly prepping hair with natural texture improves grip and structure. Working in controlled sections ensures cleaner results. Adjusting volume gradually instead of all at once helps maintain balance. Consistency in pin placement is also essential for durability throughout the event.
Styling, Presentation, or Organization Ideas
Prom bun hairstyles can be enhanced through thoughtful styling choices that emphasize structure and flow. Positioning the bun according to face shape improves visual harmony. Keeping edges clean supports a modern design appearance. Adding subtle texture variation improves depth without overwhelming the style. Organized sectioning ensures the final look remains controlled and elegant.
Budget or Time Planning
These DIY prom hairstyles are designed to be time efficient and budget friendly. Most styles can be completed using basic tools already available at home. Preparation typically requires minimal time, while execution depends on complexity. Simpler buns take less time, while braided or textured styles require more detailed sectioning. Planning ahead ensures smoother styling and reduces last-minute adjustments.
Creative Expansion and Advanced Inspiration
Prom bun hairstyles can be expanded through advanced variations such as combining multiple braids, integrating layered textures, or experimenting with asymmetrical placement. Adding controlled volume or structured loops enhances visual impact. These creative directions allow for more personalized designs while maintaining the foundation of classic bun styling. Over time, these techniques can evolve into more complex creative projects suitable for advanced DIY hairstyling inspiration.