Whimsical kitchen design has become one of the most saved categories in modern Pinterest ideas because it combines functionality with playful visual character. A whimsy kitchen uses unexpected colors, decorative details, creative organization methods, and imaginative styling choices to transform an ordinary cooking space into an inviting and expressive environment. Unlike highly formal interiors, this style focuses on warmth, personality, and layered visual interest while still maintaining practical use. Many homeowners and apartment dwellers are now exploring beginner friendly DIY decoration projects that add charm without requiring full renovation work. This article presents 10 detailed whimsy kitchen ideas designed to help readers create an aesthetic space using accessible materials, thoughtful planning, and creative project techniques. Readers will learn how to combine modern design principles with playful decorative elements while maintaining organization and usability. The guide also explains preparation methods, styling concepts, and practical execution steps for each idea. Every section focuses on realistic and actionable inspiration suitable for different kitchen sizes and budgets. The result is a complete resource for building a visually engaging kitchen filled with personality, comfort, and functional beauty.
Why This Idea Is Trending or Useful
Whimsy kitchen concepts continue gaining popularity because they balance decoration with emotional comfort and practical organization. Many Pinterest ideas now focus on interiors that feel personal rather than overly formal, and whimsical styling supports that goal effectively. This design approach encourages creative ideas such as painted cabinets, decorative shelving, handmade accents, and playful lighting arrangements that make kitchens feel more welcoming. It also works well for small spaces because visual creativity can transform compact kitchens without major structural changes. The DIY appeal is especially important since many whimsy kitchen projects rely on affordable materials and beginner friendly techniques rather than expensive renovations. Another reason for the trend is the growing preference for layered interiors that mix vintage details, minimalist style, natural textures, and artistic decoration elements together. The whimsy aesthetic also supports seasonal flexibility because decorative details can be updated throughout the year with minimal effort. In practical terms, these kitchens often improve organization by encouraging thoughtful storage displays and accessible layouts. This combination of beauty, accessibility, and creativity explains why whimsical kitchen inspiration continues to dominate modern home decor collections online.
Materials and Preparation
Creating a whimsy kitchen requires careful preparation so decorative details remain balanced and functional rather than visually overwhelming. Common materials include removable wallpaper, paint samples, floating shelves, ceramic jars, patterned textiles, vintage-inspired hooks, decorative lighting, framed art prints, and handmade storage containers. Additional materials may include peel-and-stick tiles, natural wood accents, woven baskets, glass jars, and colorful dishware used as visible decoration. Essential tools often include measuring tape, paint brushes, wall-safe adhesive strips, drills, screwdrivers, and basic organization containers. Preparation begins by evaluating the kitchen layout and identifying underused visual areas such as empty walls, cabinet surfaces, countertops, or corners. Planning is especially important because whimsy kitchens rely on coordinated layering rather than random decoration placement. Choosing a clear color palette helps maintain consistency while still allowing playful details. Before beginning any DIY tutorial project, it is helpful to create a visual inspiration board featuring textures, patterns, and decorative combinations that support the desired atmosphere. Organizing supplies in advance also simplifies installation and styling. Proper planning ensures that the final kitchen design remains practical for everyday cooking while still achieving a creative and visually engaging aesthetic.
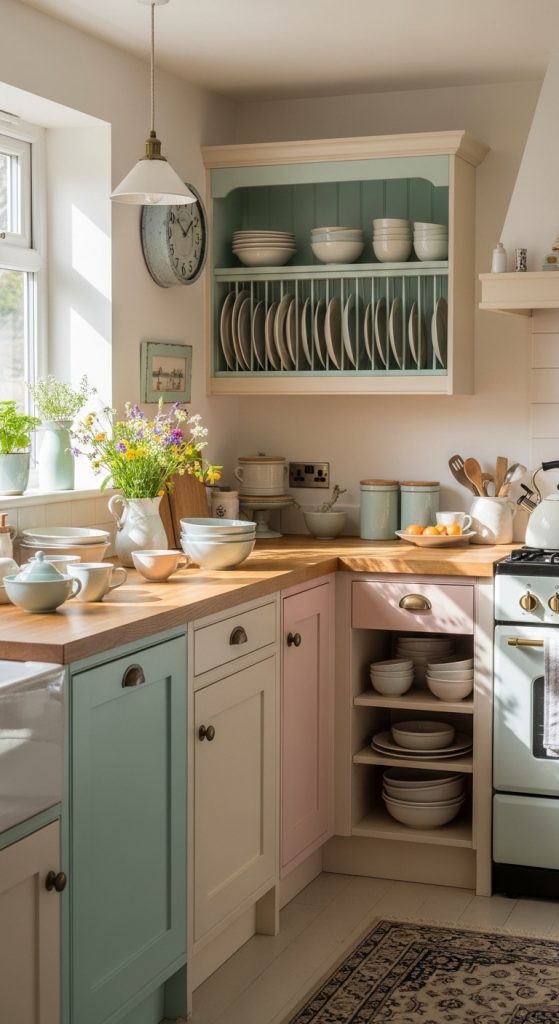
Idea 1: Painted Pastel Cabinet Accents
How to Create
Pastel cabinet accents are one of the most effective ways to create a whimsical kitchen atmosphere without replacing existing furniture. Soft shades such as muted mint, pale peach, powder blue, buttery yellow, and dusty lavender introduce visual warmth while maintaining a light and inviting environment. This concept works especially well in kitchens with neutral walls because pastel details become the focal point without overwhelming the space. Many Pinterest ideas feature selective cabinet painting where only lower cabinets, island sections, or open shelving units receive color treatment. This creates balance and prevents visual clutter. The aesthetic supports both modern design and vintage-inspired decoration styles because pastel tones pair naturally with wood textures, ceramic details, and metallic fixtures. The overall goal is to create a playful yet organized appearance that feels intentional rather than chaotic. This project is beginner friendly because it does not require advanced renovation skills. Instead, it relies on thoughtful color placement and careful surface preparation. The whimsical effect comes from combining soft color transitions with practical kitchen functionality, creating a space that feels cheerful while still maintaining structure and usability for everyday routines.
The execution process begins with cleaning cabinet surfaces thoroughly to remove grease, dust, and residue that may interfere with paint adhesion. Cabinet handles and hardware should be removed before sanding the surface lightly to create better paint grip. Measuring tape and painter’s tape help protect surrounding edges and maintain clean lines. Once prepared, primer is applied evenly before layering the selected pastel color gradually for consistent coverage. Using smaller brushes around corners and trim areas improves precision and creates a more professional finish. Cabinets should dry fully between coats to avoid uneven texture or visible brush marks. After painting, the hardware can either be reinstalled or replaced with decorative handles that support the whimsy aesthetic. Ceramic knobs, floral shapes, or vintage-inspired metallic finishes work especially well. The final styling stage includes arranging visible kitchen items such as jars, bowls, and textiles that coordinate with the cabinet palette. This step-by-step method creates a polished transformation while remaining accessible as an easy project suitable for apartment kitchens, small spaces, or full kitchen redesigns.
Idea 2: Open Shelves With Curated Decorative Storage
Step-by-Step Guide
Open shelving creates an ideal foundation for whimsical kitchen styling because it combines organization with visible decoration. Unlike closed cabinets, open shelves allow everyday objects to become part of the visual design. Ceramic mugs, glass jars, woven baskets, cookbooks, and handmade dishes can all contribute to the kitchen’s aesthetic while remaining functional. The key concept behind this style is curated display rather than cluttered storage. Many trending ideas on Pinterest emphasize balance between decorative layering and practical accessibility. Shelves often feature coordinated colors, mixed textures, and varied object heights to create visual rhythm. Wooden shelving works especially well because natural textures soften colorful decorative elements and support the cozy atmosphere associated with whimsy interiors. This concept also helps maximize smaller kitchens by encouraging vertical organization instead of overcrowded countertops. Open shelves can easily adapt to seasonal decoration changes, making the kitchen feel refreshed throughout the year. The whimsical quality develops through thoughtful combinations of useful objects displayed in an artistic and visually pleasing arrangement that still supports everyday cooking efficiency and storage accessibility.
The setup method begins by identifying wall areas that can safely support shelving without interfering with cooking movement or appliance placement. Measuring the space carefully ensures shelves remain proportional to the kitchen size. After selecting shelf materials, wall anchors and brackets should be installed securely for stability. Once mounted, organization planning becomes essential. Larger objects should be placed first to establish balance before layering smaller decorative pieces around them. Glass jars filled with dry ingredients create both storage and visual texture, while stacked bowls or colorful cups introduce variety. Leaving small areas of open space prevents overcrowding and maintains clean visual flow. Decorative additions such as framed mini artwork, hanging herbs, or patterned dishes can be incorporated gradually to avoid excessive styling. This beginner friendly DIY tutorial project improves both organization and decoration simultaneously while creating a warm and personalized kitchen atmosphere filled with accessible charm and practical functionality.

Idea 3: Vintage-Inspired Pattern Mixing
How to Make
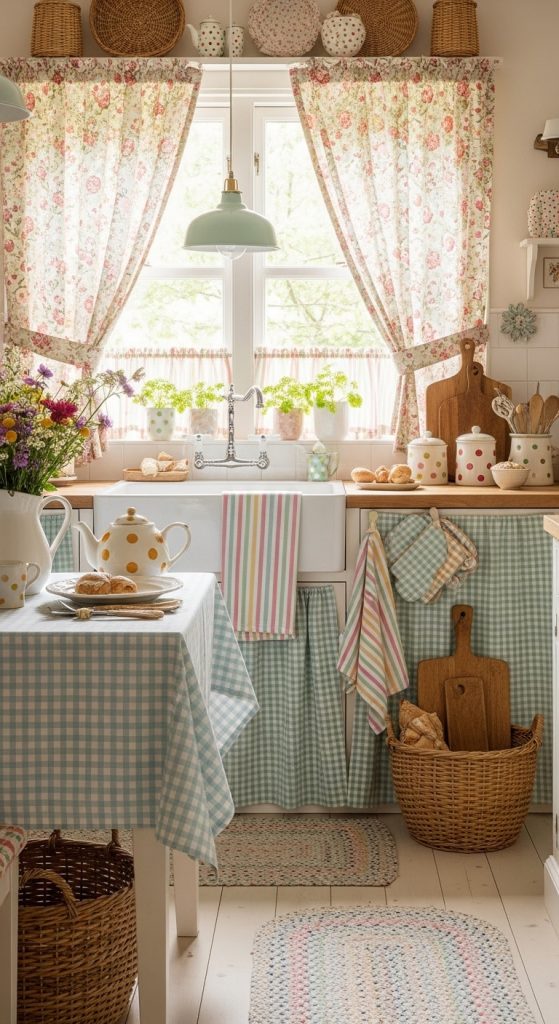
Pattern mixing is a defining feature in many whimsy kitchen interiors because it introduces personality and layered visual movement. Vintage-inspired combinations often include floral prints, gingham fabrics, striped towels, polka dot accessories, and decorative wallpaper used together in balanced proportions. The purpose of this style is not randomness but controlled contrast. Pinterest inspiration boards frequently showcase kitchens where coordinated colors unify multiple patterns into one cohesive aesthetic. This creates an environment that feels collected and expressive rather than uniform or overly polished. Pattern mixing works especially well in smaller decorative details such as curtains, seat cushions, table runners, and dish towels because these elements can be updated easily over time. The whimsical effect comes from creating visual surprise while maintaining harmony through repeated tones or textures. This approach also supports handmade decoration ideas because many fabric-based accessories can be created through simple sewing or repurposing projects. The combination of vintage influence and modern arrangement techniques allows the kitchen to feel both nostalgic and current at the same time.
The practical process begins by selecting a primary color palette before introducing patterns. This planning stage prevents visual confusion and ensures consistency across decorative elements. A common approach involves choosing one dominant pattern and supporting it with smaller or more subtle secondary prints. For example, large floral curtains can pair effectively with striped towels and simple gingham placemats if the colors remain coordinated. Measuring fabric areas carefully helps maintain balanced distribution throughout the kitchen. Peel-and-stick wallpaper can also be added to small accent areas such as pantry doors or breakfast nooks for additional visual depth. Handmade table linens and decorative cushions contribute to the layered aesthetic while supporting the DIY nature of the project. Once all decorative pieces are installed, stepping back and adjusting spacing helps maintain organization and avoid excessive density. This setup method creates a visually rich kitchen environment that feels playful, welcoming, and carefully styled without appearing overwhelming or disorganized.
Idea 4: Hanging Herb Displays With Decorative Containers
Execution Process
Hanging herb displays combine functionality with natural decoration, making them a highly practical addition to whimsical kitchens. Fresh herbs introduce greenery, texture, and movement while also supporting everyday cooking needs. In many Pinterest ideas, herbs are displayed using creative containers such as painted jars, hanging baskets, ceramic cups, or suspended wooden racks. This transforms ordinary kitchen gardening into a visible decorative feature. The whimsy aesthetic develops through the combination of natural growth patterns and artistic presentation methods. Herbs such as basil, mint, rosemary, and thyme work especially well because they remain compact and visually attractive indoors. This concept also improves organization by consolidating frequently used ingredients into one accessible location. The natural greenery softens harder kitchen surfaces and balances colorful decorative accents effectively. Hanging displays are especially useful in smaller kitchens because they maximize vertical space while reducing countertop clutter. The result is a kitchen environment that feels lively, fresh, and connected to handmade creative inspiration.
The process starts by identifying areas with sufficient natural light for healthy herb growth. Windows, open wall sections, and unused corner spaces often work best. Containers should include proper drainage to prevent excess moisture buildup. Hooks, wall-mounted rails, or ceiling supports may be installed depending on the display design. Once mounted securely, herbs can be arranged according to size and growth habits to maintain visual balance. Decorative labels or painted containers add additional personality while helping maintain organization. Regular trimming encourages healthy growth and prevents overcrowding. Watering schedules should remain consistent to keep the display attractive and functional. This beginner friendly project combines natural decoration with practical kitchen use, creating a whimsical feature that contributes both beauty and utility to the overall kitchen design.

Idea 5: Colorful Ceiling and Lighting Details
How to Create
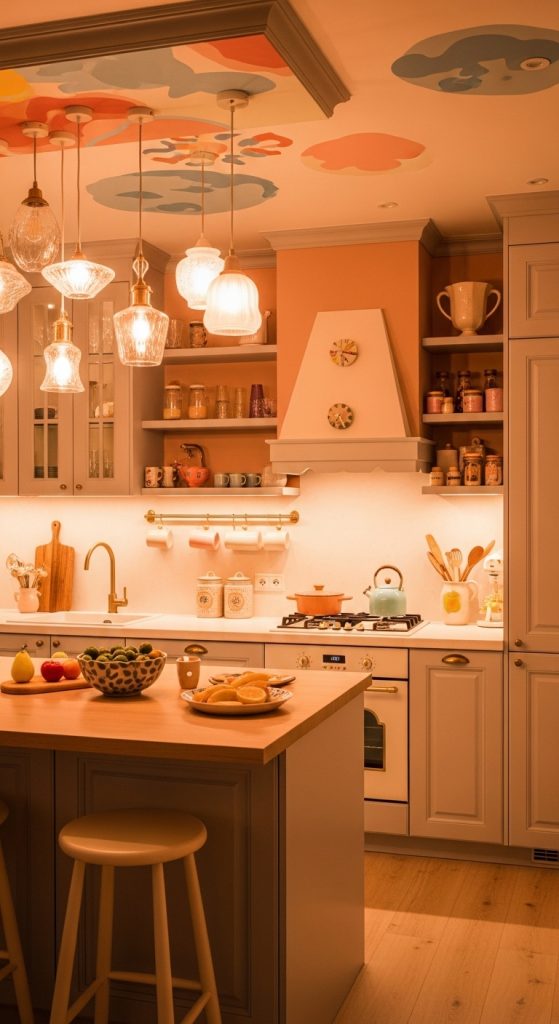
Whimsical kitchen design often extends beyond walls and cabinets by incorporating creative ceiling and lighting treatments. Many modern Pinterest ideas use ceilings as decorative focal points through painted accents, patterned wallpaper, or suspended decorative lighting arrangements. This approach transforms overlooked surfaces into part of the kitchen’s overall aesthetic composition. Soft colors, painted beams, or subtle mural-style patterns can introduce visual interest without reducing functionality. Lighting also plays a central role because whimsical interiors rely heavily on atmosphere and warmth. Pendant lights, decorative glass shades, and layered illumination create depth while highlighting decorative features throughout the space. Combining playful lighting with ceiling details helps establish a cohesive visual identity that feels immersive rather than fragmented. This concept works particularly well in kitchens with neutral furniture because ceiling decoration introduces contrast without requiring extensive renovation work.
The setup process begins by selecting a ceiling design that complements the existing kitchen palette. Lightweight paint colors often work best because they brighten the room while maintaining openness. If wallpaper is used, moisture-resistant materials should be selected for durability. Lighting placement should then be planned carefully to ensure even illumination across cooking and dining areas. Pendant lights can be centered above islands or tables, while wall sconces may enhance decorative corners. Installing dimmable lighting options adds flexibility for different moods and activities. Decorative light shades featuring soft curves or vintage-inspired forms reinforce the whimsical atmosphere effectively. This project remains accessible because small ceiling adjustments and lighting upgrades can significantly change the kitchen’s visual character without requiring large-scale remodeling.
Idea 6: Decorative Tea and Coffee Corners
Setup Method
A dedicated tea or coffee corner creates a cozy focal area that supports both organization and decoration within a whimsical kitchen. These stations are commonly featured in Pinterest inspiration because they transform routine kitchen activities into visually enjoyable experiences. The design typically includes mugs, jars, trays, spoons, and decorative shelving arranged thoughtfully to create a compact but highly styled area. Whimsical details often include handwritten labels, patterned containers, floral accents, or miniature artwork placed near the station. The purpose is to combine convenience with aesthetic appeal, allowing functional items to contribute to the overall design. This idea works especially well in smaller kitchens because it organizes frequently used items while reducing visual clutter in other areas. A tea or coffee corner also creates a sense of routine and comfort that enhances the atmosphere of the entire kitchen.
The execution process starts by selecting a countertop section, shelf, or small rolling cart to serve as the station base. Organizing containers should be chosen according to the overall kitchen palette and aesthetic direction. Glass jars, ceramic canisters, and woven trays often work effectively because they combine texture with functionality. Wall hooks or mini shelves can hold mugs and utensils vertically to save space. Decorative additions such as framed prints, miniature plants, or patterned cloths help integrate the station into the broader whimsy design. Maintaining organization is essential because overcrowding can reduce both functionality and visual appeal. This easy project creates a highly personalized area that supports daily routines while enhancing the kitchen’s decorative atmosphere.

Idea 7: Storybook-Inspired Wall Art Arrangements
How to Make
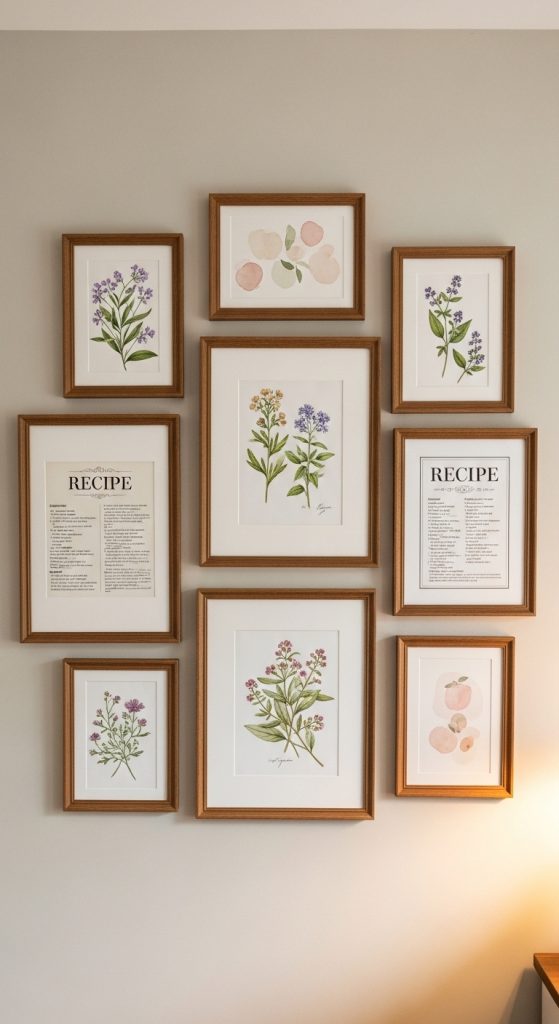
Storybook-inspired wall art adds narrative and imagination to whimsical kitchen interiors. Unlike generic wall decoration, this approach focuses on illustrations, botanical sketches, vintage food drawings, handwritten recipes, or fantasy-inspired artwork that creates emotional warmth and visual storytelling. Many Pinterest ideas combine multiple small frames in layered arrangements to create gallery-style walls filled with charm and personality. The whimsical effect develops through playful imagery and coordinated framing styles rather than large statement pieces alone. Neutral kitchens especially benefit from this technique because decorative art introduces color and texture without affecting storage or workflow. Storybook aesthetics also pair naturally with handmade decoration projects and vintage-inspired accessories, making the kitchen feel curated and expressive.
The practical process begins by selecting a wall area that remains visible without interfering with appliances or shelving. Frames should vary slightly in size while maintaining a unified style through consistent materials or colors. Layout planning is essential before installation. Arranging frames on the floor first helps establish spacing and composition. Lightweight adhesive hooks or traditional wall mounting hardware may be used depending on wall surfaces. Artwork can include printed illustrations, handwritten recipe reproductions, pressed botanicals, or DIY painted pieces created at home. Combining different artistic elements creates layered visual interest while supporting the kitchen’s overall narrative style. This beginner friendly project transforms blank walls into meaningful decorative features that strengthen the whimsy atmosphere effectively.
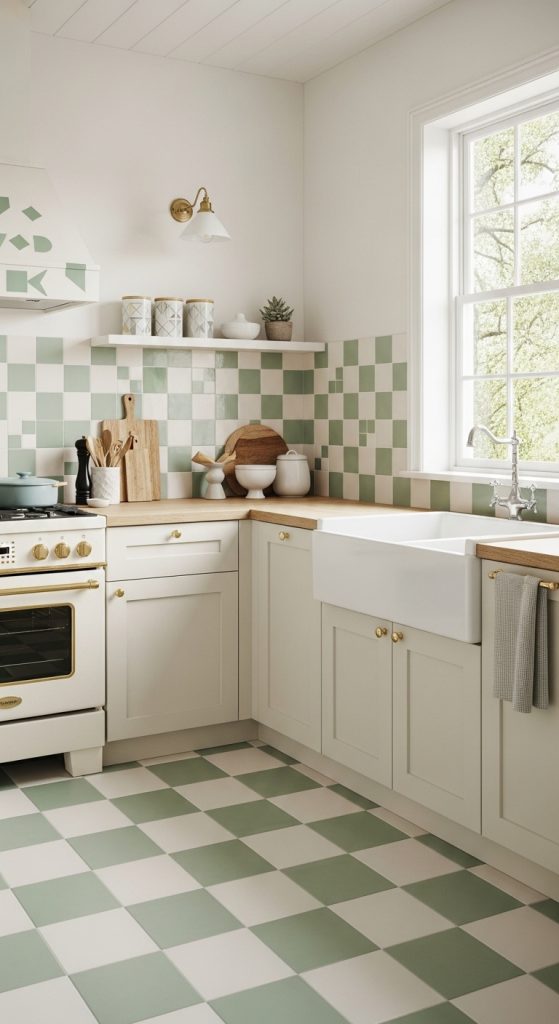
Idea 8: Playful Checkerboard and Tile Accents
Step-by-Step Guide
Checkerboard and decorative tile accents introduce visual rhythm and vintage-inspired character into whimsical kitchen spaces. These patterns are frequently used in Pinterest inspiration because they create strong aesthetic impact while remaining highly practical. Checkerboard floors, backsplash details, or countertop accessories help establish movement and structure within the room. Soft color combinations such as cream and sage, pale pink and white, or muted blue and gray maintain a playful appearance without becoming visually harsh. Tiles also support easy cleaning and durability, making them useful as both decoration and functional surfaces. The whimsy aesthetic emerges from combining geometric order with unexpected color choices and layered decorative elements. This style works effectively in both modern design and retro-inspired interiors.
The process begins with identifying areas where patterned surfaces can be introduced without overwhelming the room. Peel-and-stick tiles offer a beginner friendly solution for backsplashes and accent walls because they require minimal installation tools. Measuring carefully before application ensures alignment and symmetry throughout the design. If flooring changes are not practical, smaller checkerboard accessories such as trays, textiles, or decorative mats can still create the desired visual effect. Coordinating surrounding colors with the tile palette helps maintain consistency across the kitchen. This DIY tutorial project provides strong visual transformation while remaining adaptable to different budgets and space limitations.
Idea 9: Handmade Ceramic and Pottery Displays
How to Create
Handmade ceramics and pottery displays contribute warmth, texture, and individuality to whimsical kitchens. Unlike mass-produced decorative objects, handmade pieces introduce slight imperfections that enhance the organic and artistic atmosphere of the space. Pinterest ideas frequently showcase open shelving filled with ceramic bowls, textured mugs, painted pitchers, and sculptural serving pieces arranged intentionally as both storage and decoration. The combination of natural materials and handcrafted surfaces supports the cozy aesthetic associated with whimsy interiors. Pottery also pairs effectively with wood textures, soft fabrics, and greenery, creating balanced visual layering throughout the kitchen. These displays work especially well because they combine practical use with artistic value.
The setup process begins by selecting visible storage areas such as floating shelves, plate racks, or glass-front cabinets. Ceramics should be grouped according to color palette, texture, or shape to maintain visual organization. Layering larger bowls behind smaller pieces creates depth and prevents flat arrangements. Decorative pottery can also be mixed with functional kitchen tools to maintain usability. Handmade items featuring painted details or uneven glazing contribute additional character and support the DIY aesthetic. Proper spacing between objects prevents visual clutter and allows individual pieces to stand out. This creative project transforms ordinary storage into an artistic focal point while maintaining practical kitchen functionality.

Idea 10: Cozy Breakfast Nook With Whimsical Details
Execution Process
A whimsical breakfast nook creates a dedicated seating area that adds comfort, personality, and decorative layering to the kitchen environment. Even small kitchens can support compact seating arrangements using benches, corner tables, or window-side setups. Pinterest inspiration frequently features breakfast nooks filled with patterned cushions, layered textiles, hanging lights, and decorative wall accents that create a cozy retreat within the kitchen itself. The purpose is to establish a relaxed area that feels connected to the kitchen while still maintaining distinct visual identity. Soft textures and coordinated decoration contribute to a welcoming atmosphere suitable for meals, reading, or casual gatherings. This idea also improves space organization by defining functional zones within open kitchen layouts.
The practical process begins by measuring available seating space carefully to ensure comfortable movement around the area. Furniture should remain proportional to the kitchen size while supporting both comfort and storage if possible. Cushions, curtains, and table linens can be selected according to the overall whimsy palette to maintain consistency. Wall-mounted shelves or framed artwork help integrate the nook into the surrounding kitchen design. Decorative lighting positioned above the seating area creates warmth and visual separation from cooking spaces. This setup method transforms underused corners into highly functional and aesthetically engaging features that strengthen the whimsical atmosphere throughout the kitchen.

Common Beginner Mistakes and How to Avoid Them
One of the most common mistakes in whimsical kitchen design is adding too many decorative elements without maintaining organization or visual balance. Excessive layering can make the kitchen feel crowded rather than inviting. Another frequent issue involves mixing unrelated colors and patterns without a unifying palette, which reduces cohesion throughout the space. Beginners also sometimes focus heavily on decoration while ignoring practical kitchen functionality. Blocking storage access or overcrowding countertops can interfere with daily cooking routines. To avoid these problems, planning should always begin with organization and layout evaluation before decorative styling begins. Choosing two or three primary colors helps maintain consistency across all design elements. Decorative objects should also serve practical purposes whenever possible, such as storage jars, hanging hooks, or open shelving. Spacing between decorative pieces is equally important because visual breathing room prevents cluttered arrangements. Gradual styling adjustments work more effectively than attempting to redesign the entire kitchen at once. Careful planning and balanced decoration ensure the final result remains both functional and visually engaging.
Practical Tips for Better Results
Successful whimsy kitchen styling depends heavily on thoughtful layering and consistent visual planning. One effective tip is to combine soft textures with structured organization methods to create balance between comfort and usability. Open shelves should include a mixture of decorative and functional items rather than purely ornamental displays. Repeating certain materials such as wood, ceramic, or woven textures throughout the kitchen also strengthens cohesion. Lighting placement plays a major role in enhancing atmosphere, so warm lighting should be prioritized over overly harsh brightness. Seasonal updates can help maintain freshness without requiring major redesign work. Small decorative swaps such as changing textiles or rearranging shelves often create noticeable visual improvement. Another important strategy is maintaining accessible storage so the kitchen remains practical for everyday routines. Decorative accents should complement workflow rather than interrupt it. Using vertical space effectively also improves organization while reducing countertop clutter. Consistency, spacing, and intentional placement are the key factors that produce a polished whimsical kitchen aesthetic.
Styling, Presentation, or Organization Ideas
Styling a whimsical kitchen successfully requires combining decorative layers with practical arrangement strategies. Countertops should remain partially open to prevent visual overcrowding, while selected decorative objects can serve as focal points. Grouping similar objects together creates cleaner organization and improves visual flow. For example, ceramic bowls, wooden utensils, or glass jars can be displayed in coordinated clusters rather than scattered randomly throughout the room. Textiles such as patterned towels, curtains, and seat cushions should complement each other through shared tones or motifs. Decorative trays help organize smaller items while adding structure to countertops. Open shelving works best when heavier objects are placed lower and lighter decorative elements remain near the top. Fresh greenery and hanging herbs also improve visual softness and introduce natural texture into the space. Seasonal decorations can be rotated gradually to maintain freshness without disrupting the overall design. Thoughtful styling transforms ordinary kitchen storage into part of the decorative composition while preserving accessibility and functionality.
Budget or Time Planning
Whimsical kitchen projects can be completed effectively without requiring expensive renovation budgets or extensive construction timelines. Many of the most impactful transformations involve simple DIY decoration techniques such as painting cabinets, rearranging shelves, or adding removable wallpaper. Planning projects in stages helps distribute costs over time while preventing unnecessary purchases. Starting with smaller updates such as textiles, wall art, or decorative storage often creates immediate visual improvement without major financial commitment. Repurposing existing kitchen items also supports budget-friendly design. For example, jars, baskets, or vintage dishes can become decorative storage solutions instead of purchasing entirely new accessories. Time management is equally important because rushing installation often reduces overall quality. Completing one project area at a time allows for more careful styling decisions and easier organization adjustments. Measuring spaces accurately before purchasing materials also prevents waste and unnecessary spending. This gradual approach makes whimsical kitchen styling accessible for renters, homeowners, and beginners exploring creative home decor projects.
Creative Expansion and Advanced Inspiration
Once the foundational whimsy kitchen design is complete, additional creative expansions can introduce even more personality and visual depth. Advanced inspiration ideas include ceiling murals, custom painted furniture, decorative plate walls, layered lighting installations, and artistic backsplash patterns that extend the whimsical atmosphere throughout the entire room. Combining vintage and modern design elements also creates richer visual contrast. Handmade decorations such as embroidered linens, painted signs, or sculptural pottery add stronger individuality and support the creative project aesthetic. Seasonal styling themes can further transform the kitchen by introducing rotating color palettes, floral arrangements, or holiday-inspired decorative accents. Readers can also expand whimsy concepts into connected dining spaces using coordinated furniture, wall treatments, and organization methods. More advanced layouts may include hidden storage benches, built-in display shelving, or decorative pantry systems that blend functionality with aesthetic detail. These evolving ideas allow the kitchen to remain visually dynamic over time while still maintaining the cozy and imaginative atmosphere that defines whimsical interior styling.